Power BI is a powerful business intelligence tool used in a business analytics environment. It is easy to use and provides interactive dashboards and reports. It comes up with collaboration features such as Power BI workspace. By making use of this tool, many users can work on data in a single place.
In this article, we will provide a comprehensive exploration of Power BI workspaces. We’ll delve into the process of setting up a Power BI workspace, examine its benefits, highlight its key features, and outline any limitations you should be aware of. If you’re considering a career in Power BI, opting for a foundational certification such as PL-300 certification could be a wise decision.
Let’s dive in!
What is a Power BI workspace?
In general, Power BI workspace refers to a collaboration hub where you and your team can collaborate to create interactive dashboards and reports. To share your content with others in Power BI, you can begin by creating what is essentially another designated area, referred to as a Workspace. These Workspaces are alternatively known as “App workspaces” or “Organizational Workspaces.“
They hold this distinction because they can serve as the foundation for creating apps and are integrated within the organization’s tenants. Workspaces are most effectively utilized as collaborative spaces where teams can efficiently share and collaborate on content. Now, let’s explore how these workspaces can be employed for this purpose.
Before the advent of the Power BI workspace updated version, workspace creation was used for generating Microsoft Office 365. Now let’s see what transformations occur after switching to the new workspace:
- Crafting a Power BI workspace itself enough and there’s no need to create of Microsoft Office 365 Group
- More precise roles and flexible control over permissions
- Admin in charge of workspace creation activities occur in the Power BI
- Cannot be able to craft and utilize the content pack of an organization
How to create a workspace setting in Power BI?
To create a Workspace in Power BI, you have to follow the below steps:
- To get started, navigate to ‘Workspaces’ either by clicking on it in the left navigation pane or its icon if you’ve minimized the pane.
- Next, select ‘Create a workspace’:
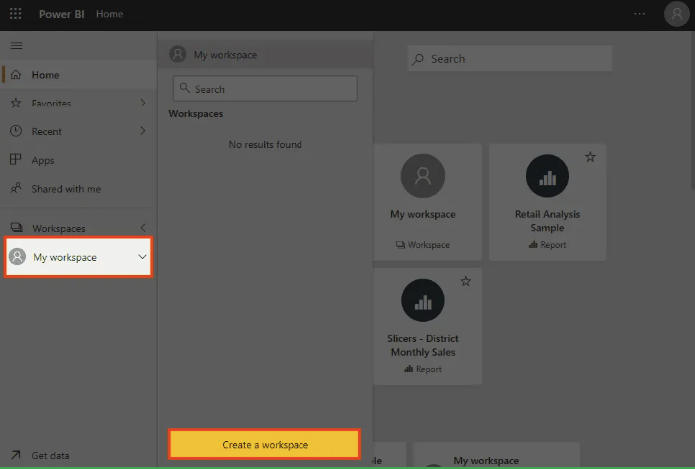
- Power BI will prompt you to fill in your workspace details.
- If you wish to include an image for your workspace, you can simply upload a picture.
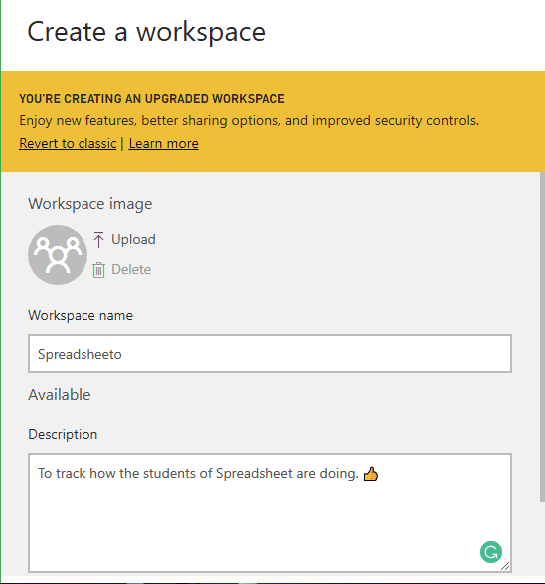
- While choosing a name for your workspace, Power BI will verify if that name is already in use. If it is, you’ll need to select a different name.
- Additionally, provide a brief description of your workspace.
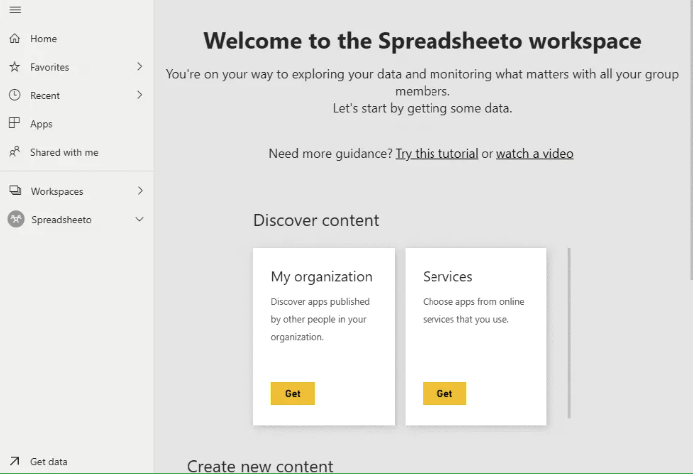
- Once you’re satisfied with the details, click ‘Save’.
- Power BI will then display your team’s workspace:
How to Change a Power BI Workspace Settings?
- If you want to change the workspace name and workspace description, click the option workspace
- Now, navigate the workspace until you find the ellipsis option on the right side
- If you find it, select the workspace settings in Power BI
- Power BI opens up a pane that looks similar to the new workspace you have created
- If you want to change advanced settings, click the advanced option.
- By default, workspace admins, maybe a user or group will be notified. If you want to change that, create new user groups or users in the contact list.
- Furthermore, it’s possible to enable access to an Office 365 Group’s SharePoint Library file storage. Once you’ve configured everything as needed, remember to click ‘Save’ to preserve the changes.
Also Read : Microsoft PL-300 exam preparation guide (Power BI Data Analyst)
How to change workspace access?
For changing workspace access, we need to add the user details:
Adding Admins, Members, or Contributors:
Wondering how to include administrators, members, or contributors to your workspace? It’s easy:
- Once more, go to ‘Workspaces’ and tap on the ellipsis icon next to your workspace’s name.
- But this time, choose ‘Workspace access’:
Accessing Power BI’s Workspace Access:
- Within this section, you can invite others to join your workspace.
- Simply enter their email addresses, pick their respective roles, and click ‘Add’.
- You also have the flexibility to modify a member’s role at a later time or remove them from the workspace if needed.
How to create a New Classic Workspace?
To create a classic workspace in Power BI instead of a new workspace, you can follow these steps:
Start by navigating to the left-hand navigation pane and click on “Workspace.”
Next, click on “Create a workspace.”
Rather than proceeding with the steps to create a new workspace, look for the “Revert to classic” link and click on it.
Now, you can provide the information for your new classic workspace, including:
- Name
- Status (public or private)
- Member’s role (edit or view)
- Members
In the advanced options, there may be a choice regarding the use of dedicated capacity. Configure this option according to your needs. Once you have filled in all the necessary information, click on the “Save” button to create your classic workspace.
Advantages of Power BI Workspace
Here are some key benefits of using the Power BI Workspaces:
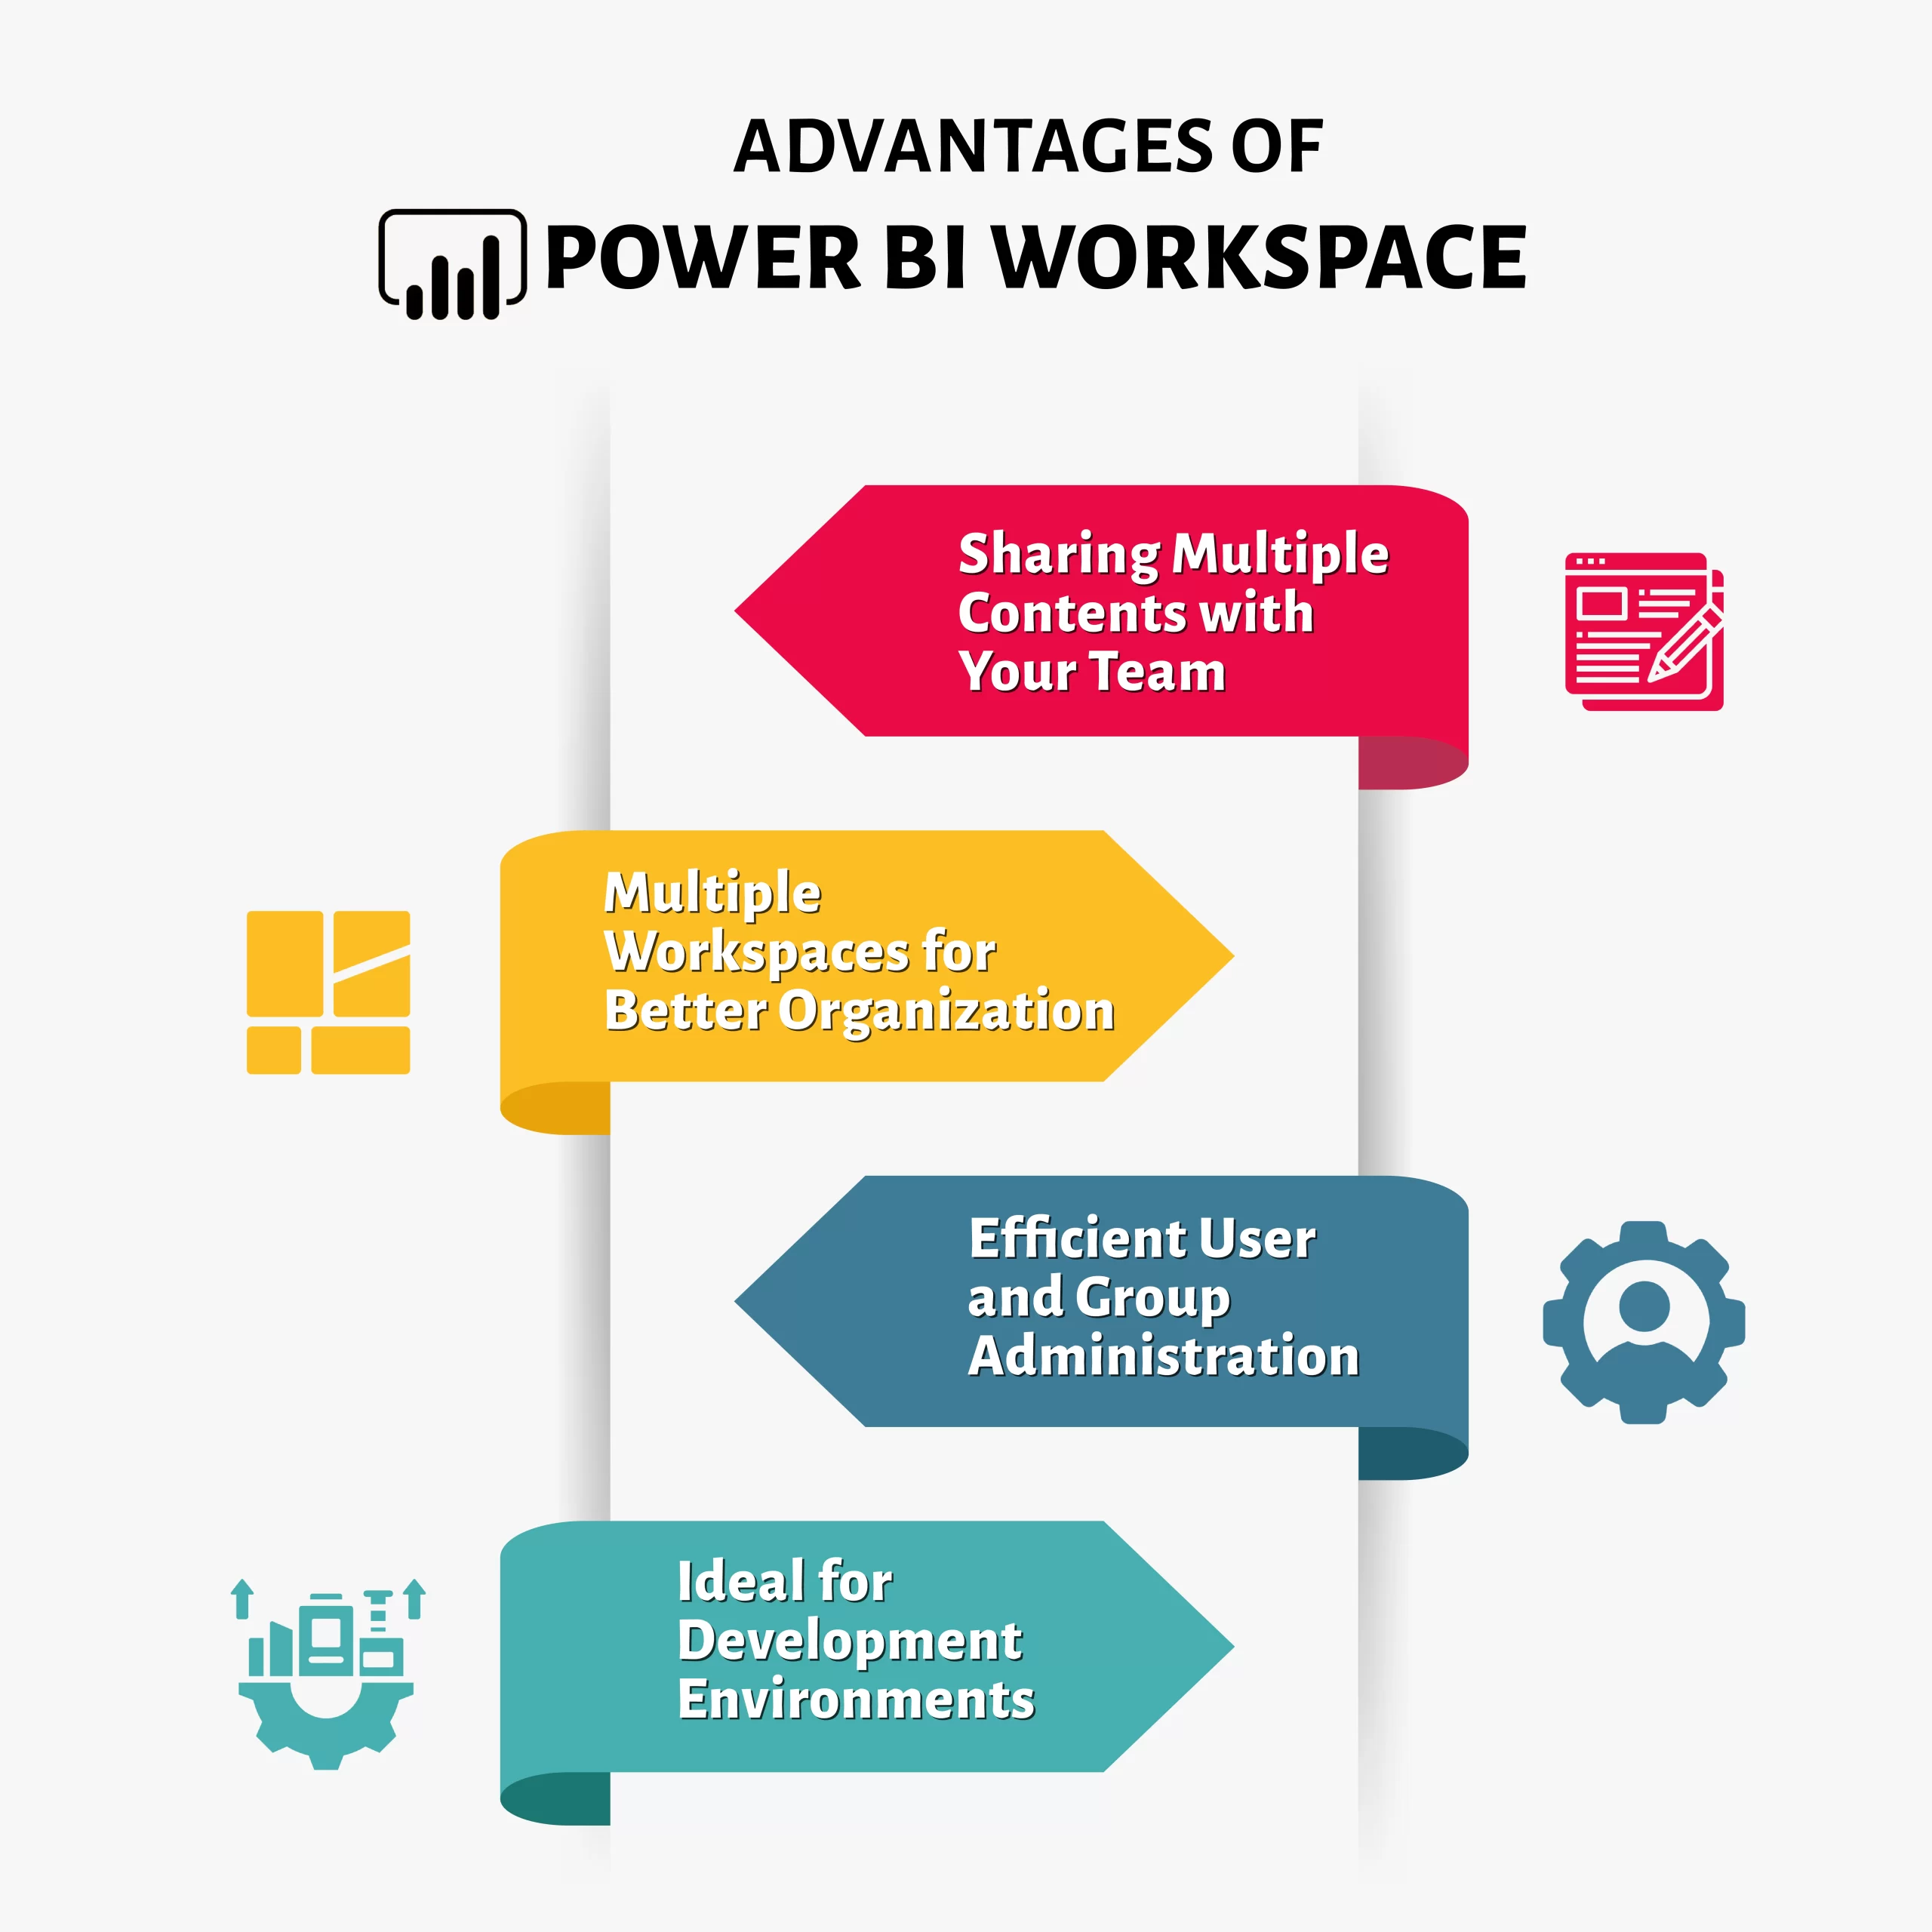
Sharing Multiple Contents with Your Team: Power BI workspaces offer a convenient way to share content with group users. You don’t need to share dashboards individually; instead, you can share them with everyone in the group simultaneously.
Multiple Workspaces for Better Organization: Power BI workspaces create distinct environments for group members. Switching between these workspaces is a straightforward process, enhancing organization and collaboration.
Efficient User and Group Administration: Power BI workspaces are seamlessly synchronized with Office 365. This means that administrators can easily manage all group members, ensuring efficient control and access management.
Ideal for Development Environments: Power BI workspaces serve as an excellent solution for development environments. These environments can be shared with other members of the development team, granting them edit access. This fosters consistent content sharing and collaboration across the organization.
Limitations of Power BI Workspace
Power BI Workspaces come with specific restrictions that you should be aware of:
- You can have a maximum of 1,000 datasets within a workspace.
- Each dataset is limited to having 1,000 reports associated with it.
- Users who have Power BI Pro licenses are allowed to be members of up to 1,000 workspaces.
- Please note that Excel Power BI Publisher functionality is not supported.
- When naming workspaces using an XMLA endpoint, certain special characters are not supported. To work around this limitation, you can use URL encoding for special characters. For example, use “%2F” for a forward slash “/”.
FAQs
What is the usage of Power BI workspace?
The purpose of a workspace is to provide a technological framework that brings together all the necessary applications, tools, and resources for efficient work and secure collaboration in a digital environment. It’s personalized to suit the needs of each individual.
How many workspaces are available in the Power BI?
In Power BI, the number of available workspaces depends on the specific plan you have. For instance, in Power BI Premium Capacity (P1), you can have a maximum of 500 workspaces, while in Power BI Premium Capacity (P2), the limit increases to 1,000 workspaces.
What are the advantages of using Power BI workspace?
Now, let’s explore the advantages of using workspaces in Power BI:
- Facilitates Collaboration: Workspaces enable multiple users to collaborate in real-time on reports, dashboards, and datasets. This promotes teamwork and ensures that everyone can contribute efficiently.
- Enhanced Security: Power BI workspaces offer robust access control features. This means you can manage who has access to your content, helping safeguard sensitive data and ensuring that only authorized users can view and interact with it.
How many users can use Power BI workspace?
When it comes to viewing role members in a workspace, there is not defined numerical limit. However, it’s essential to note that to access the report view, a license is necessary. Furthermore, if one of the new workspaces is utilizing shared capacity, every individual added to it must possess either a Power BI Pro or Premium Per User (PPU) license.
Is there a limit to the number of Power BI workspaces?
There are specific limitations within the Power BI workspace:
- You can have a maximum of 1,000 datasets.
- Each dataset is restricted to containing a maximum of 1,000 reports.
- Users holding Power BI Pro licenses can be members of up to 1,000 workspaces.
Conclusion
Hope this insightful blog delves into the Power BI workspaces, Power BI workspace creation, Power BI workspace advantages, its limitations, and so on. If you’re eager to unlock the full potential of Power BI and delve into its advanced features, I highly recommend pursuing the PL-300 Certification. To prepare effectively, utilize resources such as PL-300 exam questions and study guides.
To sharpen these practical skills, consider engaging in Power BI hands-on labs and making use of Power BI sandboxes. These hands-on experiences can significantly enhance your proficiency and competence in working with Power BI.
- Top 25 AWS Data Engineer Interview Questions and Answers - May 11, 2024
- What is Azure Synapse Analytics? - April 26, 2024
- AZ-900: Azure Fundamentals Certification Exam Updates - April 26, 2024
- Exam Tips for AWS Data Engineer Associate Certification - April 19, 2024
- Maximizing Cloud Security with AWS Identity and Access Management - April 18, 2024
- A Deep Dive into Google Cloud Database Options - April 16, 2024
- GCP Cloud Engineer vs GCP Cloud Architect: What’s the Difference? - March 22, 2024
- 7 Ways to Double Your Cloud Solutions Architect Role Salary in 12 Months - March 7, 2024

