
In this blog post, we will look into Optimizing Azure Deployments Using ARM Templates and understand how to deploy an ARM template using Azure CLI. We will explore a live scenario to give you hands-on experience in deploying resources in Azure, helping you grasp the practical aspects of optimizing and automating your deployments efficiently.
ARM templates are design documents created in JSON file format and are used in the Azure Resource Manager to outline how the resources in Azure will be structured and used. Therefore, these templates allow resources to be deployed and maintained in a repeatable manner with assurance of exactly what state will be deployed based on the infrastructure designed.
For those preparing for the Microsoft Azure Administrator AZ-104 Course, becoming proficient in ARM templates is essential. This certification course covers a wide range of Azure administrative tasks, including deploying and managing Azure resources.
Advantages of the ARM Templates
Infrastructure as Code (IaC):
ARM Templates allow the users to create a blueprint of their structure and manage it on the Azure Cloud environment in the form of code. This way, features such as versioning ability, testing, or even collaboration can be facilitated making sure that the structure is more reliable and consistent.
Repeatability and Consistency:
However, with the use of ARM Templates, the same environment with the same configuration if required can be deployed any number of times thus decreasing the chances of human error and other flawless chances in the deployments.
Easier Administration:
The deployment of resources is synchronized through ARM Templates making it possible for the infrastructure to be monitored, updated, or managed as a whole. This majorly cuts down the complications associated with large-scale deployments.
Managing Dependencies:
In particular, ARM Templates are capable of installing resources in a focused order as defined by the dependencies for the resources. This guarantees that all the resources are rolled out in the correct order without any manual planning.
Collaboration with CI/CD Pipelines:
It is possible to include ARM templates in the course of building Continuous Integration/Continuous Deployment (CI/CD) lifecycle processes. This means that whenever there are changes to the necessary infrastructure in the cloud platform, automating those changes can be done.
Scalability:
At the same time, it is relatively easy to deploy an ARM Template for a complex architecture with many resources; over time, one can easily run more ARM Templates around that baseline.
Structure of an ARM Template
The file of the ARM Templates contains several pairings of richly detailed key-value sets in the form of JSON. For instance, below, you can see a format of ARM Templates
{ “$schema”: “https://schema.management.azure.com/schemas/2024-09-03/deploymentTemplate.json#”, “content version”: “1.0.0”, “parameters”:{}, “variables”: {}, “functions”:[], “resources”: [], “outputs”:{} }
1. Schema:
The schema defines from where the schema information of the template is taken and this is used in template validation.
2. Content Version:
The content version specifies the version of the template. Tracking changes and ensuring consistency across various versions of the template becomes much easier with this approach.
3. Parameters:
This section allows you to define the inputs that can be provided at deployment time. This makes the template more flexible and reusable across different environments. Below is an example of parameters that allow users to specify the type of storage account they want to deploy in Azure.
{
"parameters": {
"storageAccountType": {
"type": "string",
"defaultValue": "Standard_LRS",
"allowed values": [
"Standard_LRS",
"Standard_GRS",
"Standard_RAGRS",
"Premium_LRS"
],
"metadata": {
"description": "Storage Account type"
}
}
}
}
4. Variables:
The variables section defines values that can be reused throughout the template. Unlike parameters, these are calculated within the template and cannot be provided during deployment.
{
"variables": {
"storageAccountName": "[concat('storage', uniqueString(resourceGroup().id))]"
}
}
5. Functions:
In a template, the function contains the steps and procedures to be followed. It is just like a variable that defines the steps performed when called in templates. The below example of the function defines the unique name for the resources.
6. Resources:
The resources section is the most critical part of the ARM Template. It defines the Azure resources to be deployed, including their properties, configurations, and dependencies.
{
 "resources": [
{
"type": "Microsoft.Storage/storageAccounts",
"apiVersion": "2024-09-03",
 "name": "[variables('storageAccountName')]",
 "location": "[resourceGroup().location]",
 "sku": {
 "name": "[parameters('storageAccountType')]"
 },
"kind": "StorageV2",
"properties": {}
}
]
}
1. Outputs:
The outputs section is used for value returns once the deployment is complete. This may feature the resource IDs, Connection strings or useful information as post-deployment operations.
{
“outputs”: {
“storageAccountConnectionString”: {
 “type”: “string,”
 “value”: “[listKeys(resourceId(Microsoft.Storage/storageAccounts’, variables(‘storageAccountName’), ‘2024-09-03’) ‘.keys[0].value]”
 }
Copy
}
}
Azure Quickstart templates
It is a repository of pre-created Azure resource manager arm templates available from Microsoft. The purpose of these templates is to ease the deployment of the said infrastructure of any applications on azure.
Deployment of ARM Templates using Azure CLI
For the hands-on part of this tutorial, you will need to login to our Whizlabs Website using your credentials (Email ID and Password).

Click on the Training Library panel, select Cloud Computing, Microsoft Azure, and Microsoft Azure Exam AZ-104 Course.

You will be redirected into AZ-104 Azure Administrator Associate Course. Select the Hands-on lab button to be taken into Hands-on Lab Page.
Once the Hands on lab page opens, scroll down further to select ‘Automate deployment of resources by using templates’. Click on the ‘Create a Windows VM using an ARM Template Start button to begin the lab.

Once you click the Start button, you will be redirected to the lab page. Click on ‘Start Guided Lab’ to begin the lab.

To start the lab, we must enable the button by participating in Whizlabs Training. Agree to the Whizlabs Term of User and click ‘Start lab’.

The lab will begin with Whizlabs User’s Credentials, including Username and password. We provide lab steps along the screenshots to be followed in the Azure Portal. Click on the ‘Open Console’ Button which will redirect you to the Azure Portal.

Please give the Username and Password provided by Whizlabs on the Sign-in In Page.


Creation of an ARM Template
To create a Windows Virtual Machine, you will need an ARM Template with A Windows Virtual Machine (VM). There follows an ARM Template, which uses a Windows Virtual Machine, public IPv4 address, virtual network, and subnet along with a network interface. A network security group (NSG) to enable Remote Desktop Protocol (RDP) connections.Diagnostics storage requirements. Template. The text file has to be saved as template.json.
{
  "$schema": "https://schema.management.azure.com/schemas/2019-04-01/deploymentTemplate.json#",
"contentVersion":"1.0.0.0",
 "metadata": {
"_generator": {
"name": "bicep",
"version": "0.8.9.13224",
"templateHash":"15495738823141086515"
}
},
"parameters": {
"adminUsername": {
"type": "string",
"metadata": {
"description": "Username for the Virtual Machine."
}
},
"adminPassword":{
"type":"secureString",
"minLength": 12,
"metadata": {
"description":"Password for the Virtual Machine."
}
},
"dnsLabelPrefix": {
 "type": "string",
"defaultValue": "[toLower(format('{0}-{1}', parameters('vmName'), uniqueString(resourceGroup().id, parameters('vmName'))))]",
"metadata": {
"description": "Unique DNS Name for the Public IP used to access the Virtual Machine."
}
},
"publicIpName": {
"type": "string",
"defaultValue": "myPublicIP",
"metadata": {
"description": "Name for the Public IP used to access the Virtual Machine."
}
},
"publicIPAllocationMethod": {
"type": "string",
"defaultValue": "Dynamic",
"allowedValues": [
"Dynamic",
"Static"
],
"metadata": {
"description": "Allocation method for the Public IP used to access the Virtual Machine."
}
},
"publicIpSku": {
"type": "string",
"defaultValue": "Basic",
"allowedValues": [
"Basic",
"Standard"
],
"metadata": {
"description": "SKU for the Public IP used to access the Virtual Machine."
}
},
"OSVersion": {
 "type": "string",
"defaultValue": "2022-datacenter-azure-edition-core",
"allowedValues": [
"2008-R2-SP1",
"2008-R2-SP1-smalldisk",
"2012-Datacenter",
"2012-datacenter-gensecond",
"2012-Datacenter-smalldisk",
"2012-datacenter-smalldisk-g2",
"2012-Datacenter-zhcn",
"2012-datacenter-zhcn-g2",
"2012-R2-Datacenter",
"2012-r2-datacenter-gensecond",
"2012-R2-Datacenter-smalldisk",
"2012-r2-datacenter-smalldisk-g2",
"2012-R2-Datacenter-zhcn",
"2012-r2-datacenter-zhcn-g2",
"2016-Datacenter",
"2016-datacenter-gensecond",
"2016-datacenter-gs",
"2016-Datacenter-Server-Core",
"2016-datacenter-server-core-g2",
"2016-Datacenter-Server-Core-smalldisk",
"2016-datacenter-server-core-smalldisk-g2",
"2016-Datacenter-smalldisk",
"2016-datacenter-smalldisk-g2",
"2016-Datacenter-with-Containers",
"2016-datacenter-with-containers-g2",
"2016-datacenter-with-containers-gs",
"2016-Datacenter-zhcn",
="2016-datacenter-zhcn-g2",
"2019-Datacenter",
"2019-Datacenter-Core",
"2019-datacenter-core-g2",
"2019-Datacenter-Core-smalldisk",
"2019-datacenter-core-smalldisk-g2",
"2019-Datacenter-Core-with-Containers",
"2019-datacenter-core-with-containers-g2",
"2019-Datacenter-Core-with-Containers-smalldisk",
"2019-datacenter-core-with-containers-smalldisk-g2",
"2019-datacenter-gs",
"2019-Datacenter-smalldisk",
"2019-datacenter-smalldisk-g2",
"2019-Datacenter-with-Containers",
"2019-datacenter-with-containers-g2",
"2019-datacenter-with-containers-gs",
"2019-Datacenter-with-Containers-smalldisk",
"2019-datacenter-with-containers-smalldisk-g2",
"2019-Datacenter-zhcn",
 "2019-datacenter-zhcn-g2",
"2022-datacenter",
"2022-datacenter-azure-edition",
"2022-datacenter-azure-edition-core",
"2022-datacenter-azure-edition-core-smalldisk",
"2022-datacenter-azure-edition-smalldisk",
"2022-datacenter-core",
"2022-datacenter-core-g2",
"2022-datacenter-core-smalldisk",
"2022-datacenter-core-smalldisk-g2",
"2022-datacenter-g2",
"2022-datacenter-smalldisk",
"2022-datacenter-smalldisk-g2"
],
"metadata": {
"description": "The Windows version for the VM. This will pick a fully patched image of this given Windows version."
}
,
"vmSize":{
"type":"string",
"defaultValue": "standard_b2s",
"metadata":{
"description":"Size of the virtual machine."
}
},
"location": {
"type": "string",
"defaultValue": "[resourceGroup().location]",
"metadata": {
"description": "Location for all resources."
}
},
"vmName": {
"type": "string",
"defaultValue": "simple-vm",
"metadata": {
"description": "Name of the virtual machine."
}
}
},
"variables": {
"storageAccountName": "[format('bootdiags{0}', uniqueString(resourceGroup().id))]",
"nicName": "myVMNic",
"addressPrefix": "10.0.0.0/16",
"subnetName": "Subnet",
"subnetPrefix": "10.0.0.0/24",
"virtualNetworkName": "MyVNET",
"networkSecurityGroupName": "default-NSG"
},
"resources": [
{
"type": "Microsoft.Storage/storageAccounts",
"apiVersion": "2021-04-01",
"name": "[variables('storageAccountName')]",
"location": "[parameters('location')]",
"sku": {
"name": "Standard_LRS"
},
"kind": "Storage"
},
{
"type": "Microsoft.Network/publicIPAddresses",
"apiVersion": "2021-02-01",
"name": "[parameters('publicIpName')]",</span
 "location": "[parameters('location')]",
"sku": {
"name": "[parameters('publicIpSku')]"
},
"properties": {
"publicIPAllocationMethod": "[parameters('publicIPAllocationMethod')]",
"dnsSettings": {
"domainNameLabel": "[parameters('dnsLabelPrefix')]"
}
}
},
{
"type": "Microsoft.Network/networkSecurityGroups",
"apiVersion": "2021-02-01",
"name": "[variables('networkSecurityGroupName')]",
"location": "[parameters('location')]",
"properties": {
"securityRules": [
{
"name": "default-allow-3389",
"properties": {
"priority": 1000,
"access": "Allow",
"direction": "Inbound",
"destinationPortRange": "3389",
"protocol": "Tcp",
"sourcePortRange": "*",
"sourceAddressPrefix": "*",
"destinationAddressPrefix": "*"
}
}
]

},
{
"type": "Microsoft.Network/virtualNetworks",
"apiVersion": "2021-02-01",
"name": "[variables('virtualNetworkName')]",
"location": "[parameters('location')]",
"properties": {
"addressSpace": {
"addressPrefixes": [
"[variables('addressPrefix')]"
]
},
"subnets": [
{
"name": "[variables('subnetName')]",
"properties": {
"addressPrefix": "[variables('subnetPrefix')]",
"networkSecurityGroup": {
"id": "[resourceId('Microsoft.Network/networkSecurityGroups', variables('networkSecurityGroupName'))]"
}
}
}
]
},
"dependsOn": [
 "[resourceId('Microsoft.Network/networkSecurityGroups', variables('networkSecurityGroupName'))]"
]
},
{
"type": "Microsoft.Network/networkInterfaces",
"apiVersion": "2021-02-01",
"name": "[variables('nicName')]",
"location": "[parameters('location')]",
"properties": {
"ipConfigurations": [
{
 "name": "ipconfig1",
"properties": {
"privateIPAllocationMethod": "Dynamic",
"publicIPAddress": {
"id": "[resourceId('Microsoft.Network/publicIPAddresses', parameters('publicIpName'))]"
},
"subnet": {
"id": "[resourceId('Microsoft.Network/virtualNetworks/subnets', variables('virtualNetworkName'), variables('subnetName'))]"
}
}
}
]
},
"dependsOn": [
 "[resourceId('Microsoft.Network/publicIPAddresses', parameters('publicIpName'))]",
 "[resourceId('Microsoft.Network/virtualNetworks', variables('virtualNetworkName'))]"
 ]
},
{
"type": "Microsoft.Compute/virtualMachines",
"apiVersion": "2021-03-01",
"name": "[parameters('vmName')]",
"location": "[parameters('location')]",
"properties": {
"hardwareProfile": {
"vmSize": "[parameters('vmSize')]"
},
"osProfile": {
"computerName": "[parameters('vmName')]",
"adminUsername": "[parameters('adminUsername')]",
"adminPassword": "[parameters('adminPassword')]"
},
"storageProfile": {
"imageReference": {
"publisher": "MicrosoftWindowsServer",
"offer": "WindowsServer",
"sku": "[parameters('OSVersion')]",
"version": "latest"
 },
"osDisk": {
"createOption": "FromImage",
"managedDisk": {
"storageAccountType": "StandardSSD_LRS"
}
},
"dataDisks": [
{
 "diskSizeGB": 1023,
 "lun": 0,
"createOption": "Empty"
}
]
},
"networkProfile": {
"networkInterfaces": [
{
"id": "[resourceId('Microsoft.Network/networkInterfaces', variables('nicName'))]"
}
]
},
"diagnosticsProfile": {
"bootDiagnostics": {
"enabled": true,
  "storageUri": "[reference(resourceId('Microsoft.Storage/storageAccounts', variables('storageAccountName'))).primaryEndpoints.blob]"
}
 }
},
"dependsOn": [
"[resourceId('Microsoft.Network/networkInterfaces', variables('nicName'))]",
 "[resourceId('Microsoft.Storage/storageAccounts', variables('storageAccountName'))]"
]
}
  ],
"outputs": {
"hostname": {
"type": "string",
"value": "[reference(resourceId('Microsoft.Network/publicIPAddresses', parameters('publicIpName'))).dnsSettings.fqdn]"
}
  }
}
Deploy the ARM Template
In the Azure Portal, open the Azure CLI within the Cloud Shell pane.

In the pop-up box, Click on Bash.

In the getting started box, we have to enter the following details and click on apply.
Select “No storage account required”.
Subscription: Select your own subscription

In the toolbar of the Cloud Shell pane, select the Manage file option and then click on Upload to upload the template.json file into the Cloud Shell home directory.

Now we will deploy the resources using the given command. This step may take a few minutes for the resources to be deployed successfully.
az deployment group create –name <deployment-name> –template-file <path-to-template-file> –parameters ‘{“adminUsername”: {“value”: “<admin-username>”}, “adminPassword”: {“value”: “<admin-password>”}}’ –resource-group <resource-group-name>
NOTE: Copy this command to a text editor and replace:
- ‘<deployment-name>’ with the name of your deployment
- `<resource-group-name>` with the name of your resource group
- `<path-to-template-file>` with the path to file containing the ARM template which in this case would be the file name
- `<admin-username>` with the username
- `<admin-password>` with a password of length greater than or equal to 12.

Verify the deployment
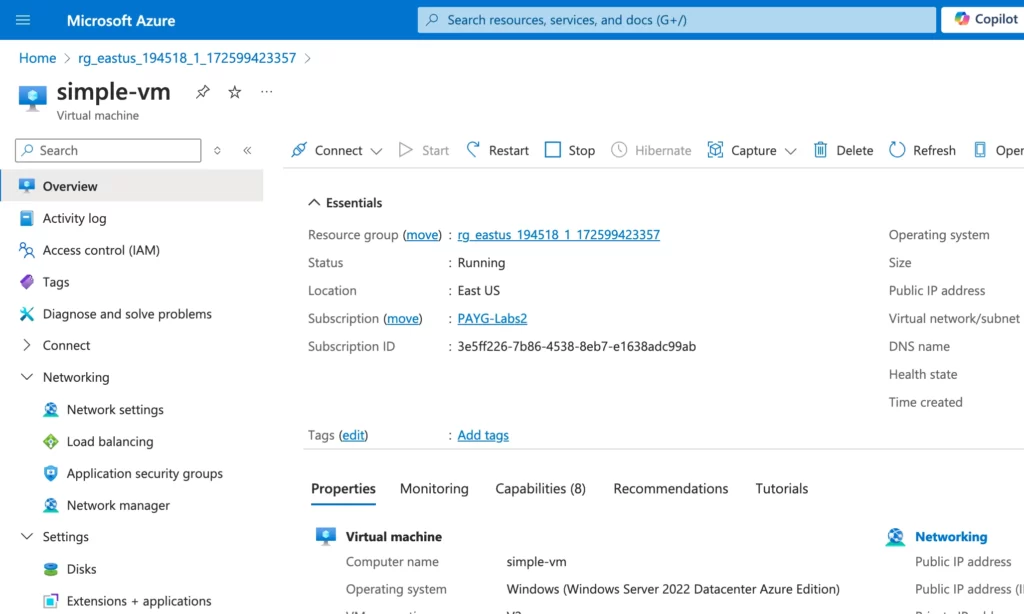
After the execution of the above command, you will be deployed with Windows Virtual Machine.

ARM Deployment Modes
Adopting resources in an ARM template requires an understanding of the available deployment modes in the Azure resource manager. ARM provides two deployment modes in which the user can choose to deploy the resources Incremental and complete.
1. Incremental deployment mode
In Incremental mode, Azure Resource Manager does any changes that are going to strengthen the resources included in the ARM template. If a resource exists, then it will be modified; if such resources do not exist, they will be constructed. However, the existing resources within the resource group which are not included in the template are not modified.
2. Complete deployment mode
In Complete mode, any resources that have not been included in the ARM template will be deleted. It does not matter the number of resources, or which particular resources are deployed within the resource group, they would all be wiped out and only those resources which are expounded in the template would remain.
Conclusion:
In this blog, we have discussed some of the important aspects of why one should consider the usage of ARM templates, beginning from the need for repeatability and idempotency to the ease of resource handling provided by centralized configurations.
As you have followed the steps – connecting via Azure CLI, you have practically learned how to make use of the ARM templates through Azure CLI. You can explore these steps in Whizlabs Sandbox or explore our Hands-on Labs for experimentation. Whether you prefer self-paced exploration or structured guidance, Whizlabs has the tools to support your learning journey.
- How to Enable CORS for Azure Functions? - January 24, 2025
- How Microsoft Entra ID Simplify Developer Authentication? - January 21, 2025
- What Role Does Azure Redis Cache Play in Reducing Latency? - December 27, 2024
- Master Cloud Management with Azure Resource Architecture - December 2, 2024
- Microsoft Defender: Your Key to Azure Security Management - November 26, 2024
- What is Microsoft Entra ID and How It Enhances Security - November 26, 2024
- How to Build Secure Networks with Azure Virtual Networking - November 20, 2024
- Step-by-Step Nginx Deployment on Azure Kubernetes Service - November 13, 2024