Microsoft offers a managed Kubernetes service called Azure Kubernetes Service which reduces the process of deploying, scaling, and managing containerized applications. As containerized workloads become more popular across companies, AKS provides a simple approach for developers and businesses to utilize Kubernetes as its infrastructure is not to be bothered with. Such a situation allows the teams to pay more attention to their applications and less to the management of distributed systems.
This blog is particularly focused on Azure Kubernetes Service, its essential feature and go through the steps to set up an AKS cluster. We will also execute the yaml code for deploying containers inside the cluster and exposing the container via load balancer on the internet. Whether you are new to kubernetes, this guide will help you get started with AKS and simplify your journey into scalable application management.
Features of Azure Kubernetes Service (AKS)
AKS provides several features for deploying and managing the containerized applications.
Fully Managed Control Plane
Azure handles the Kubernetes control plane in AKS clusters, which includes the API server, scheduler, and etcd database. This management means you automatically receive updates, security patches, and control plane monitoring without needing to handle these manually.
Node Auto-Scaling
AKS includes a cluster autoscaler to automatically add or remove nodes based on workload demand. You can also enable horizontal pod autoscaling to adjust the number of pod replicas based on resource needs like CPU or memory usage.
Integration with DevOps and CI/CD
AKS continuously connects with Azure DevOps and GitHub Actions, making it easier to set up CI/CD pipelines for Kubernetes-based applications. This integration enables quick, safe deployments..
Identity and Access Management
With support for Azure Entra ID, AKS allows secure access control through role-based access control (RBAC) and supports single sign-on (SSO) for developers and operators.
Network Security
AKS includes Azure Virtual Network (VNet) integration, Network Security Groups (NSGs), and network policies for fine-grained control over networking and security, keeping workloads isolated and secure.
Integrated Monitoring and Insights
Azure Monitor for AKS offers logging, real-time monitoring, and analytics into your AKS apps and clusters. You can monitor performance and quickly resolve any problems with this service.
Flexible Storage Options
AKS supports various storage choices, such as Azure Disks for high-performance needs, Azure Files for shared volumes, and Blob Storage for unstructured data. This flexibility allows your applications to manage stateful workloads smoothly.
Why Choose AKS?
AKS provides a range of benefits, making it a popular choice for deploying Kubernetes clusters on Azure. Here are some reasons why AKS stands out:
Reduced Operational Overhead
With AKS, you’re not responsible for managing the control plane or infrastructure. Azure handles these aspects, allowing you to focus on application deployment and scaling.
Cost-Effective
Azure provides the control plane at no additional cost, and you only pay for the worker nodes you utilize. The auto-scaling feature further helps optimize resource usage, keeping costs efficient.
Enhanced Security
Built-in security features, like Azure AD integration, network policies, and integration with Azure Key Vault for secrets management, work together to keep applications and data secure.
Scalability and Flexibility
AKS can handle a variety of applications, from small microservices to large, stateful workloads. The ability to scale clusters and resources on demand makes AKS suitable for businesses of all sizes.
Seamless Integration with the Azure platform
Integrating AKS with Azure DevOps, Azure Monitor, and Application Gateway is simple because it is part of the Azure platform. This integration gives you access to the most effective tools available for managing and deploying applications.t.
Real Time Scenario: Deploying Azure Kubernetes Service through Azure Portal
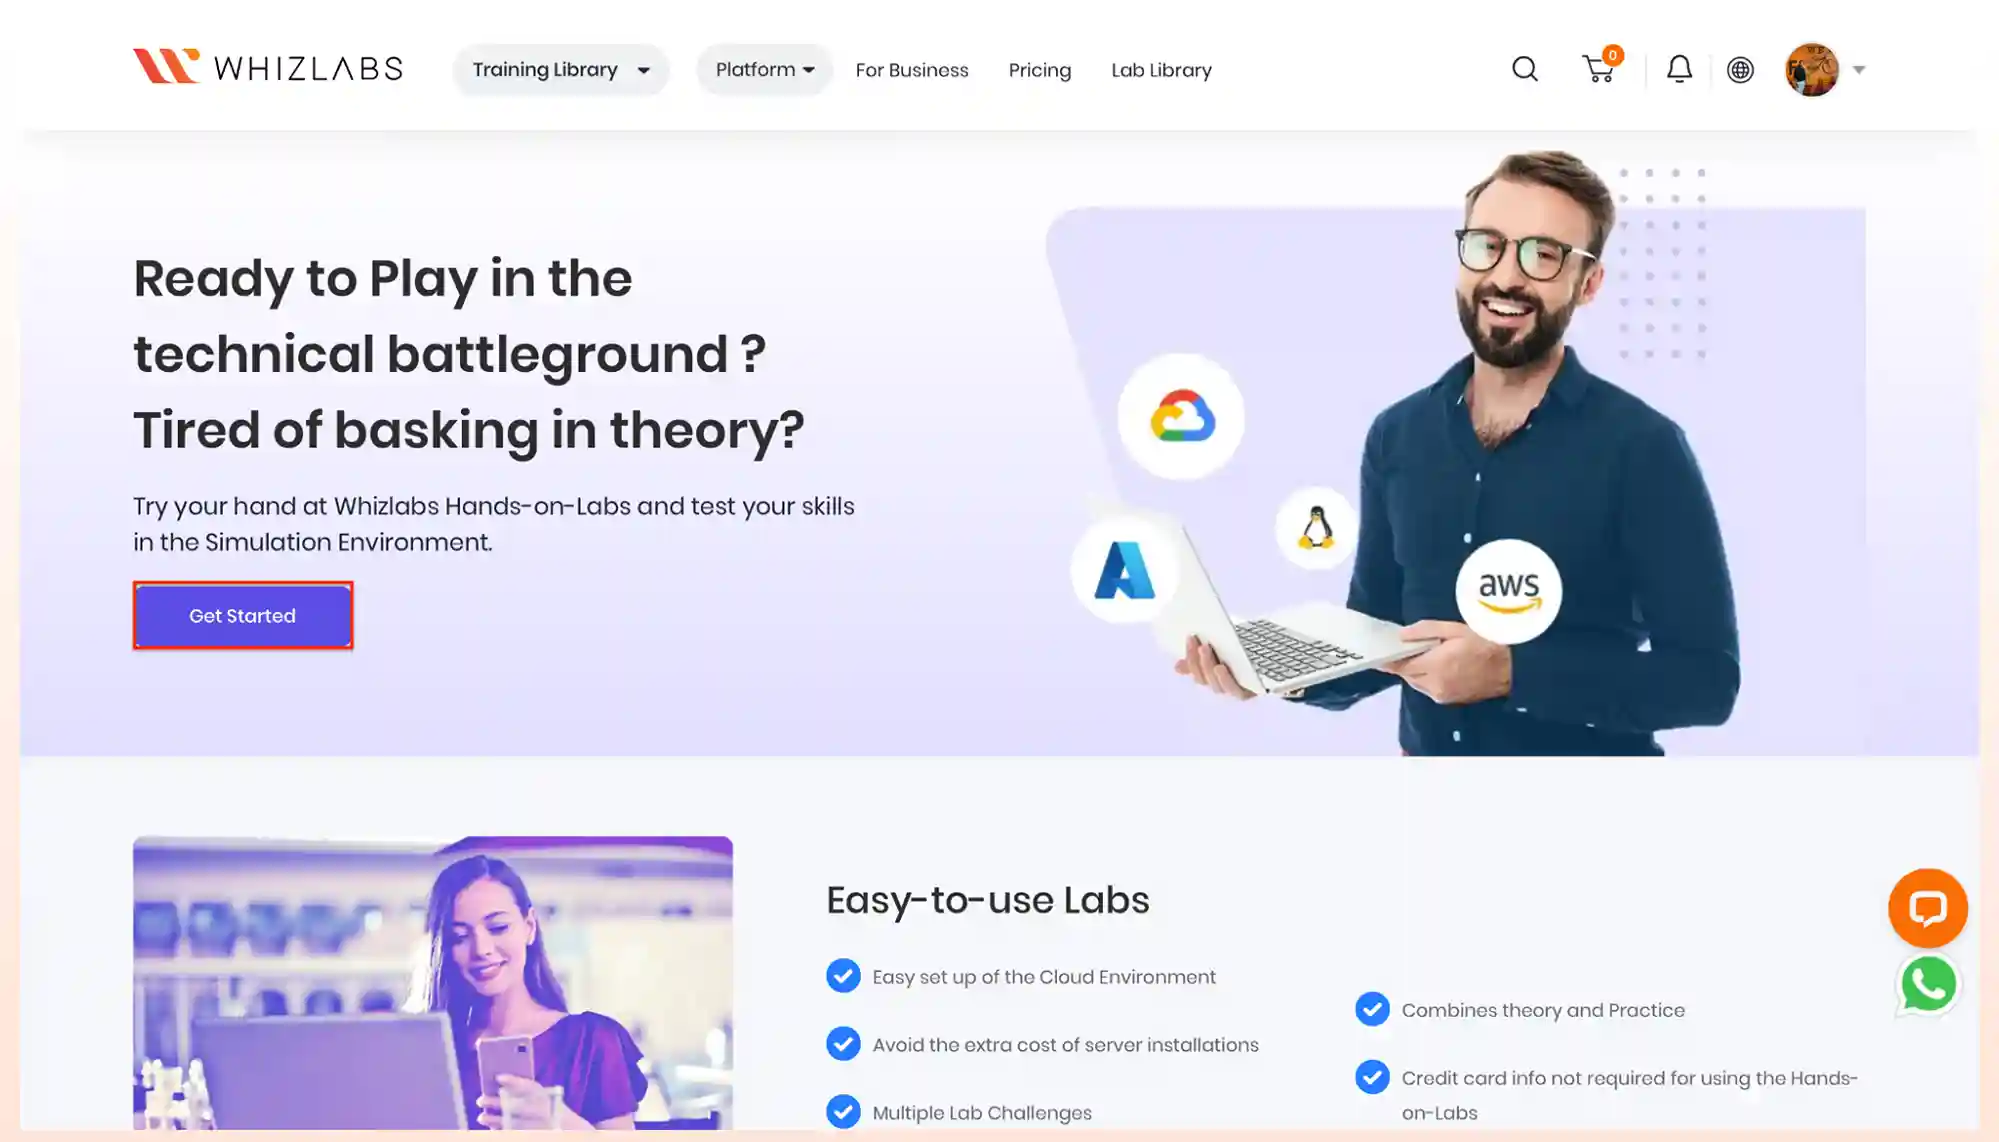
- For the section of this guide/ experience you will have to access our Whizlabs Website by logging in using our provided credentials (Email ID and Password). Navigate to the Platform panel. Choose Hands-on Labs to access the Hands-on Lab page.
2. Click on Get Started so that you will be redirected to the Hands-on Labs page.
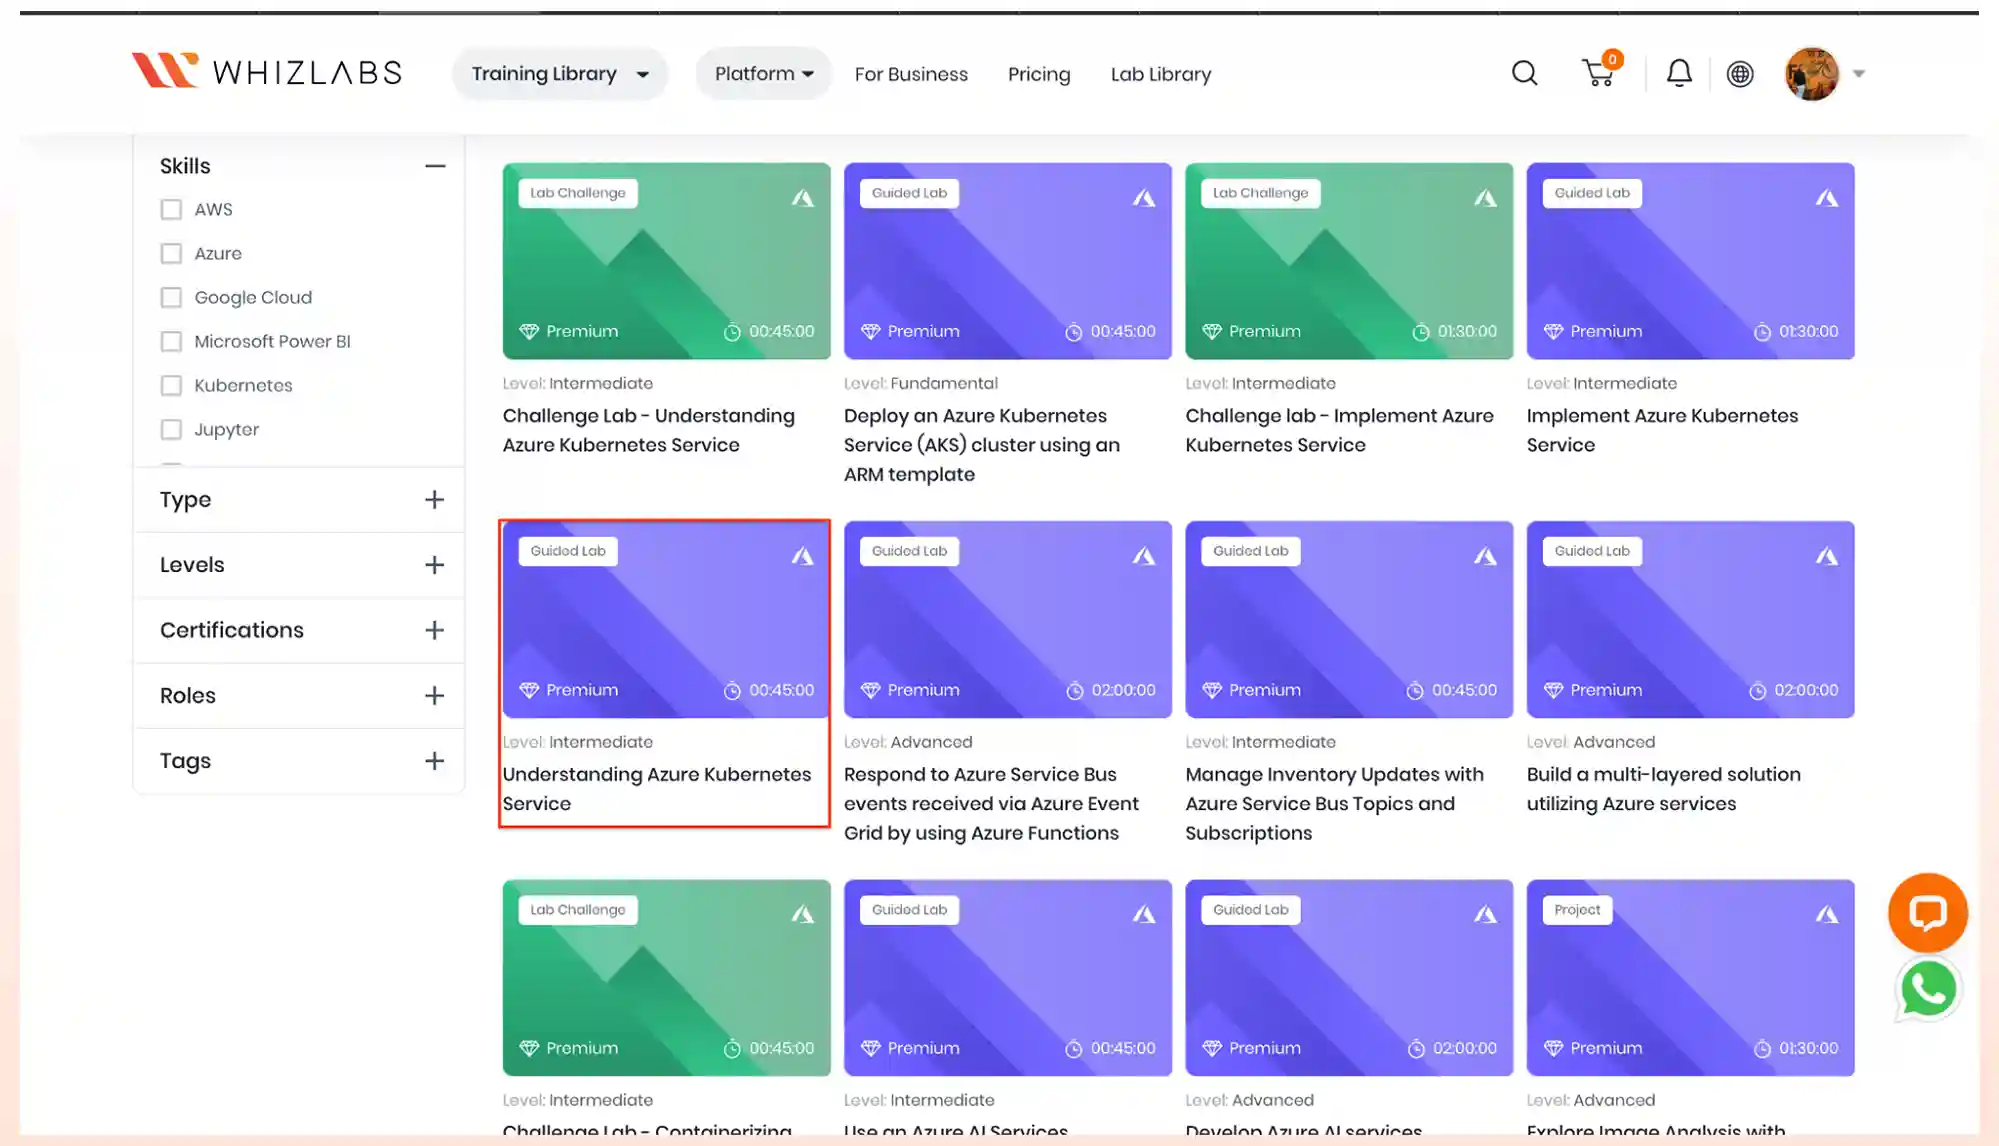
3. Please search for Azure Kubernetes Service in the search tab. You will find Azure Container labs for hands-on practice. For hands-on practice, we will use the Understanding Azure Kubernetes Service lab. Click on the Understanding Azure Kubernetes Service lab.
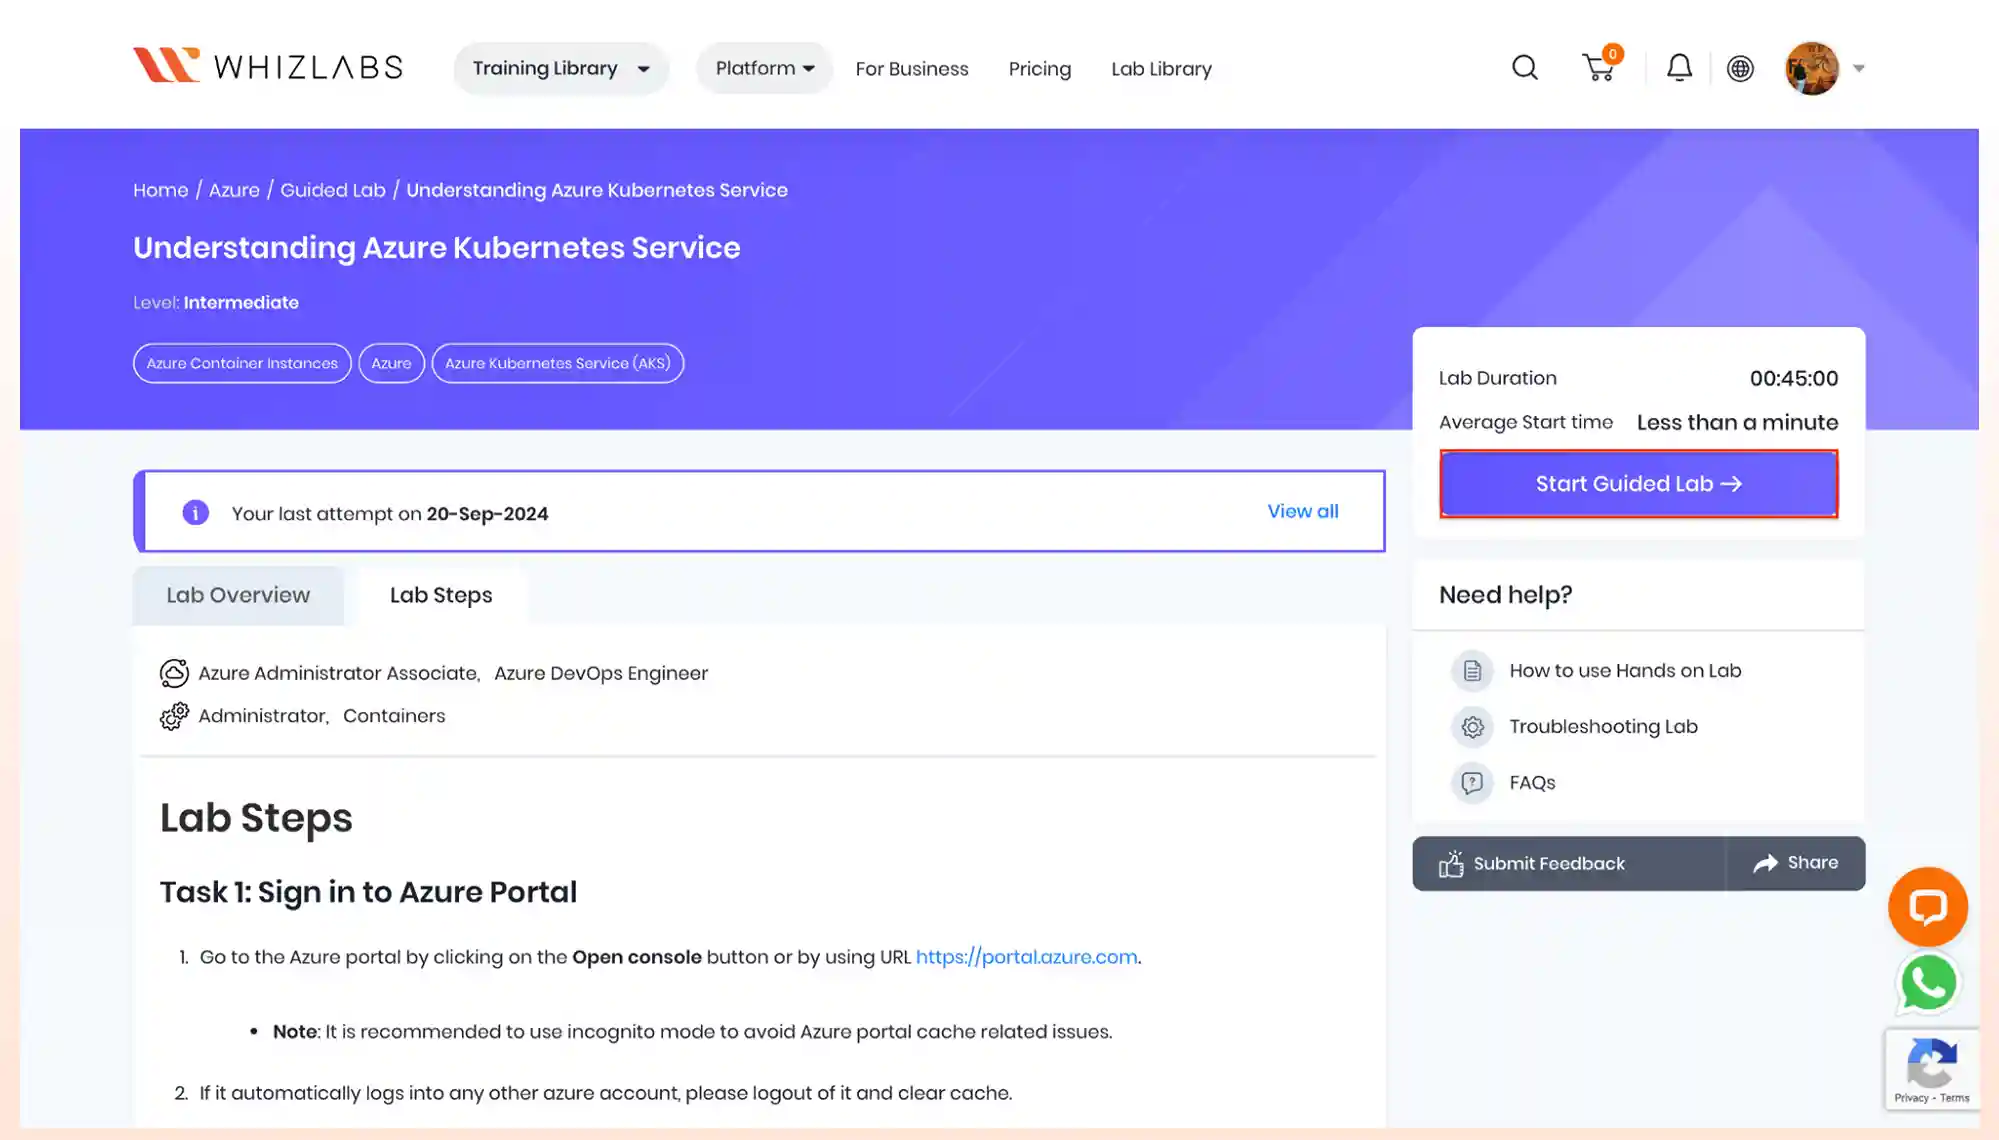
4. Once you click the Start button, you will be redirected to the lab page. Click on ‘Start Guided Lab’ to begin the lab.
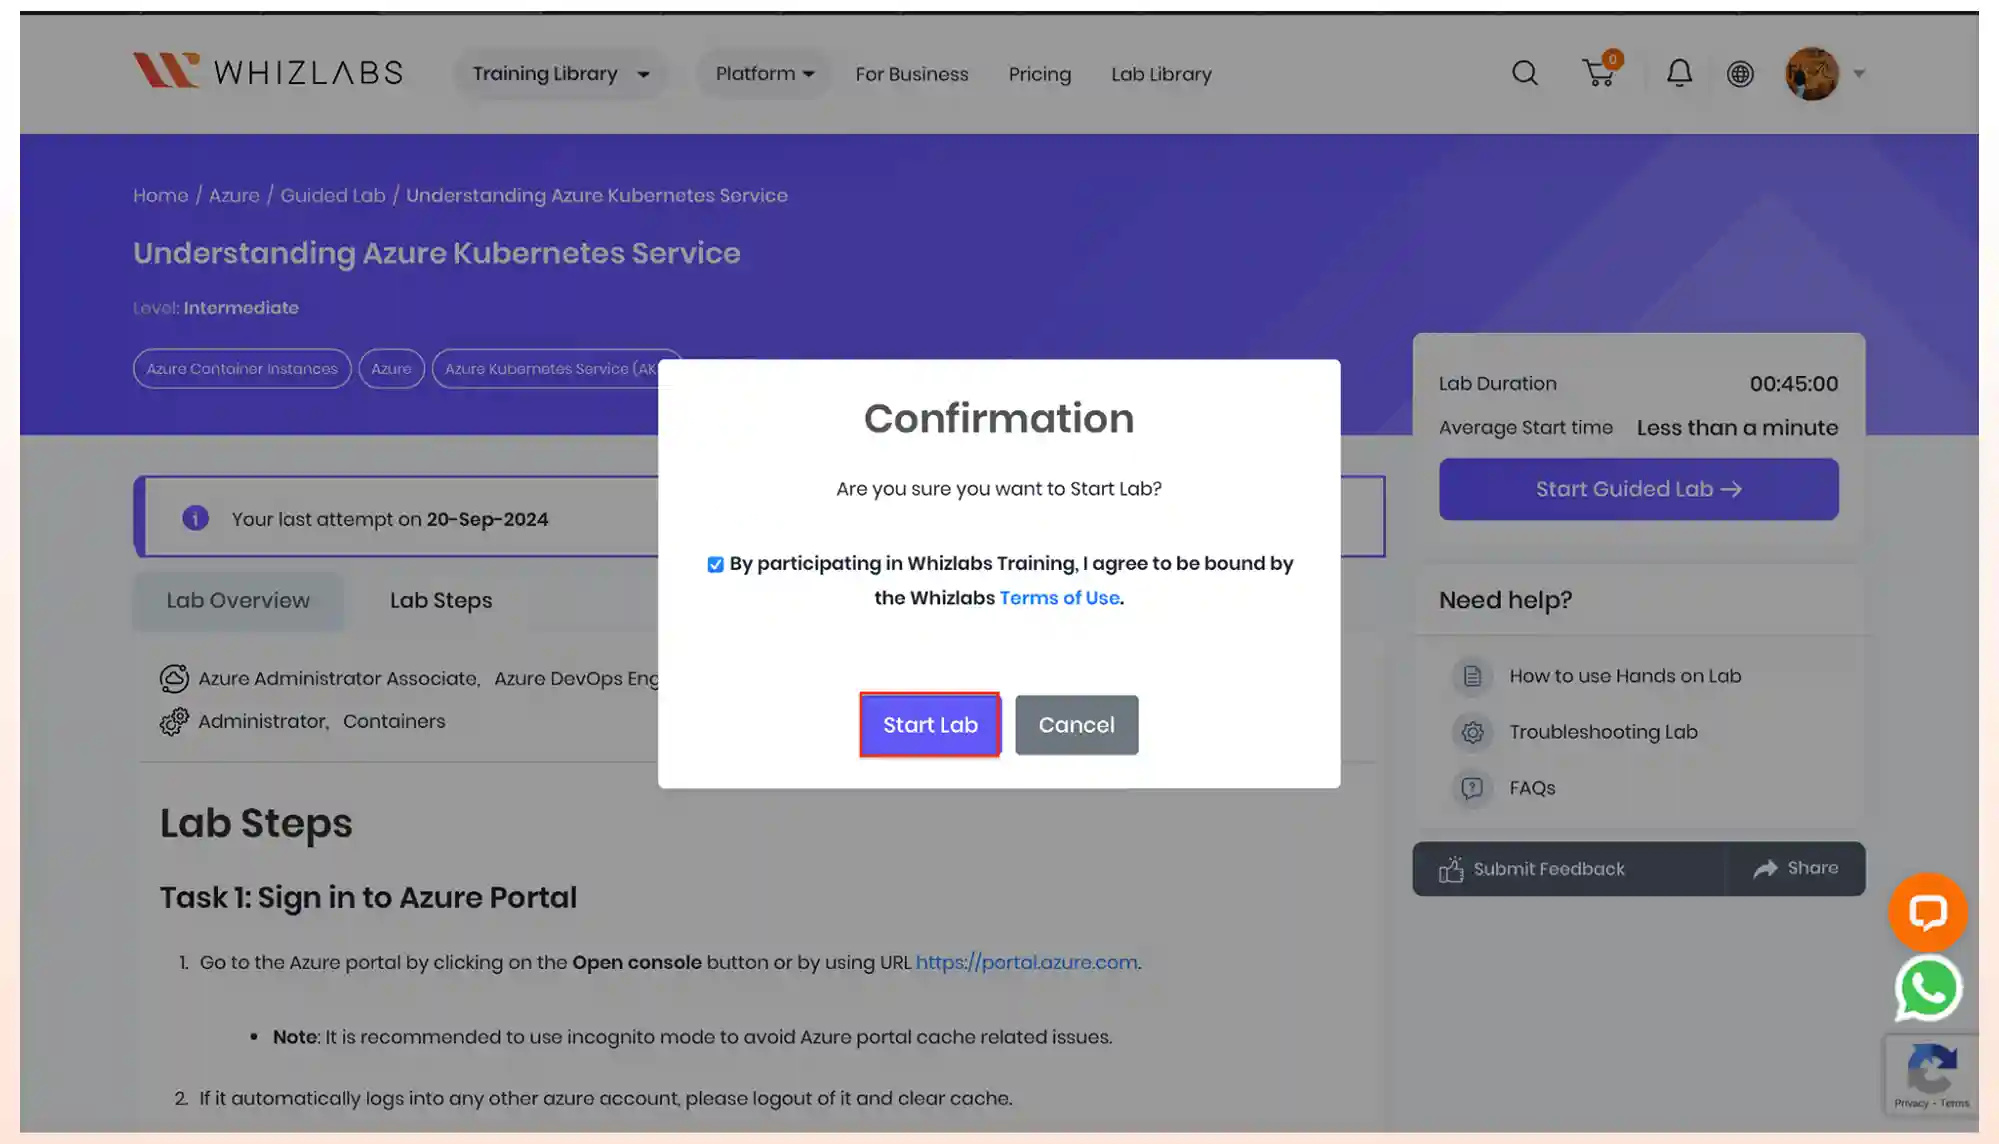
5. To start the lab, we must enable the button by participating in Whizlabs Training. Agree to the Whizlabs Term of User and click ‘Start lab’.
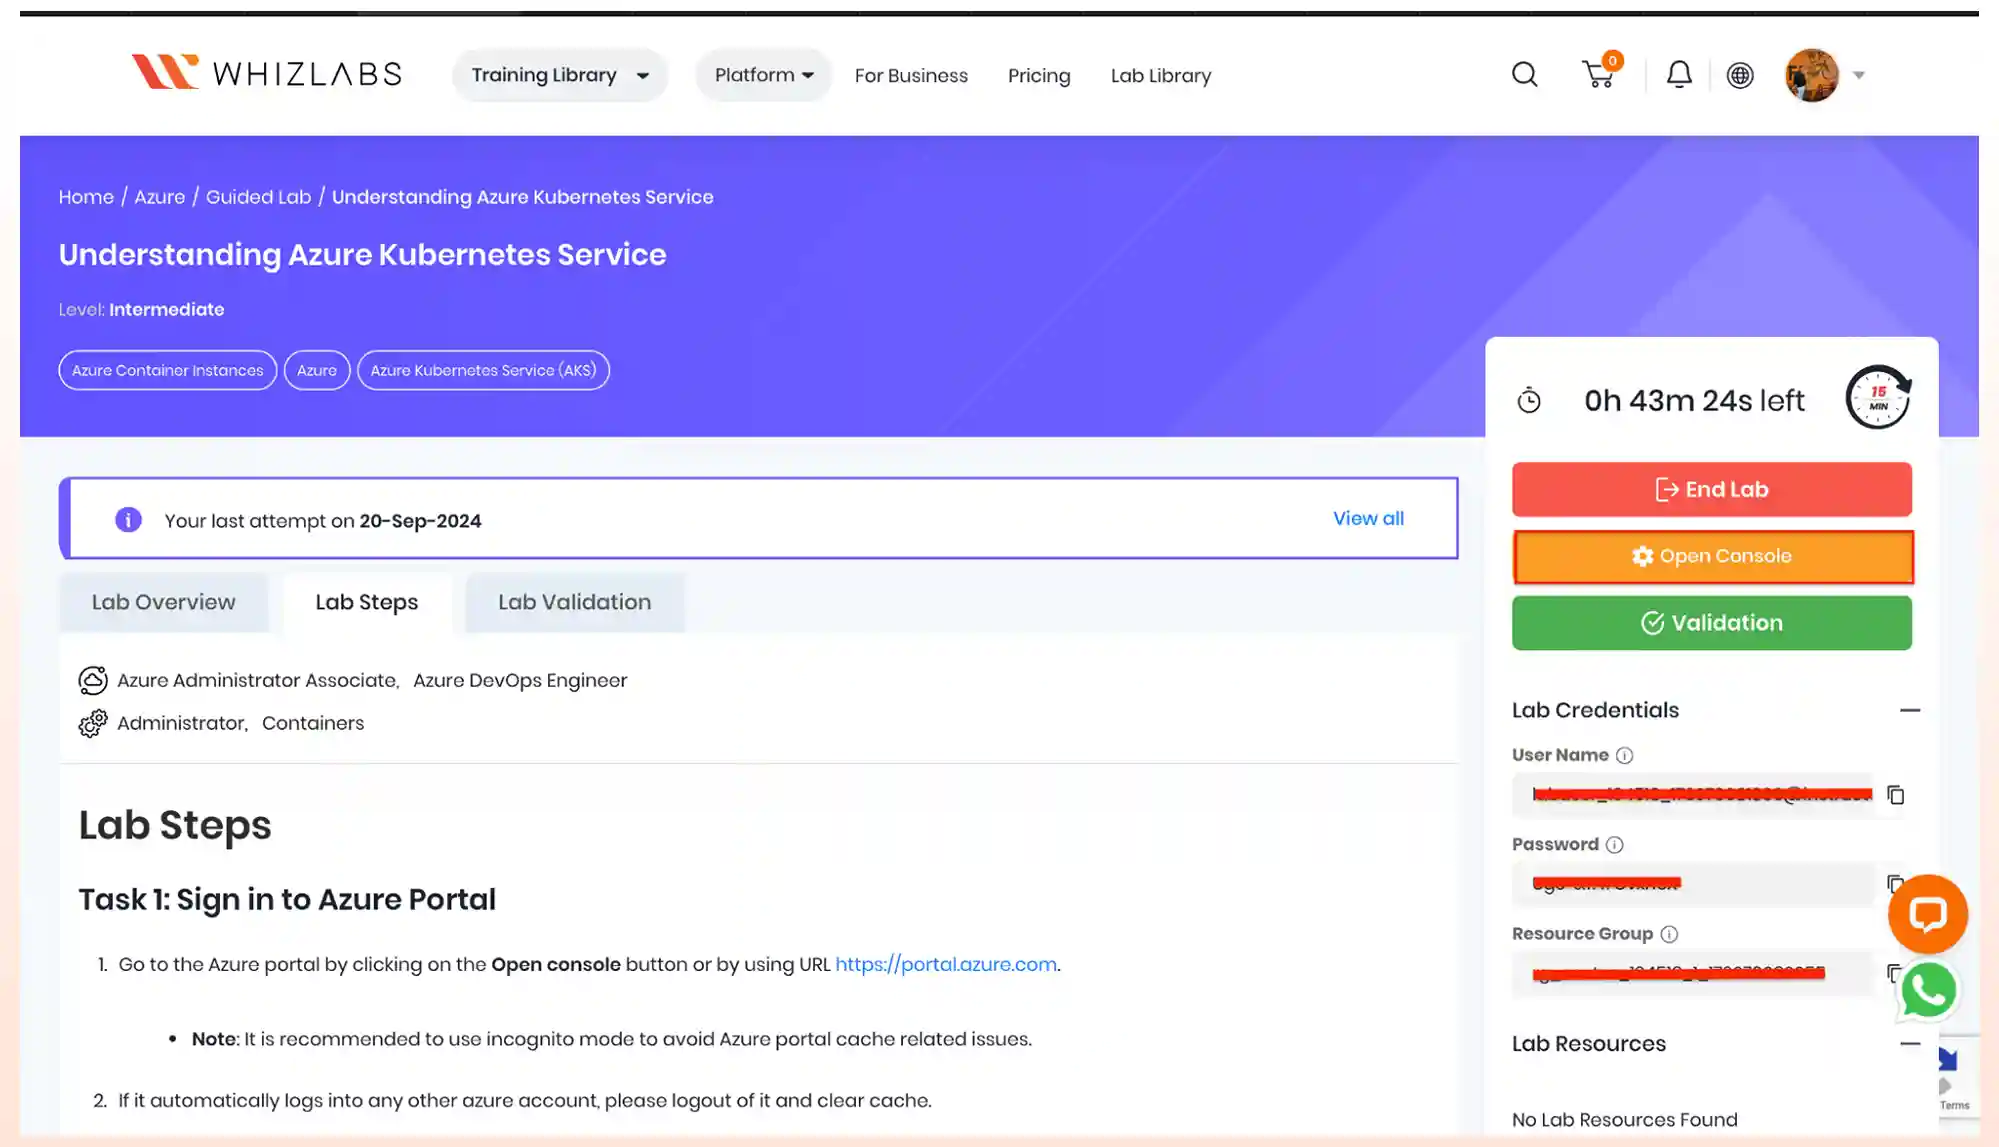
6. The lab will begin with Whizlabs User’s Credentials, including Username and password. We provide lab steps along with the screenshots to be followed in the Azure Portal. Click on the ‘Open Console’ Button which will redirect you to the Azure Portal.
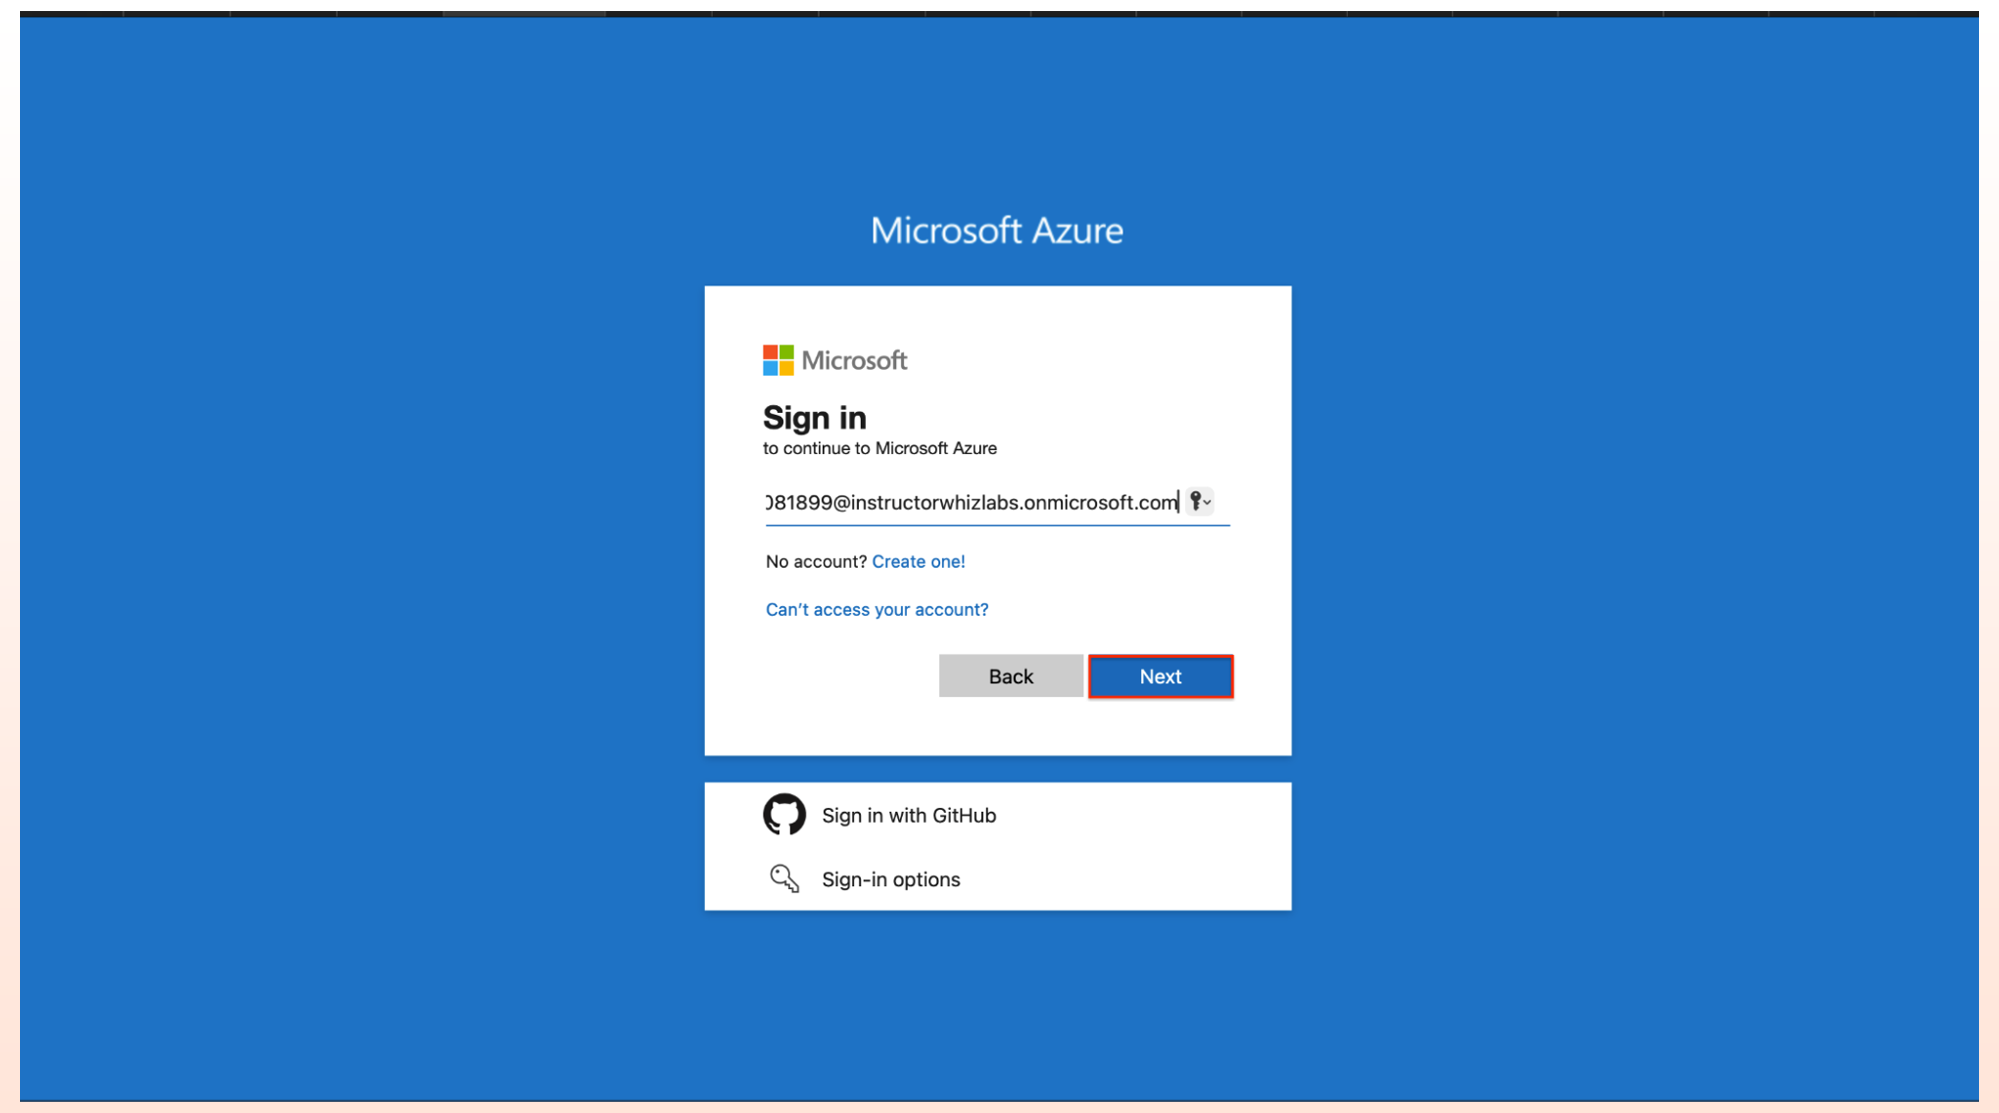
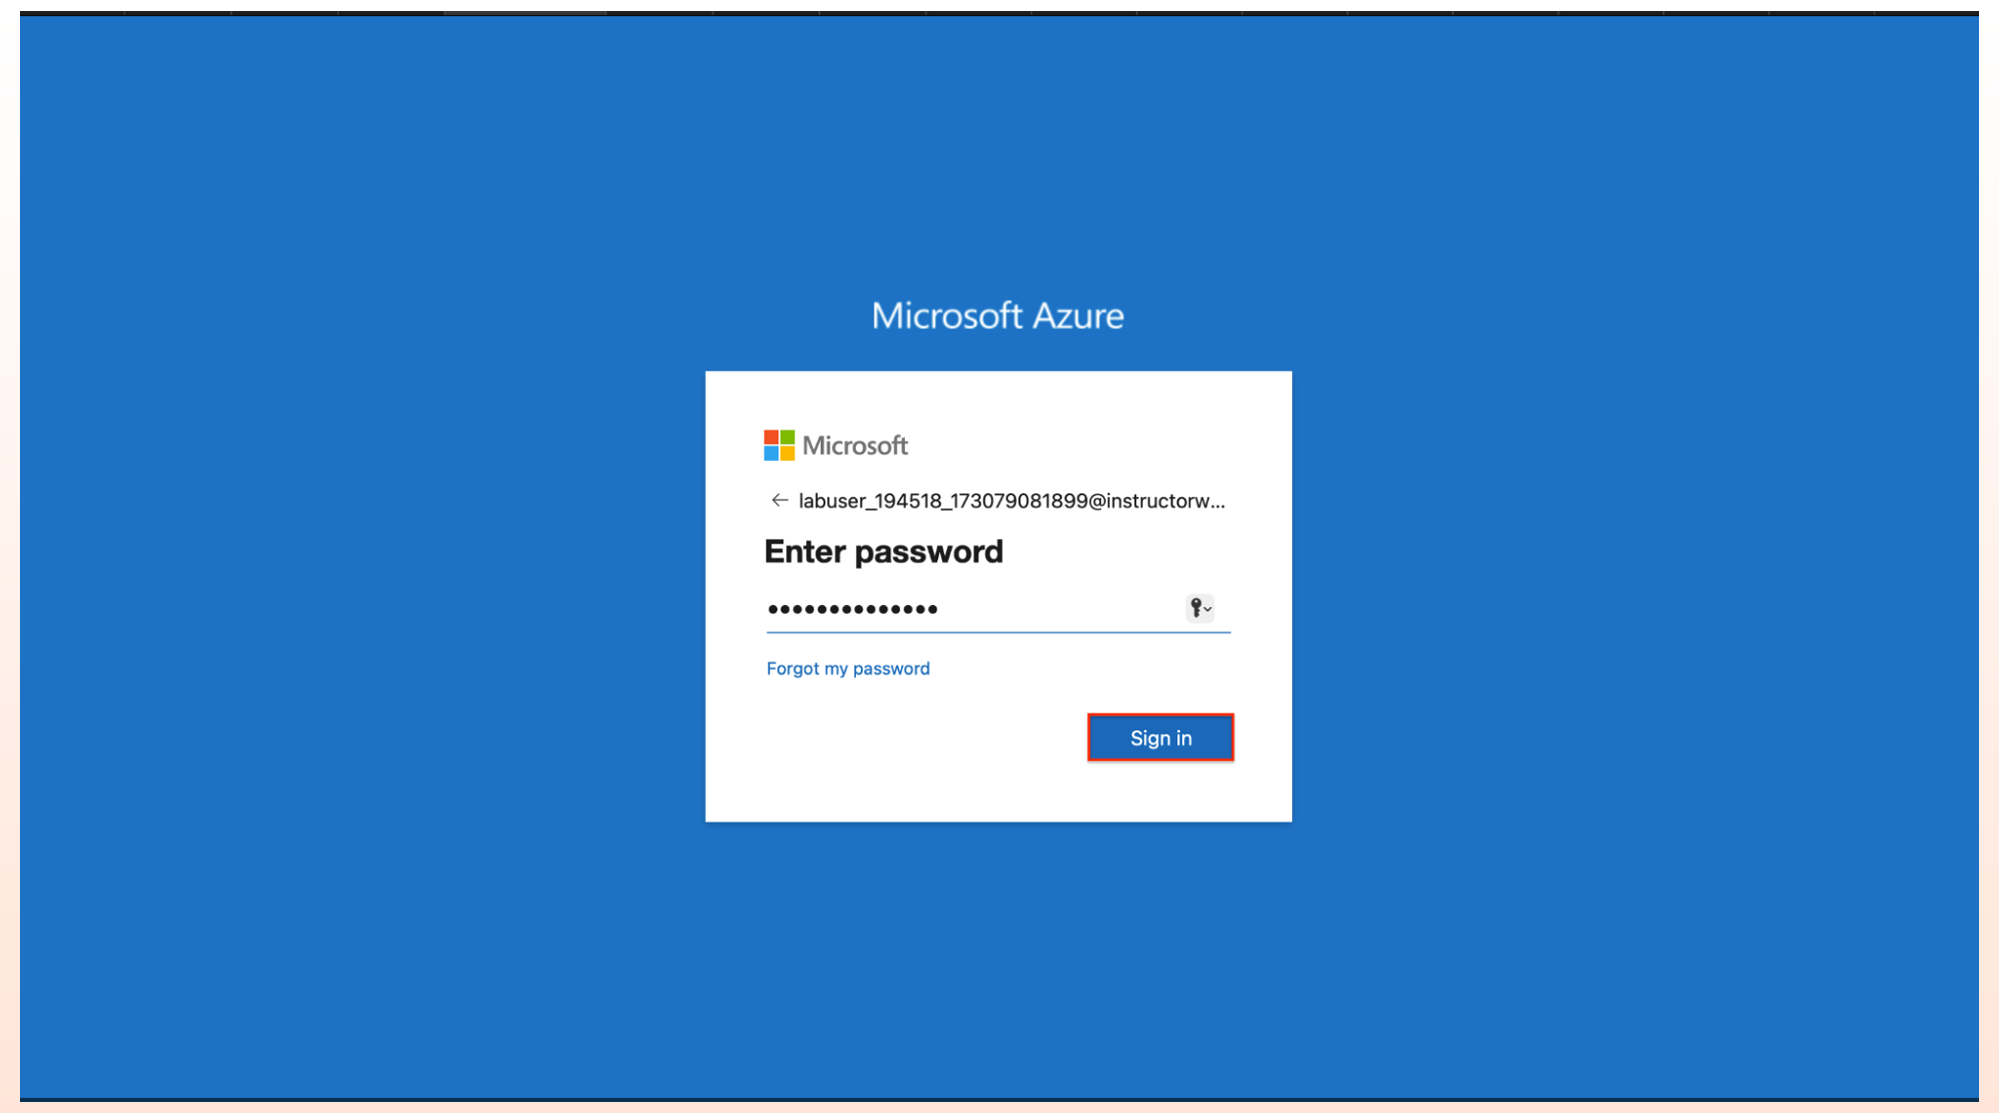
7. Please give the Username and Password provided by Whizlabs on the Sign-in Page.
Creation of Azure Kubernetes Service
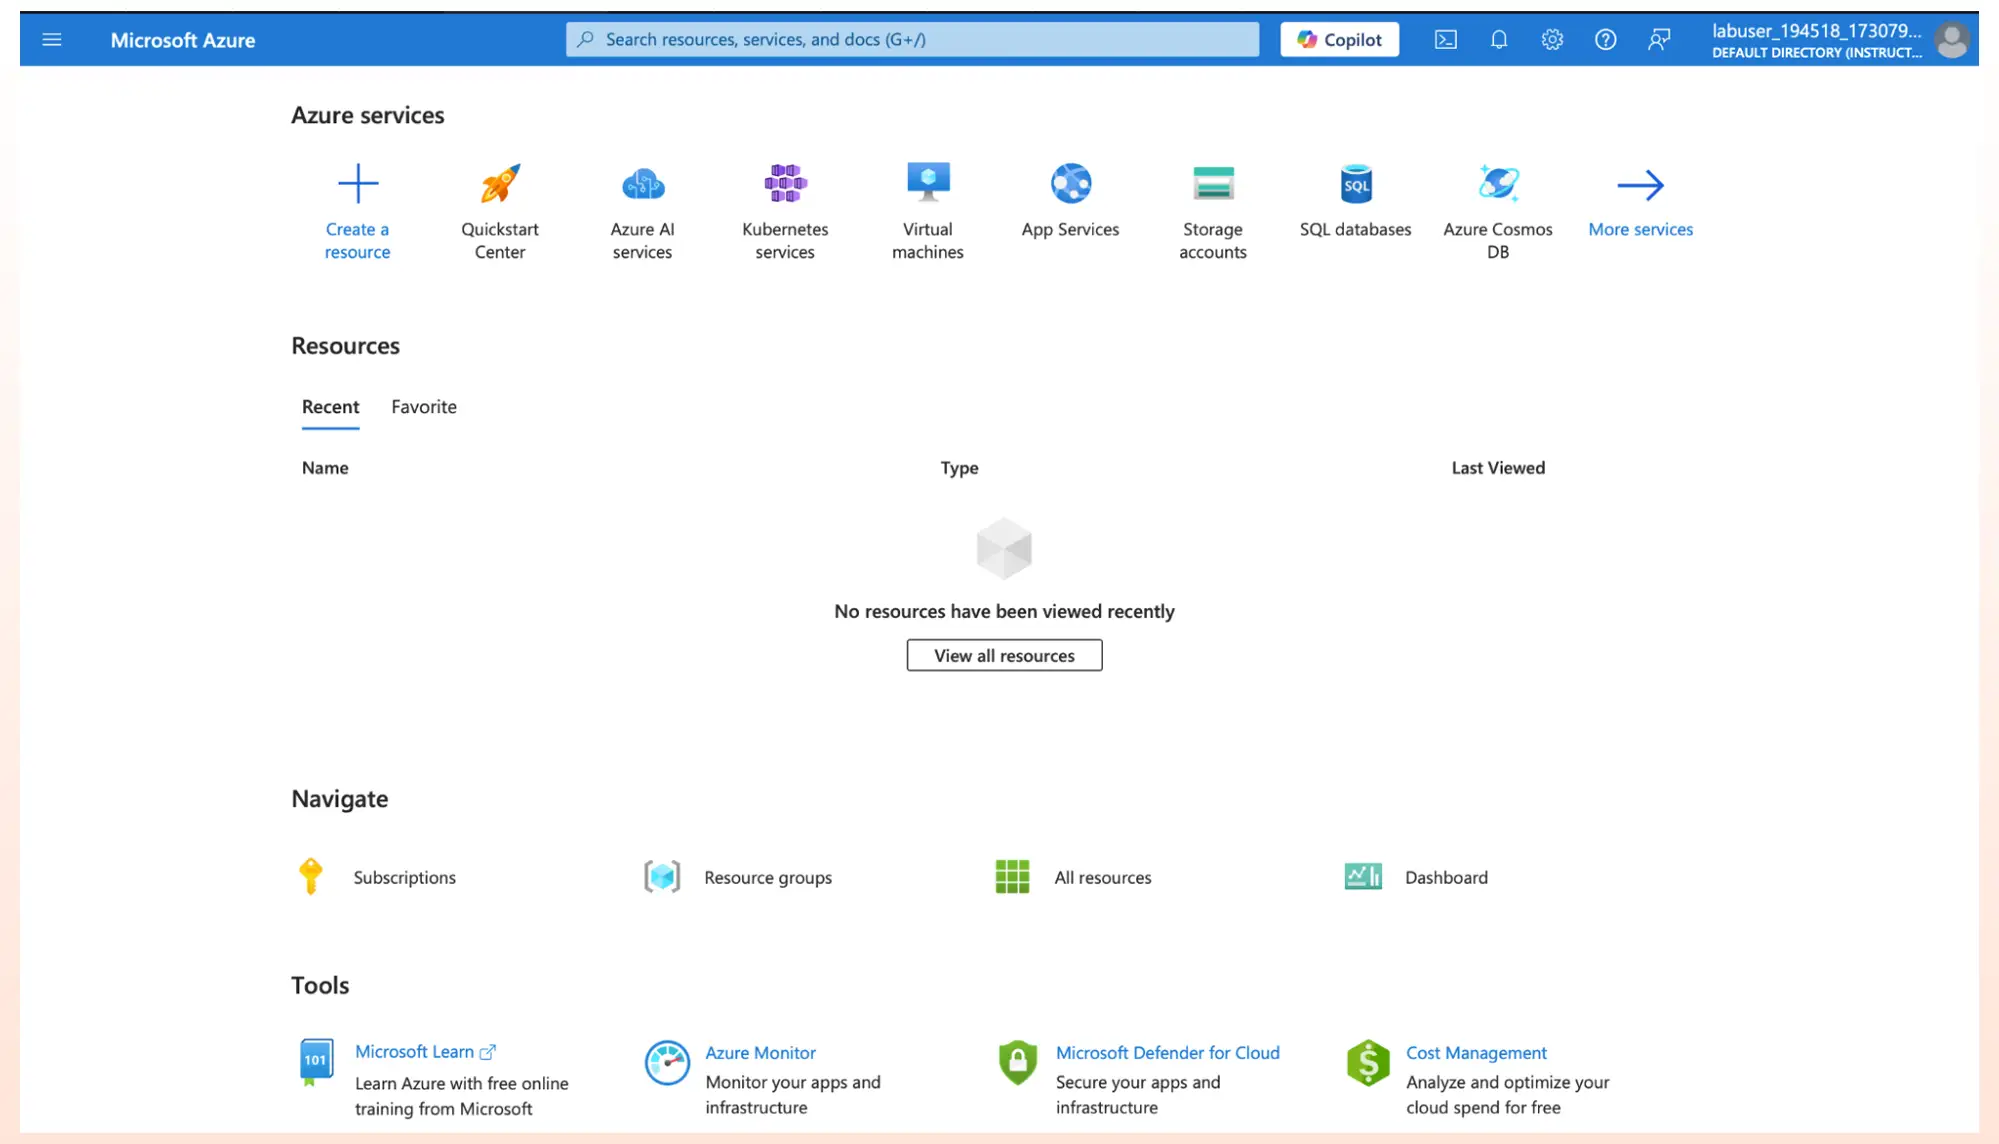
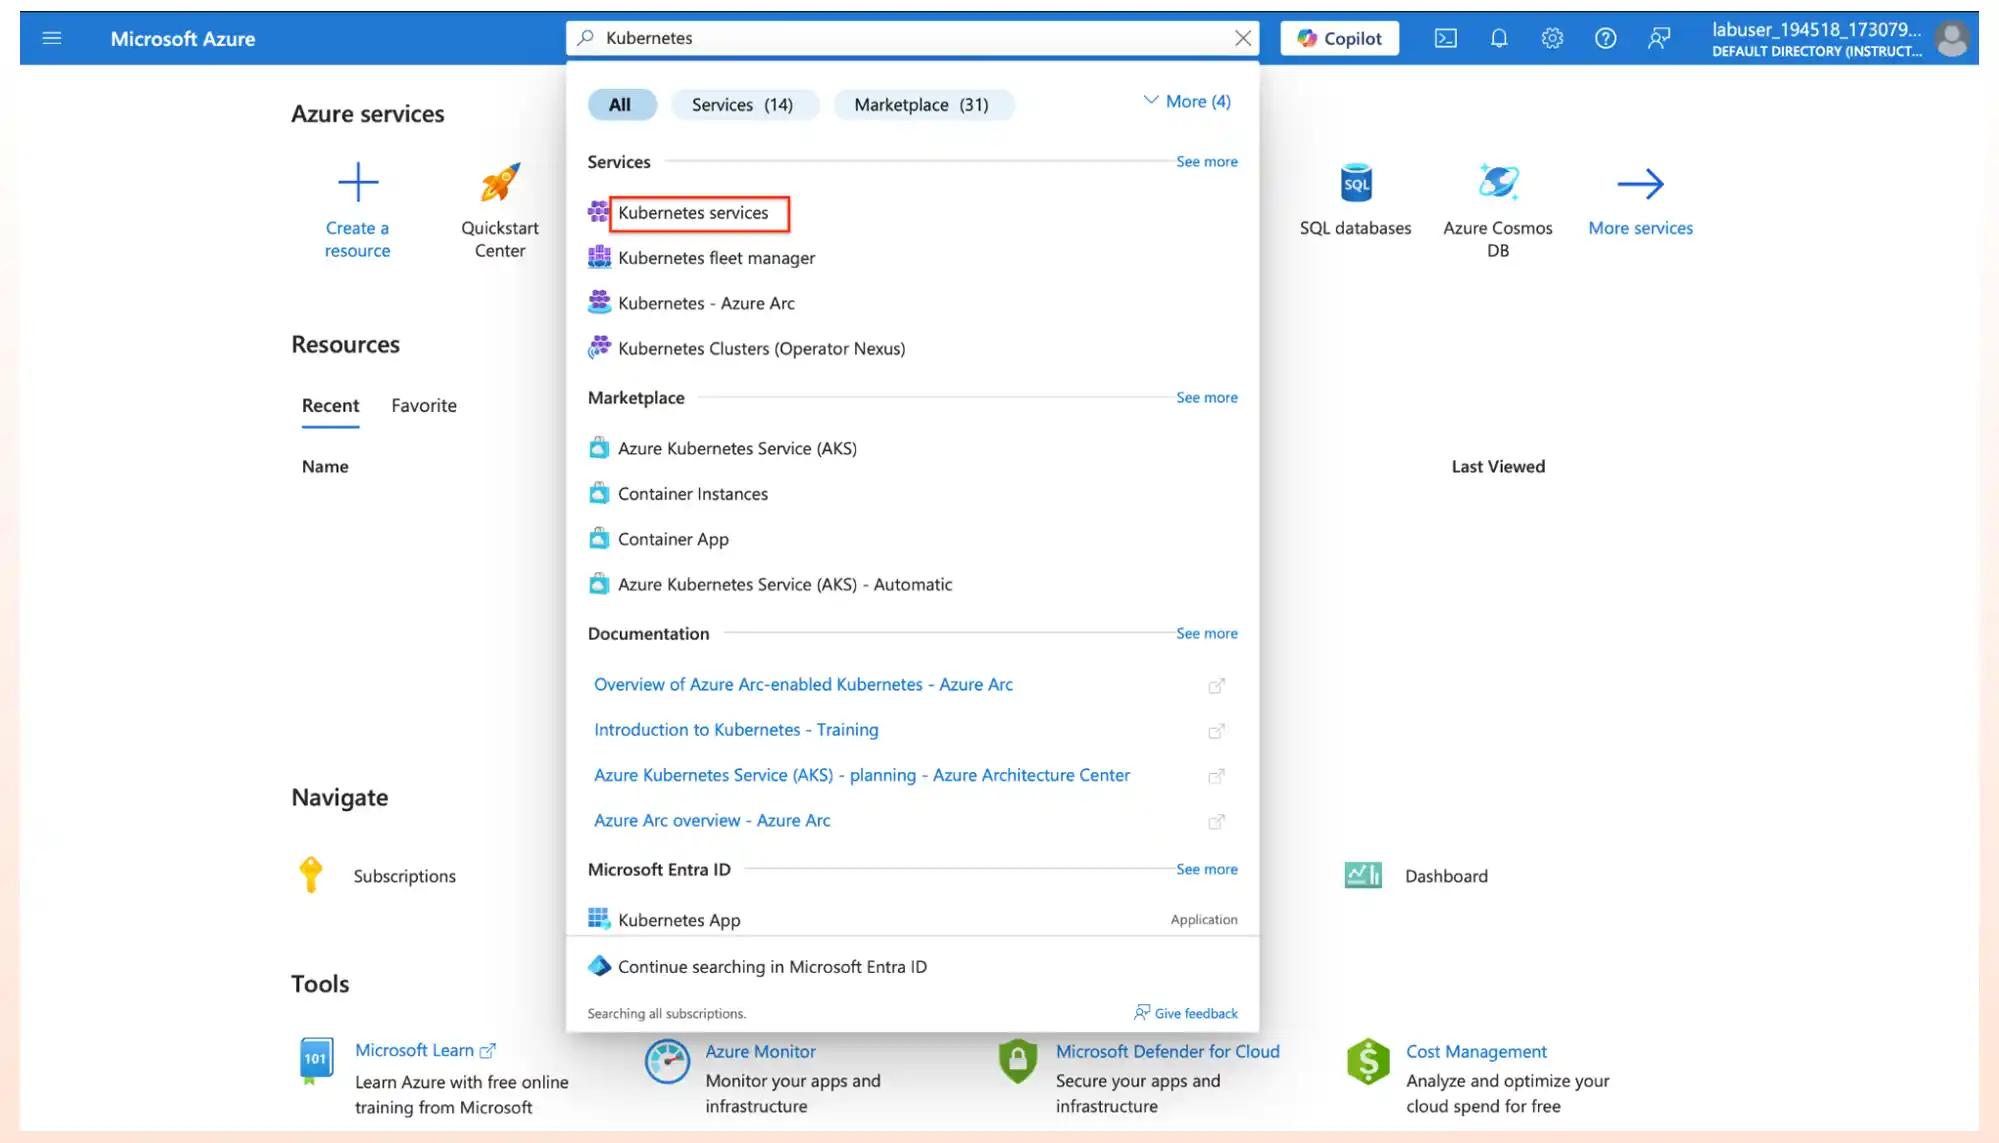
- Once the Azure Portal is opened, We will create the Azure Kubernetes Service through the Azure Portal. In the Azure Portal search for Azure Kubernetes Service and Click on Azure Kubernetes Service.
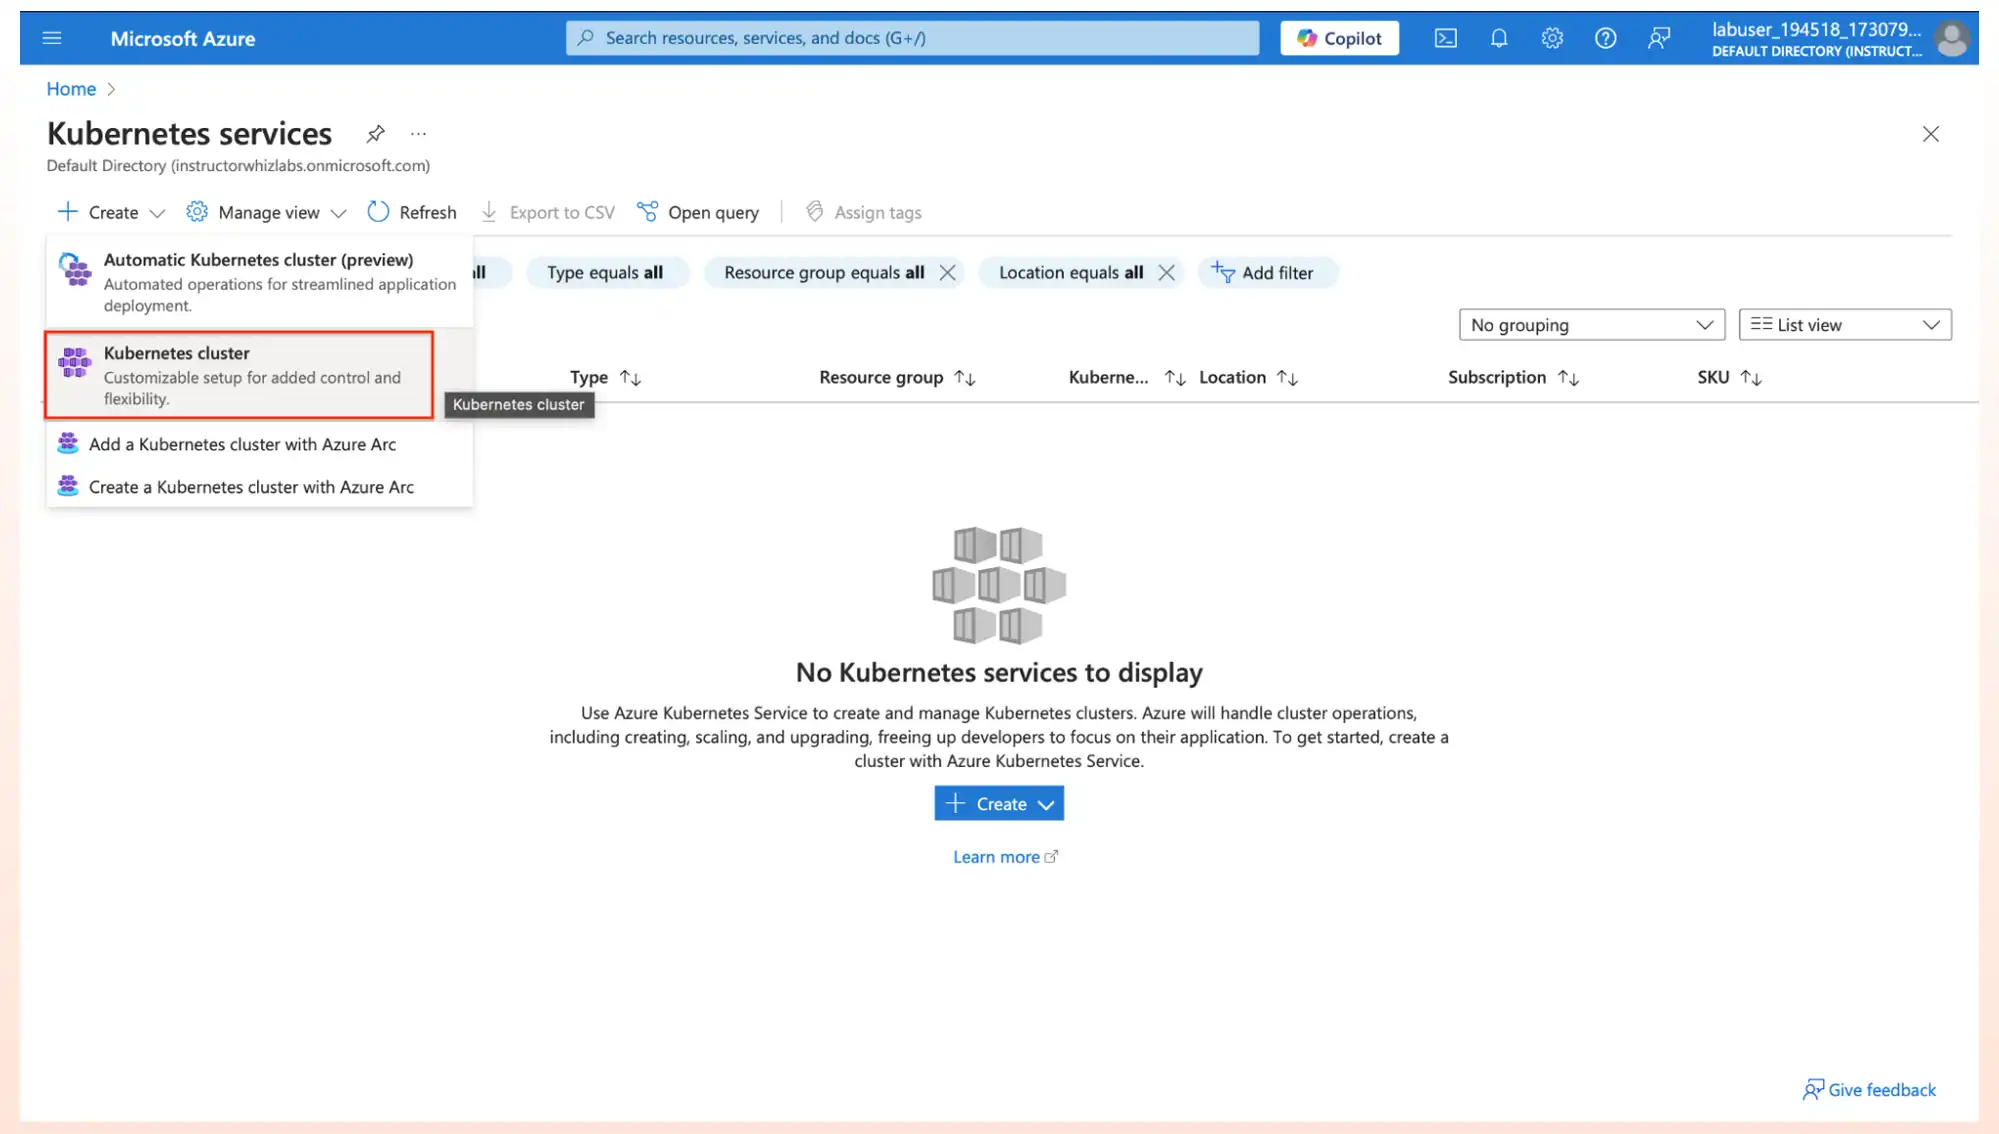
2. Under Kubernetes Services, Click on Kubernetes cluster to start creating the cluster.
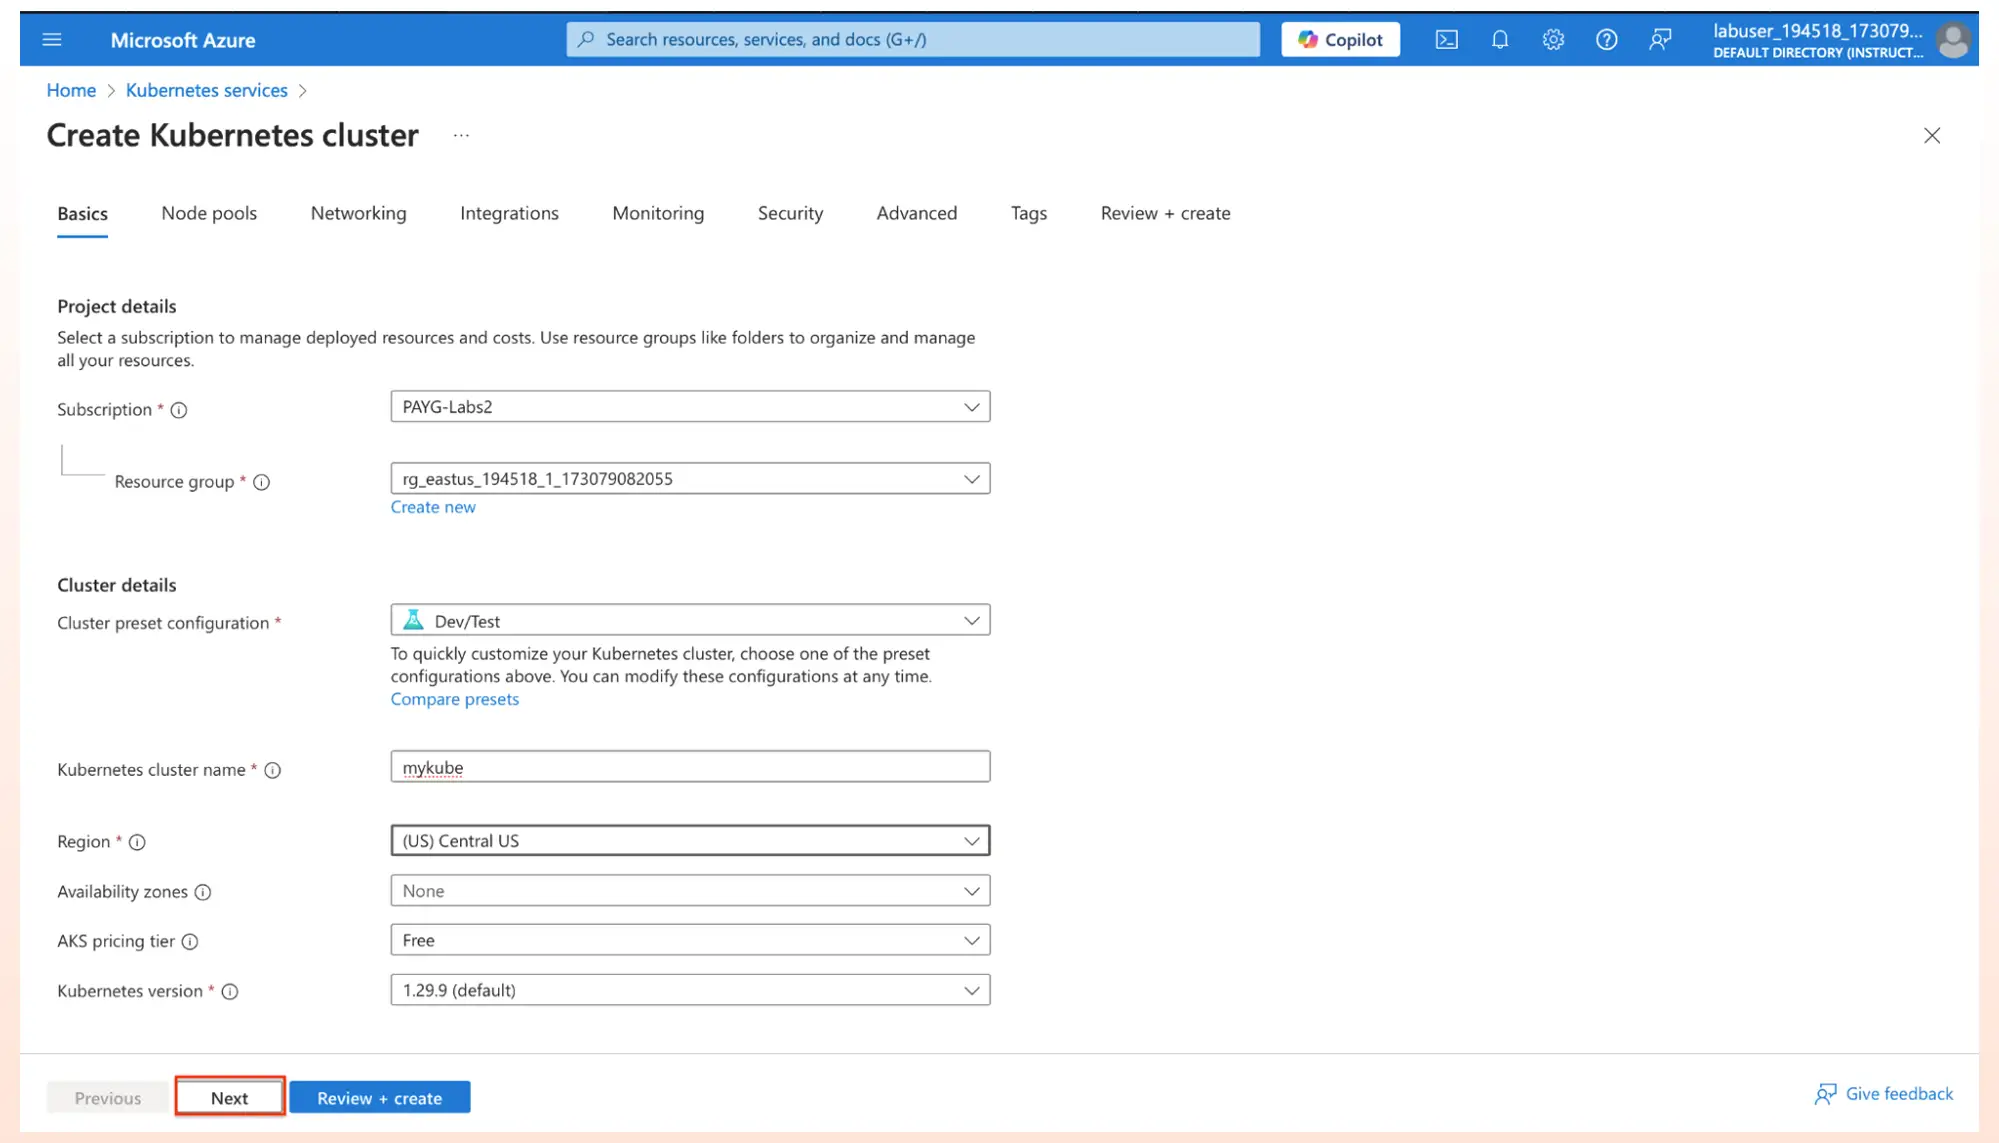
3. We need to fill in the necessary details in order to proceed with the creation of the cluster.
Project Details:
- Resource Group – Select the Resource Group as per your subscription
Cluster Details:
- Cluster Preset Configuration – Select Dev/Test under Cluster Preset Configuration
- Kubernetes Cluster Name – Give your own name for the cluster
- Region: Central US
- Click on next button
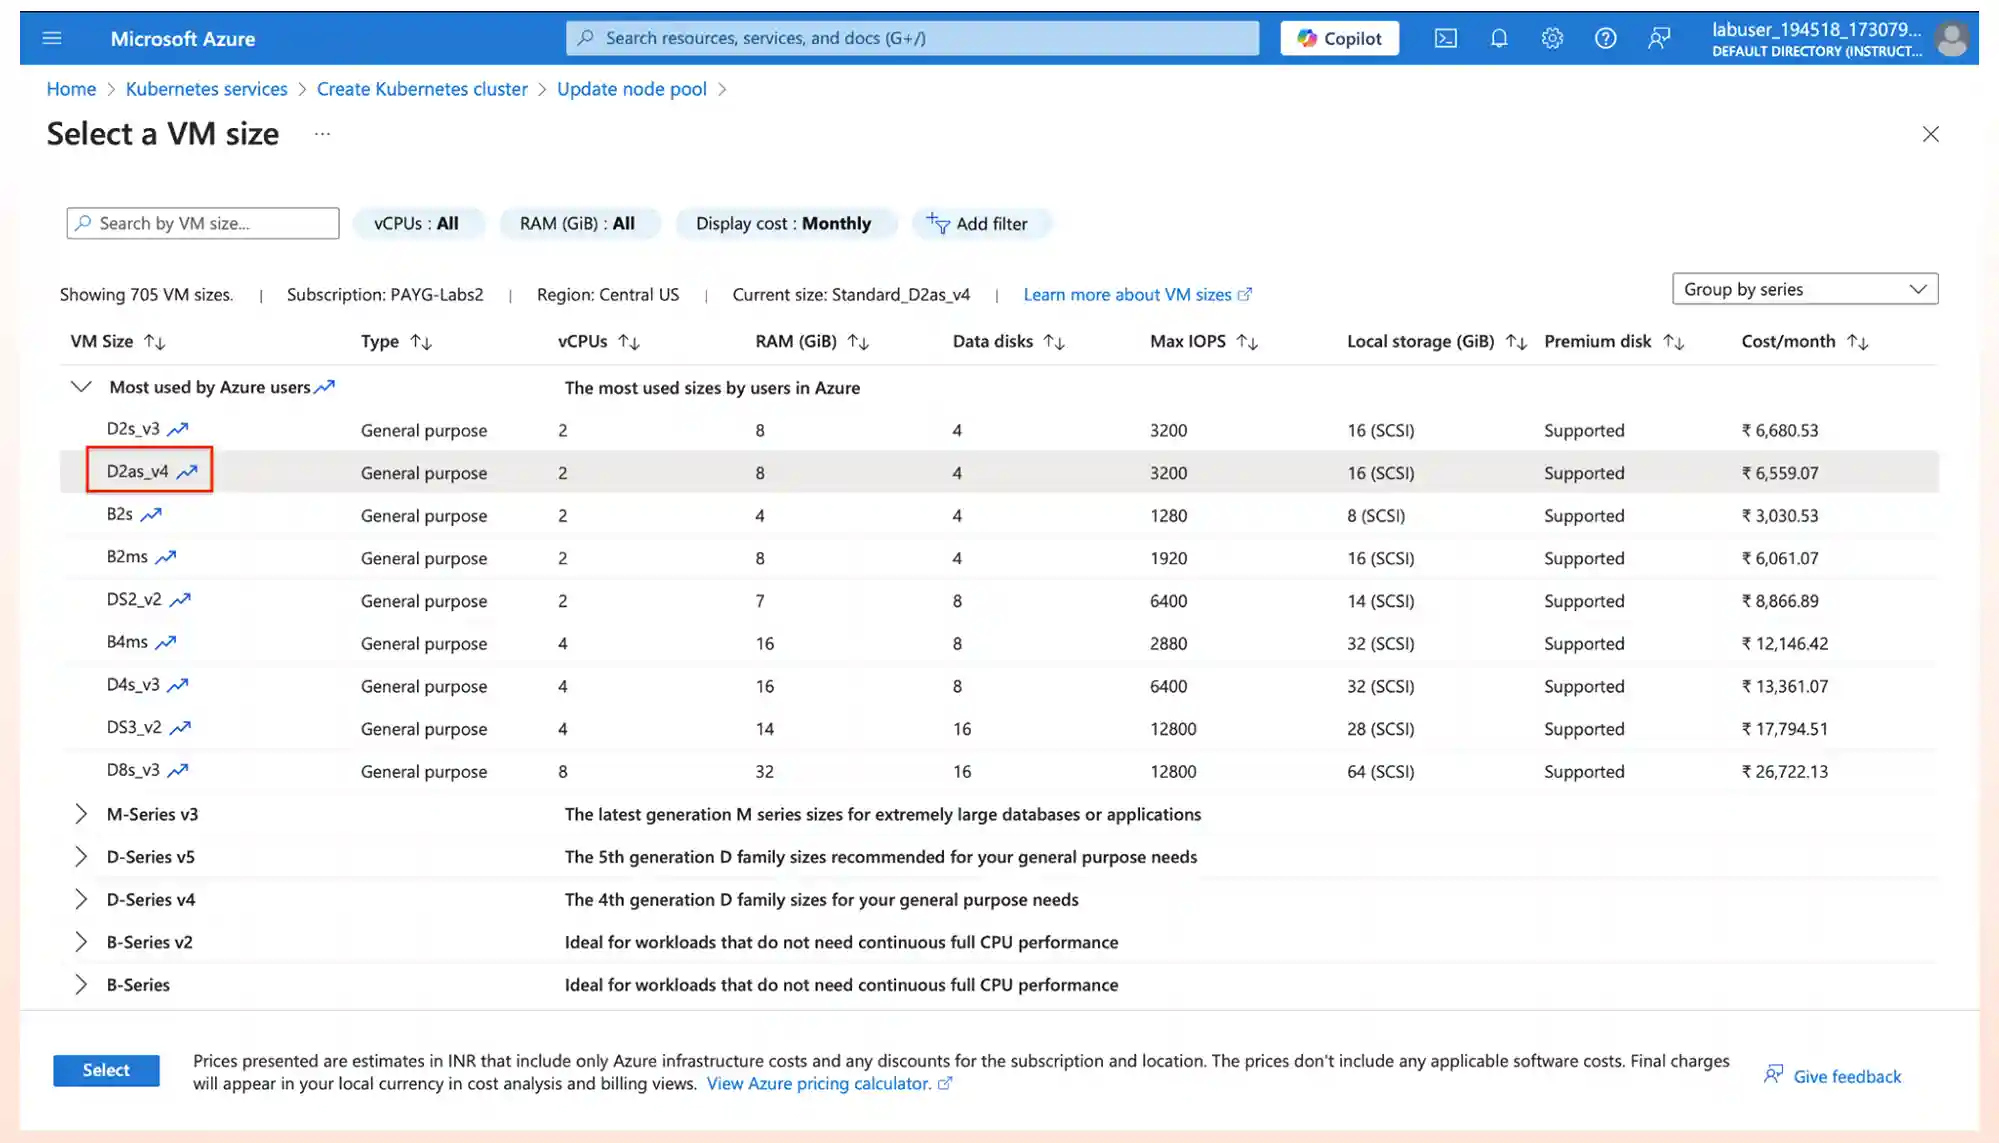
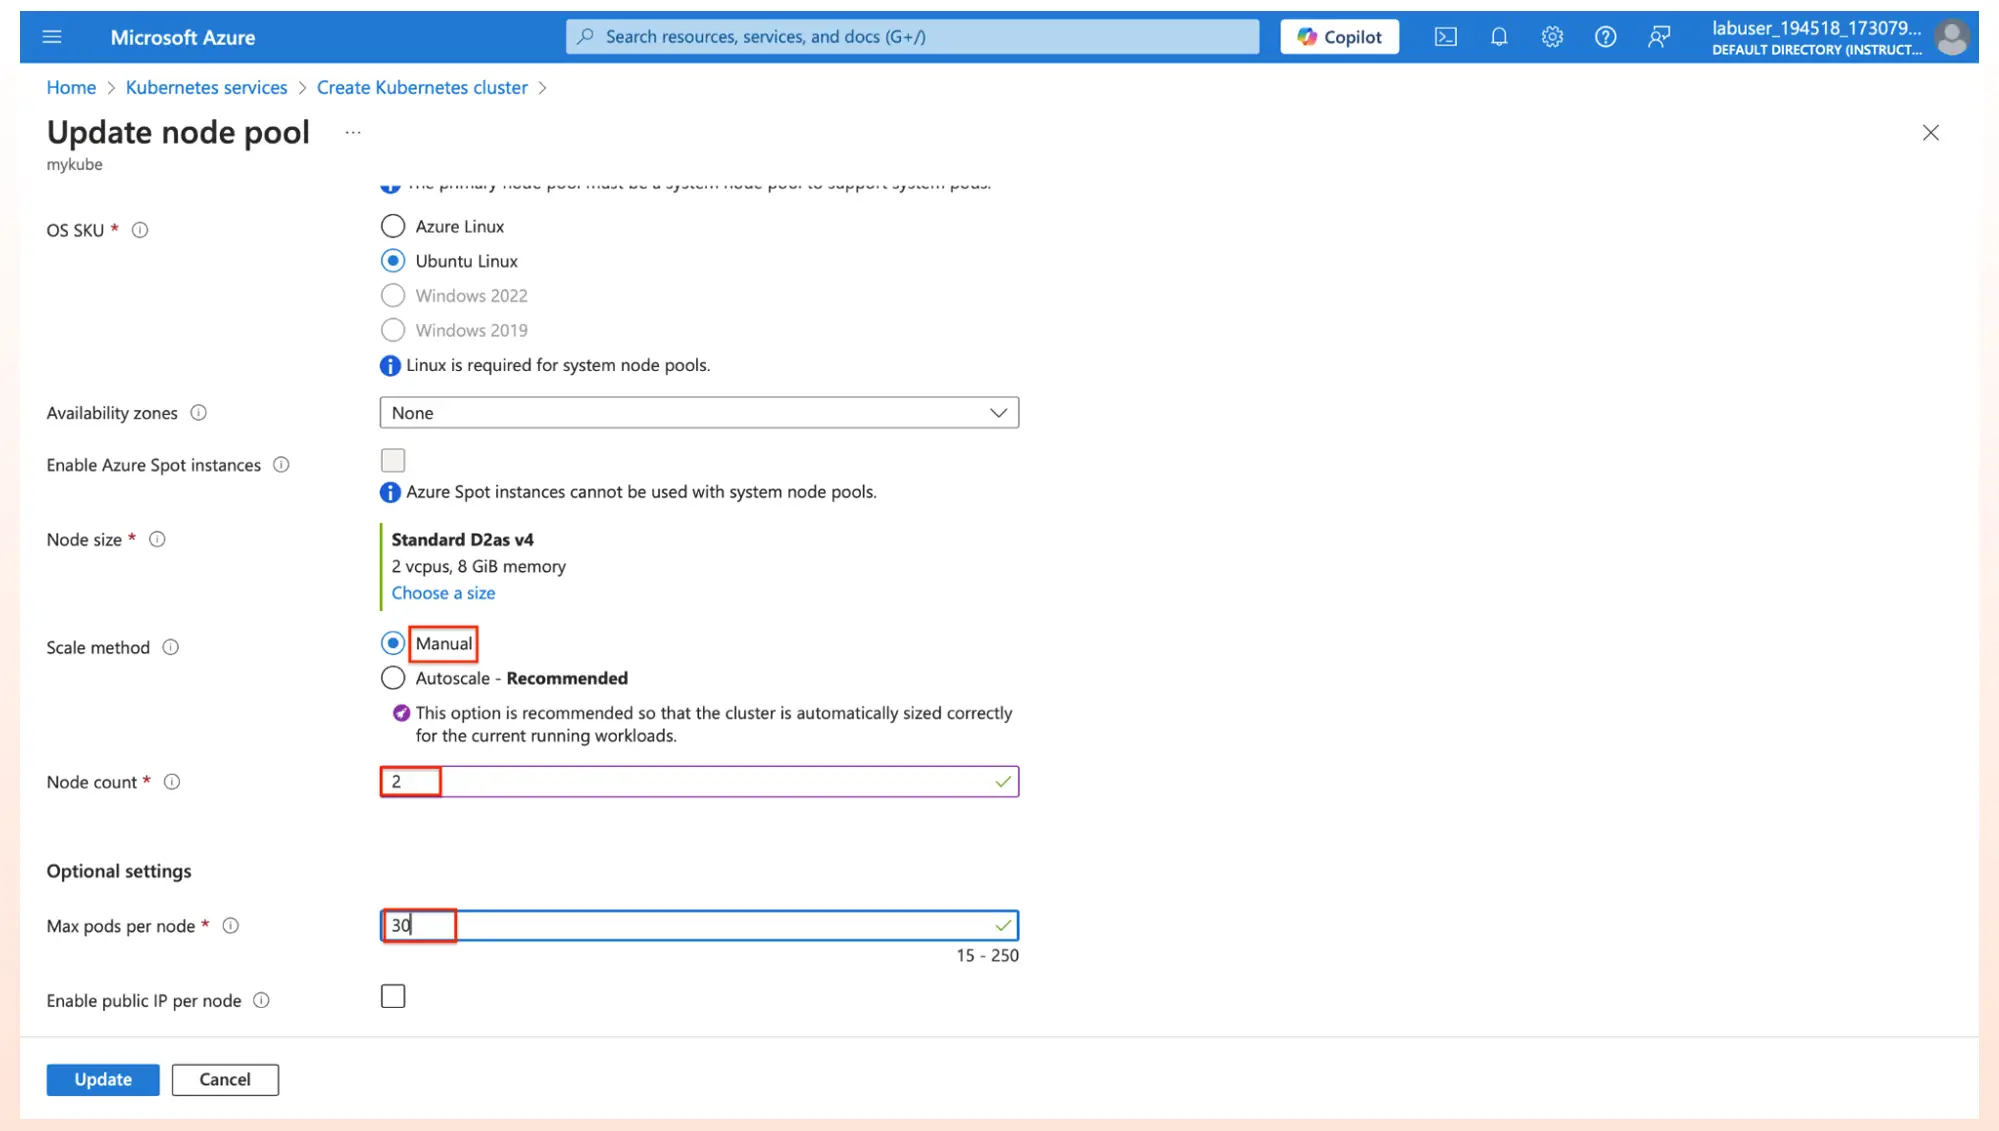
4. Now go to the Node Pool tab and in the default node pool, Select the node size, In that page enter the following details
- Node Size – Click on select size, and select Standard D2as v4 and click OK
- Scale method – Select Manual
- Node count – Enter 2
- Max pods per nodes – Enter 30
- Click on Update
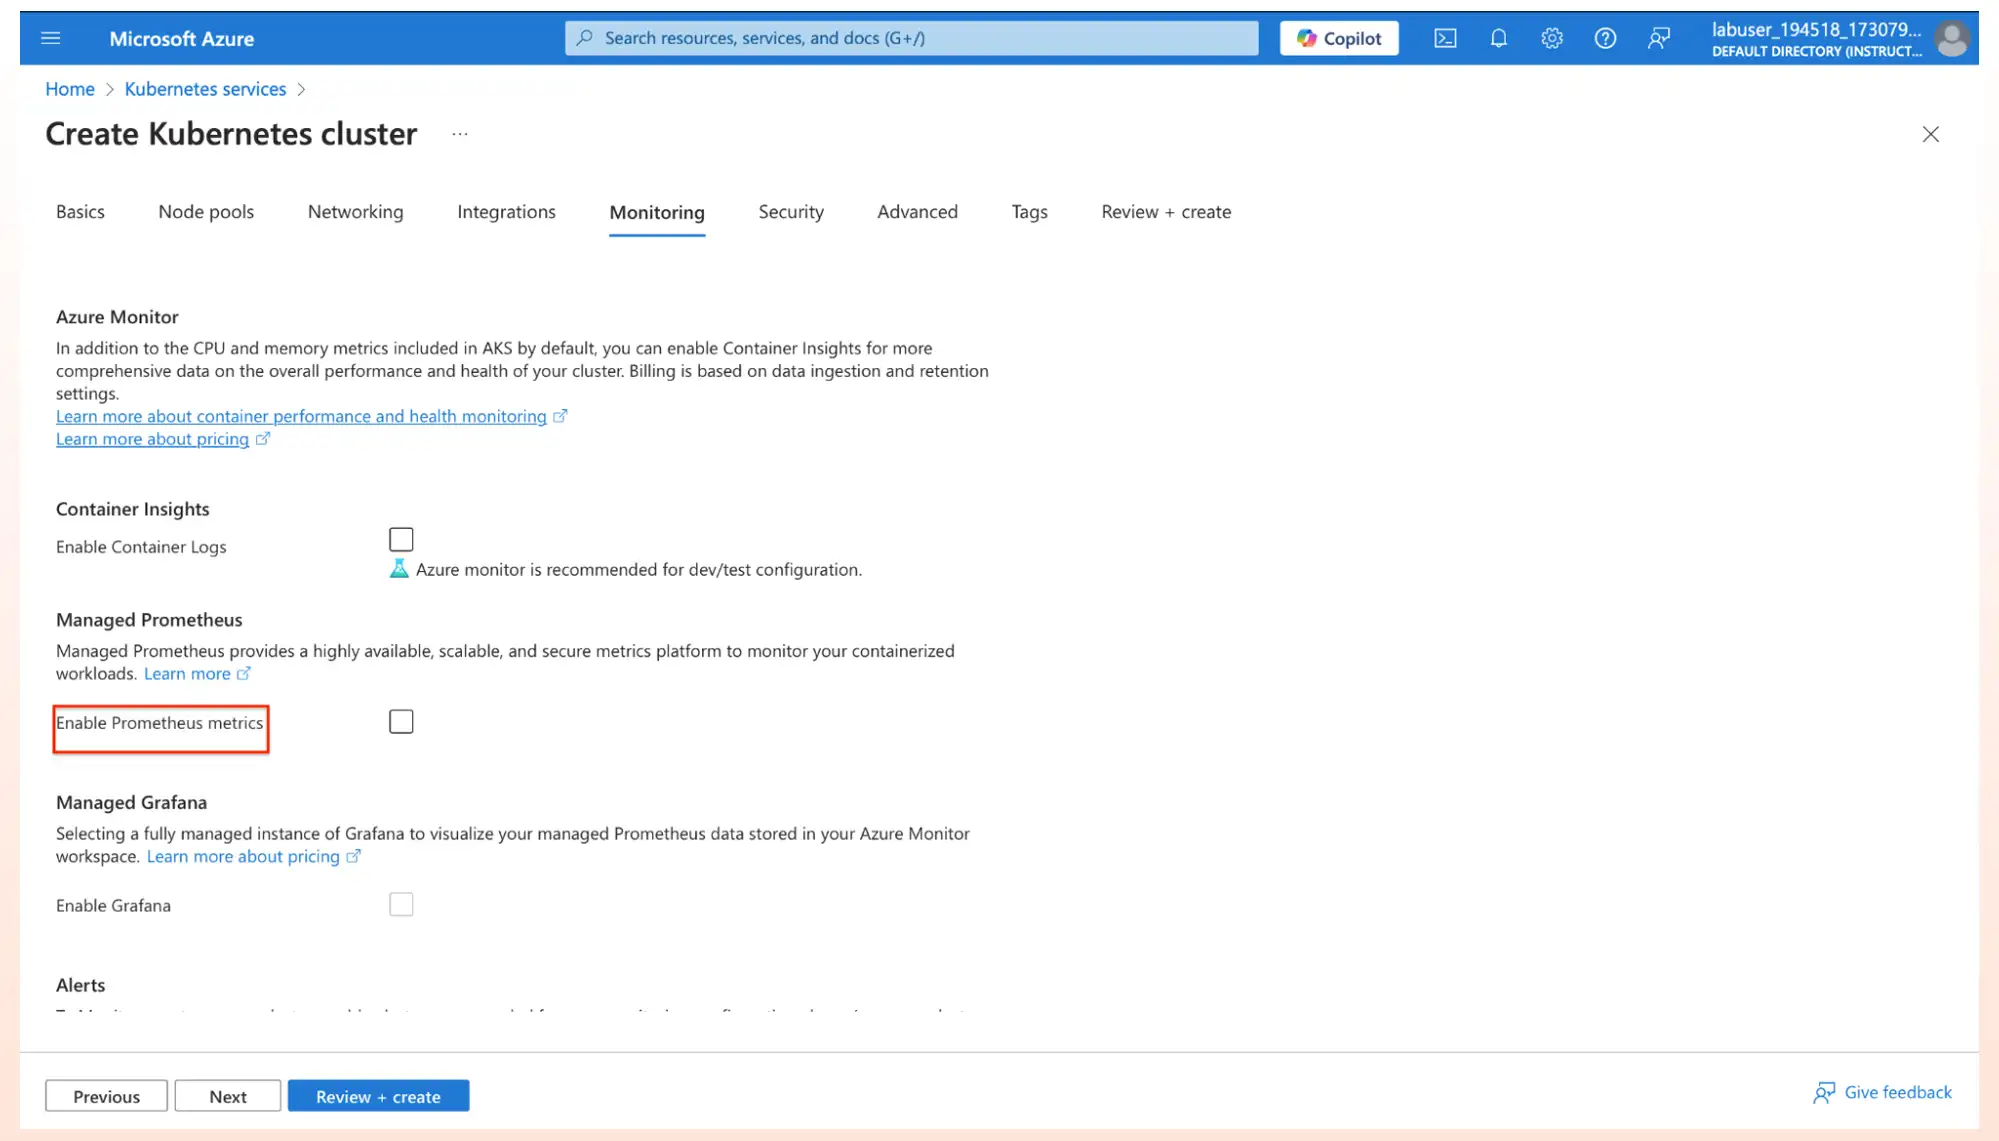
5. Under the Monitoring tab, Uncheck Enable Prometheus Monitoring button.
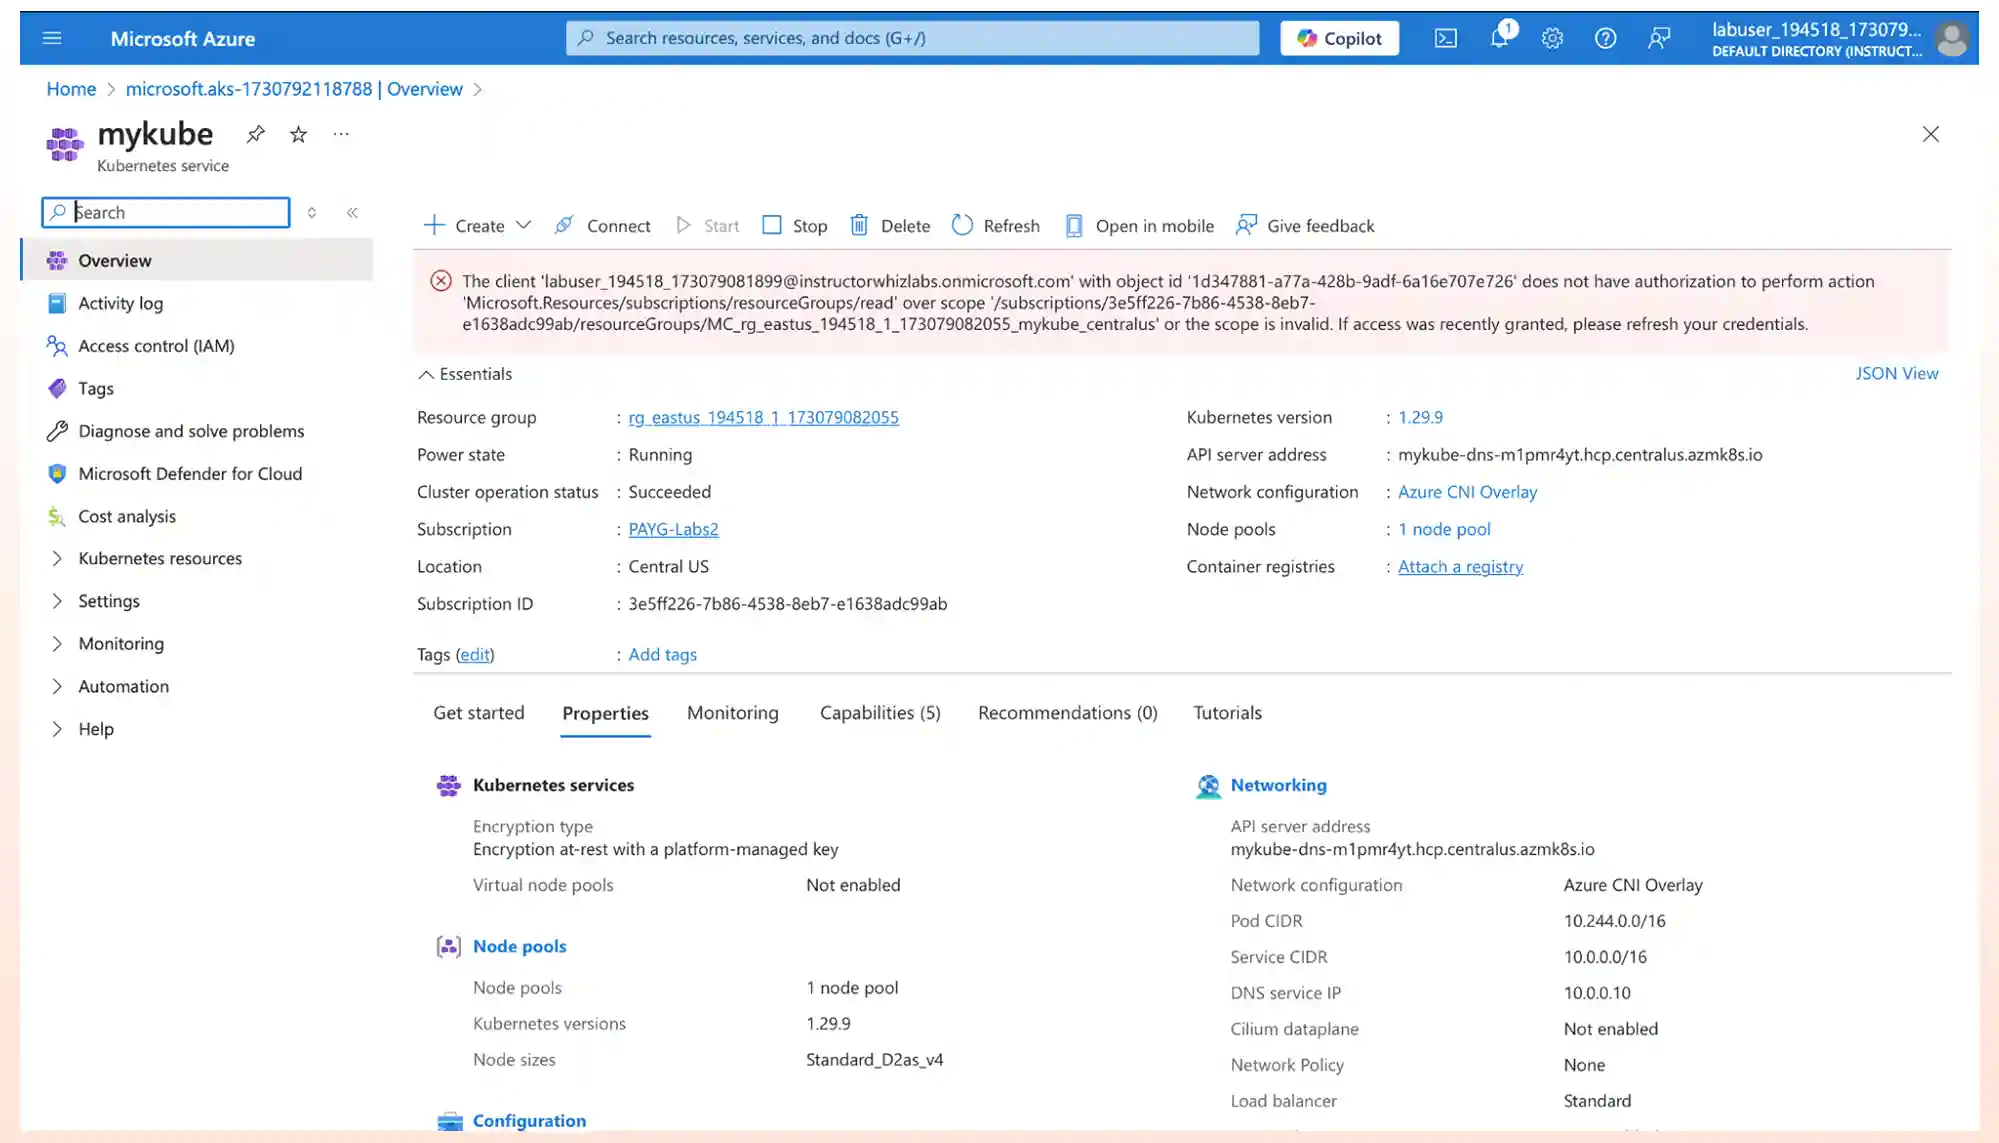
6. Click on Review and Create, so that Azure Kubernetes Service will be deployed. After the deployment is complete, Click on go to resource.
Deploy a Container on AKS
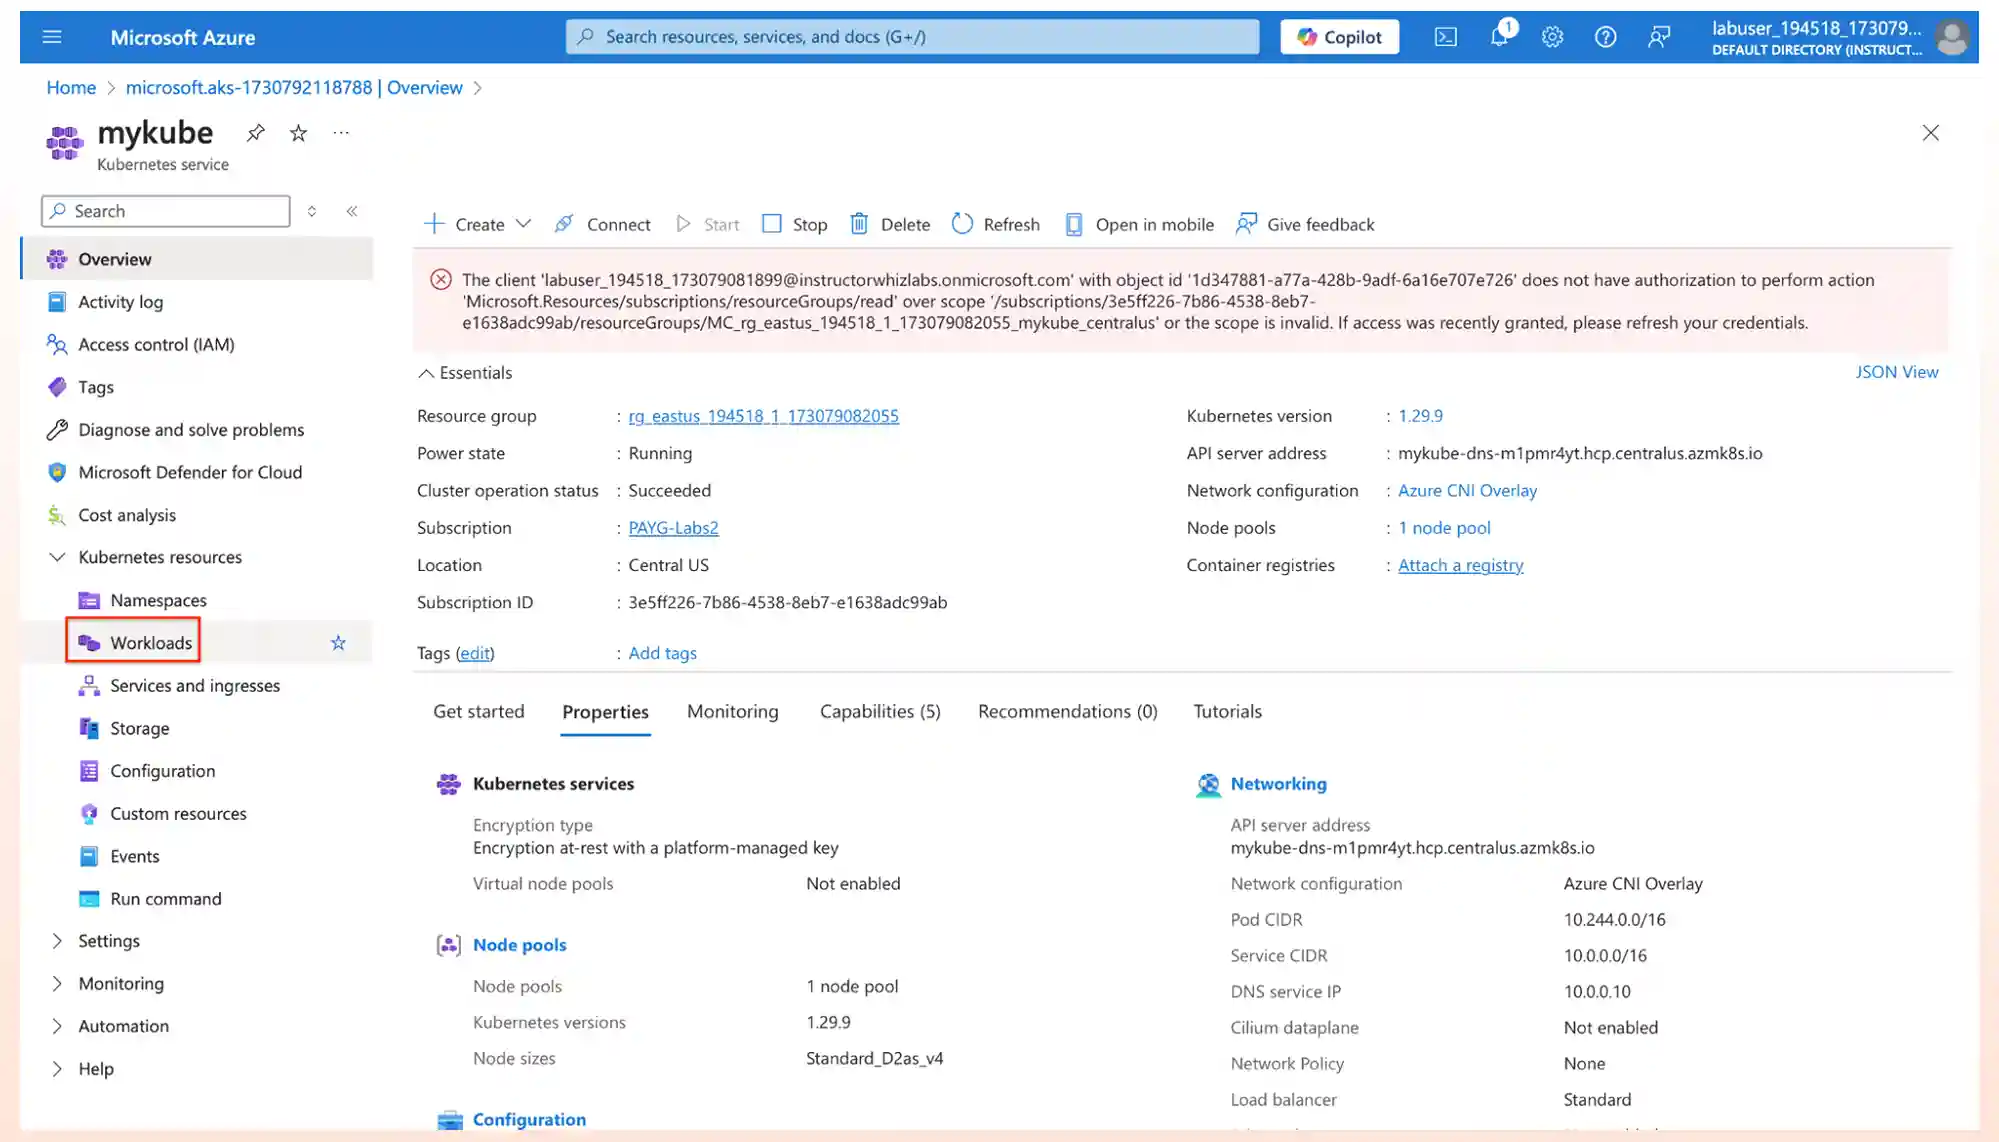
- On the left side panel, under Kubernetes resources, select workloads and click on create and apply a YAML.
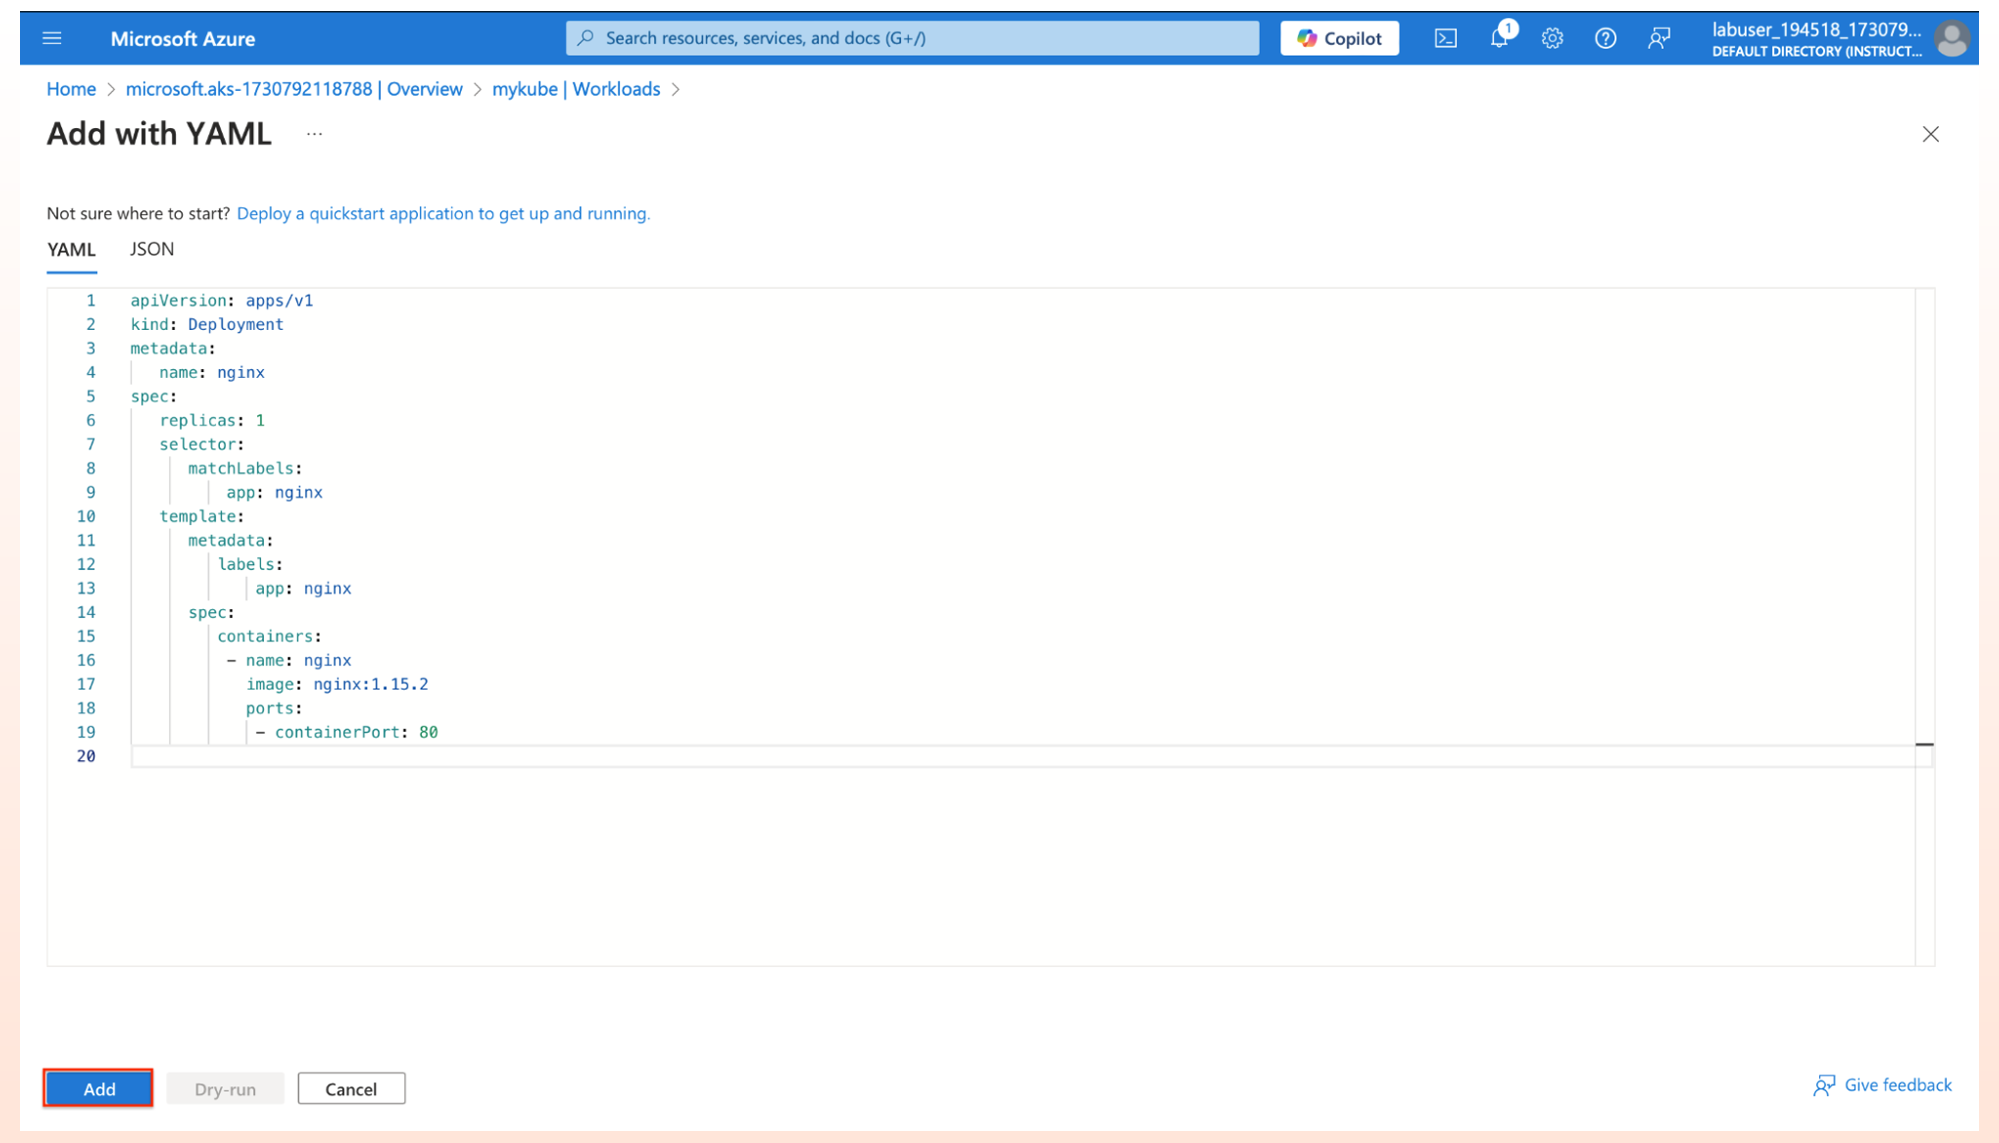
2.Copy and paste the below Yaml deployment in the yaml tab and click on Add.
apiVersion: apps/v1
kind: Deployment
metadata:
   name: nginx
spec:
   replicas: 1
   selector:
      matchLabels:
          app: nginx
   template:
      metadata:
         labels:
             app: nginx
      spec:
         containers:
          - name: nginx
            image: nginx:1.15.2
            ports:
             - containerPort: 80
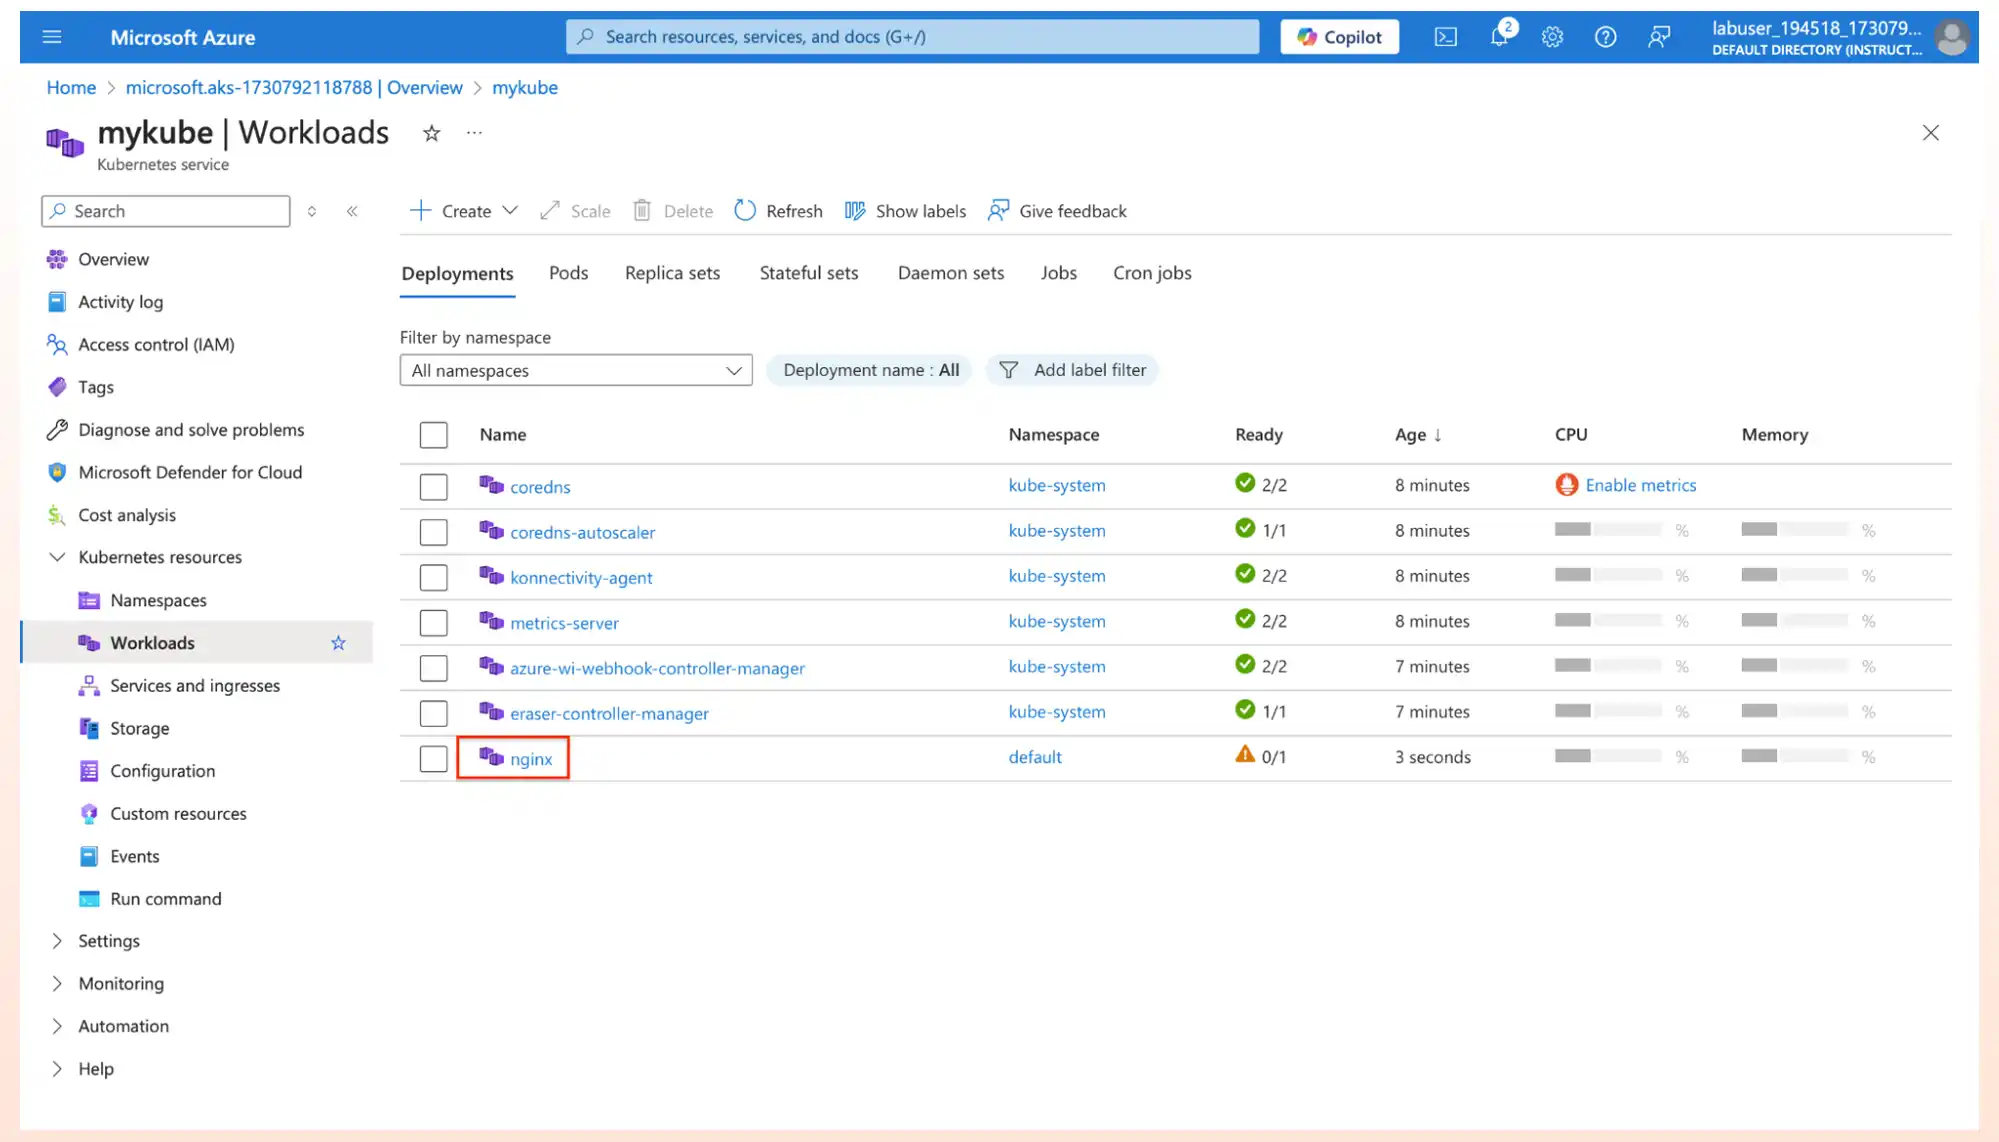
3.You can see the nginx server has been deployed.
Create a Service (Load Balancer) for the container
- Click on the Service and Ingress from the left menu of Kubernetes resources.
2. Click on Create and Select Apply a YAML.
3. Now we have the service deployment file, which will place a load balancer in front of our container, allowing external access to the container over the internet.
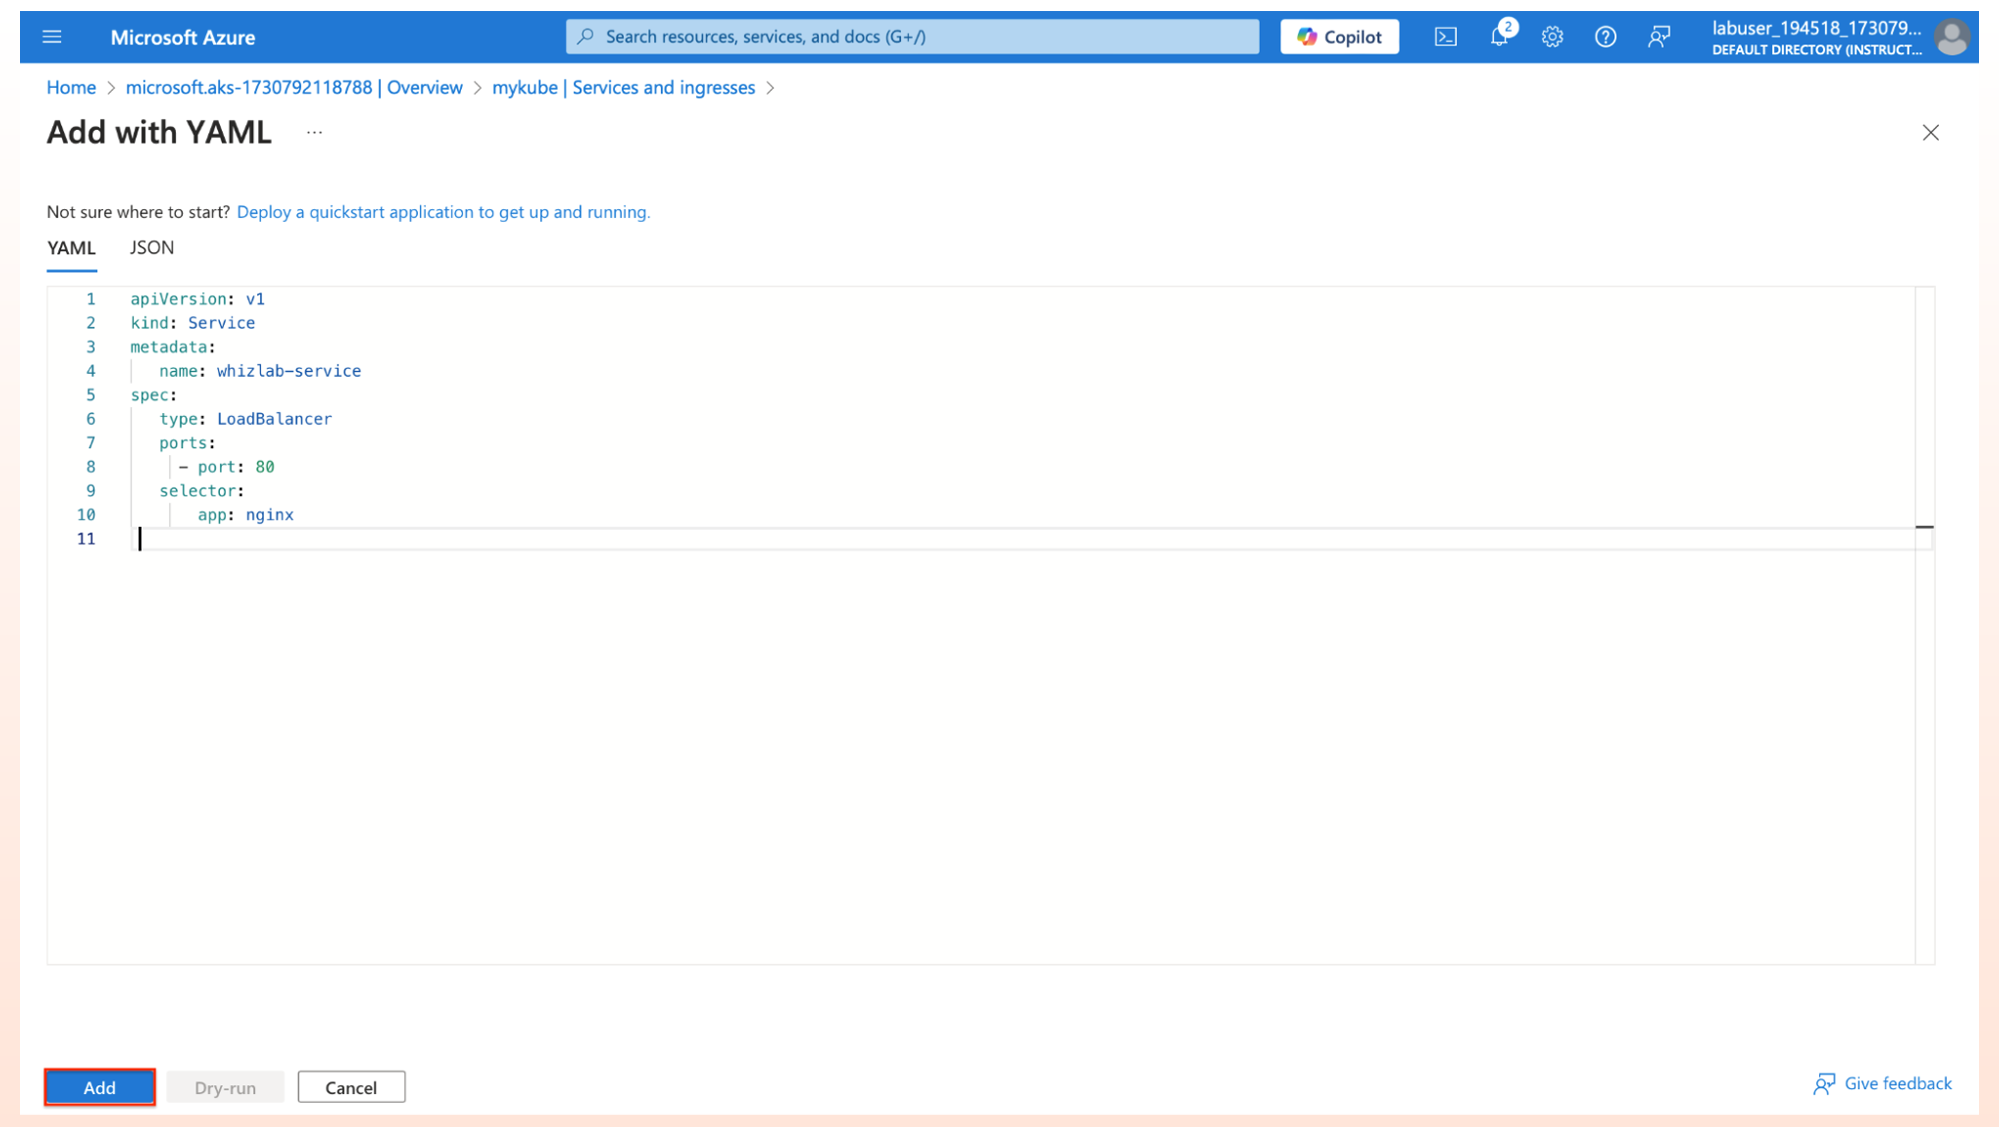
4. Copy and paste the below code and click on add.
apiVersion: v1
kind: Service
metadata:
      name: whizlab-service
spec:
     type: LoadBalancer
     ports:
         - port: 80
     selector:
           app: nginx
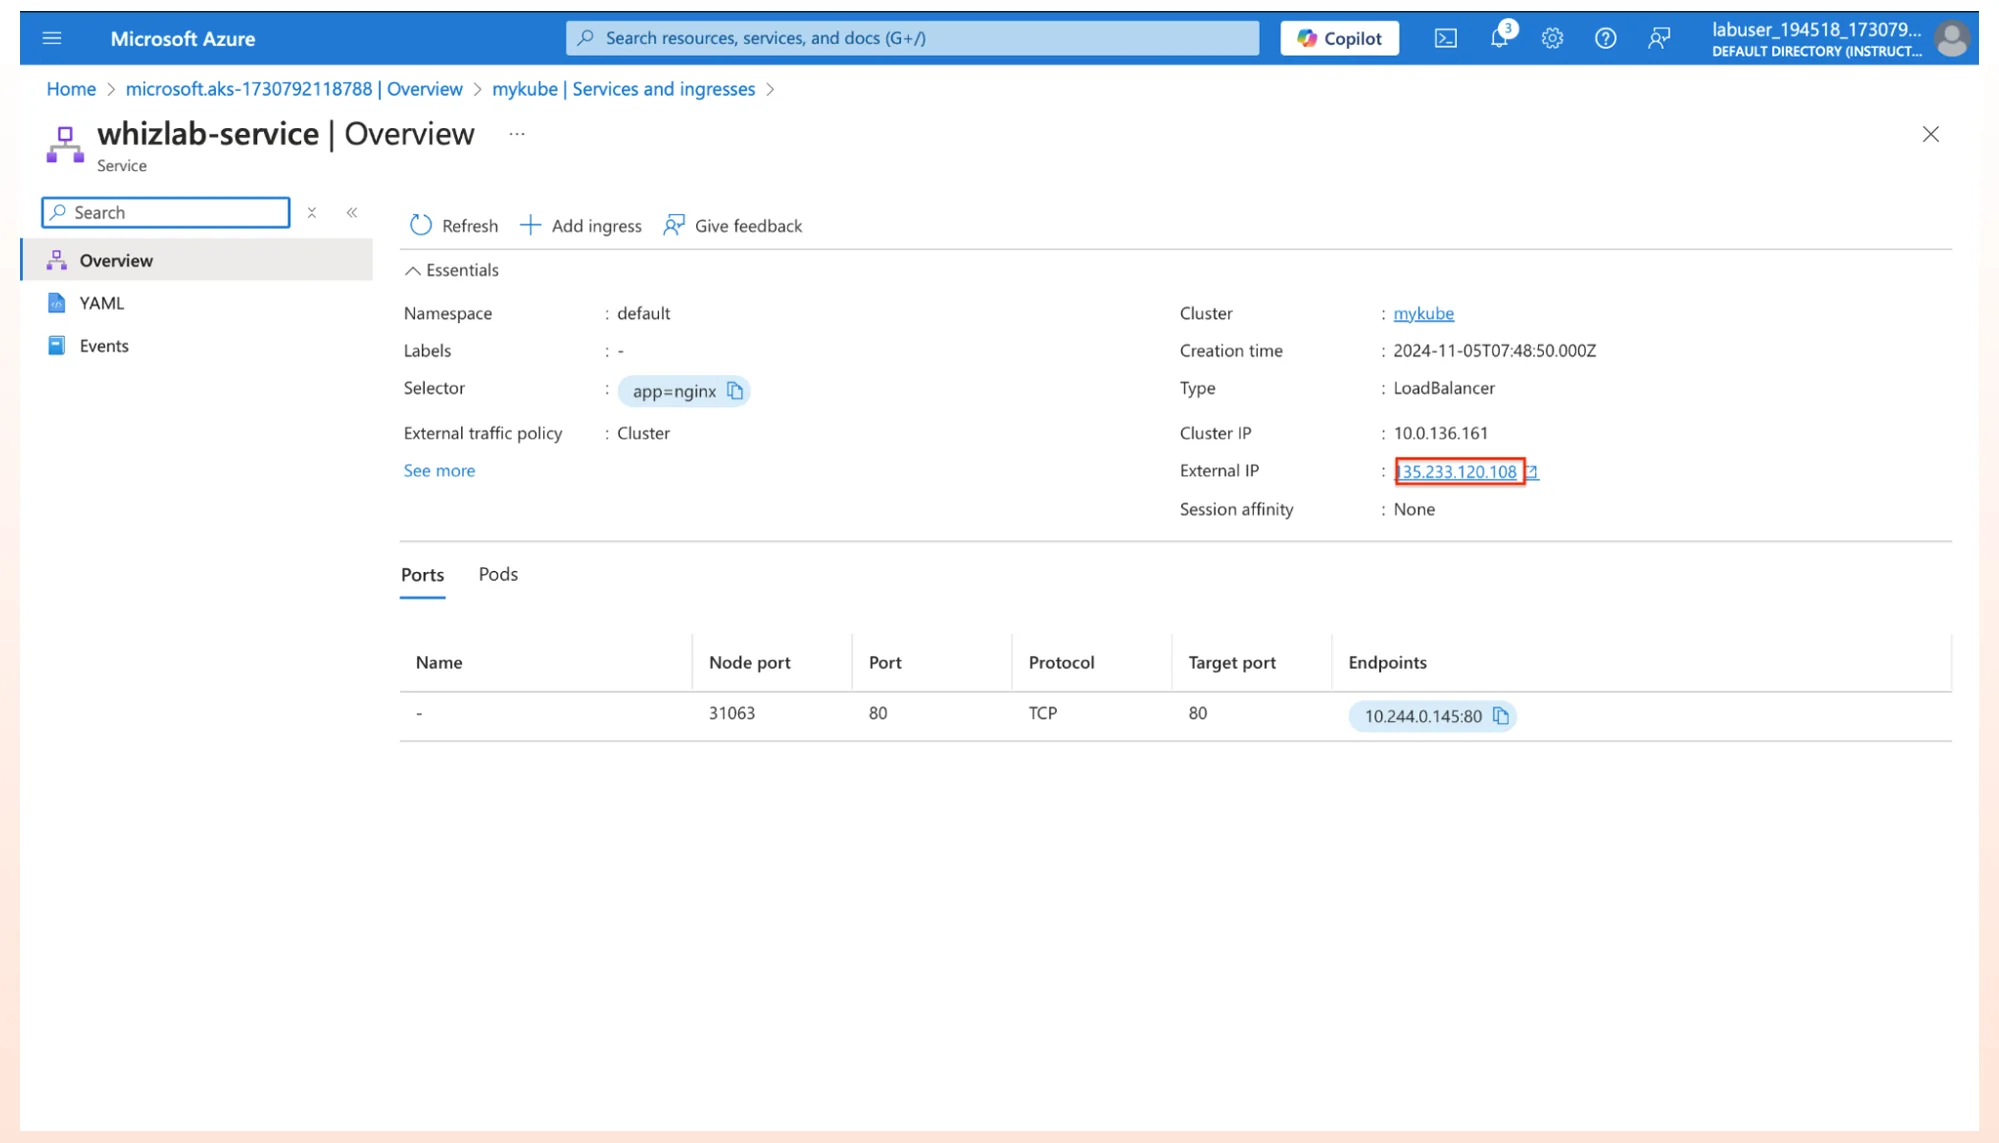
5. You can see the service has been deployed with the external IP address.
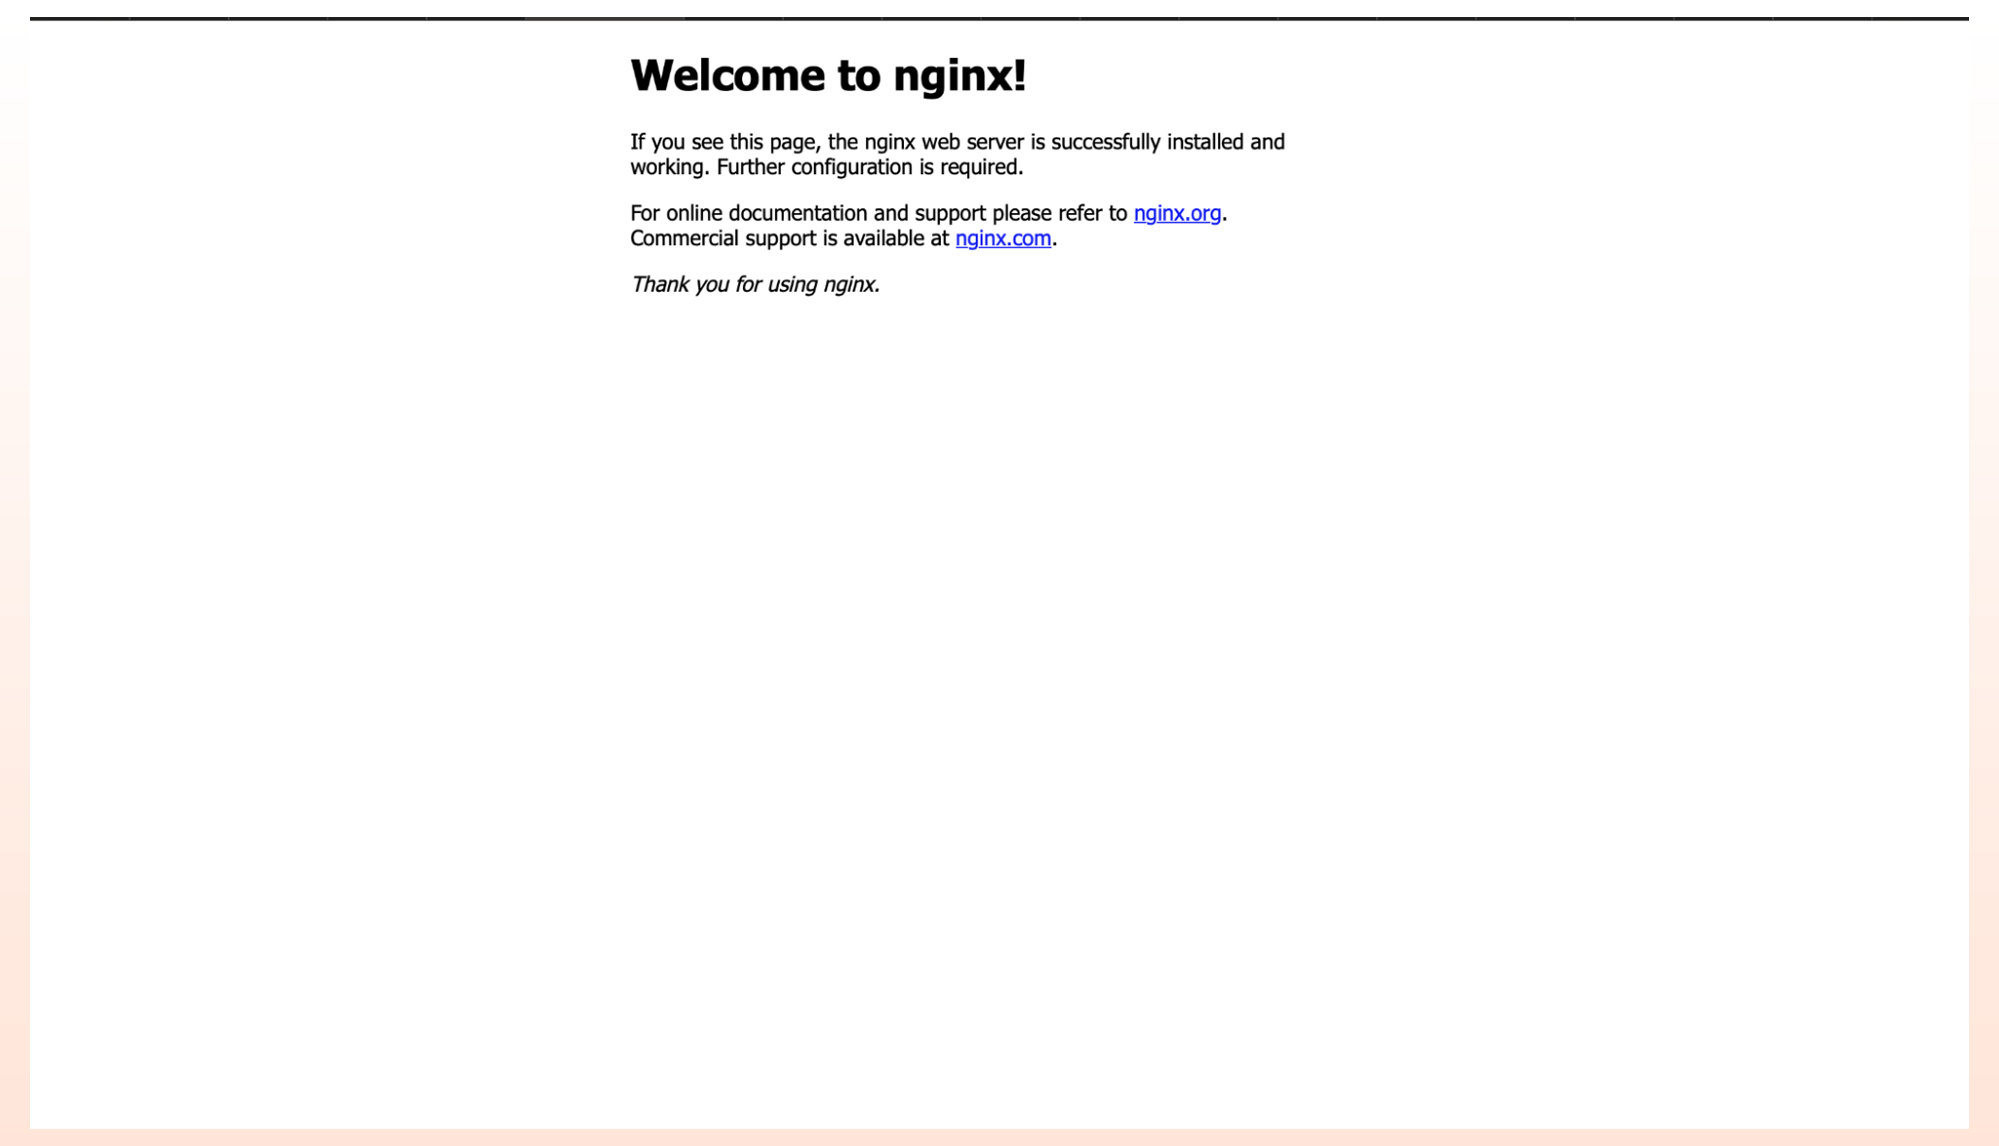
6. Click on the external IP address, you are able to see the Nginx web page has been exposed on the internet.
Conclusion
The blog post covered the topic of setting up Azure Kubernetes Service using the Azure Portal in a straightforward manner.AKS offers security and scalability, for Kubernetes, on Azure without requiring handling of the intricate Kubernetes infrastructure. This allows teams to effortlessly develop and oversee applications.
Azure Kubernetes Service holds importance for those preparing for the AZ-104: Microsoft Azure Administrator Certification. Dive into the scenario provided in our Hands-on Labs. Try it out in our Azure Sandbox setups to gain hands-on experience with AKS in Azure.
- How to Enable CORS for Azure Functions? - January 24, 2025
- How Microsoft Entra ID Simplify Developer Authentication? - January 21, 2025
- What Role Does Azure Redis Cache Play in Reducing Latency? - December 27, 2024
- Master Cloud Management with Azure Resource Architecture - December 2, 2024
- Microsoft Defender: Your Key to Azure Security Management - November 26, 2024
- What is Microsoft Entra ID and How It Enhances Security - November 26, 2024
- How to Build Secure Networks with Azure Virtual Networking - November 20, 2024
- Step-by-Step Nginx Deployment on Azure Kubernetes Service - November 13, 2024


 5. Under the Monitoring tab, Uncheck Enable Prometheus Monitoring button.
 6. Click on Review and Create, so that Azure Kubernetes Service will be deployed. After the deployment is complete, Click on go to resource.
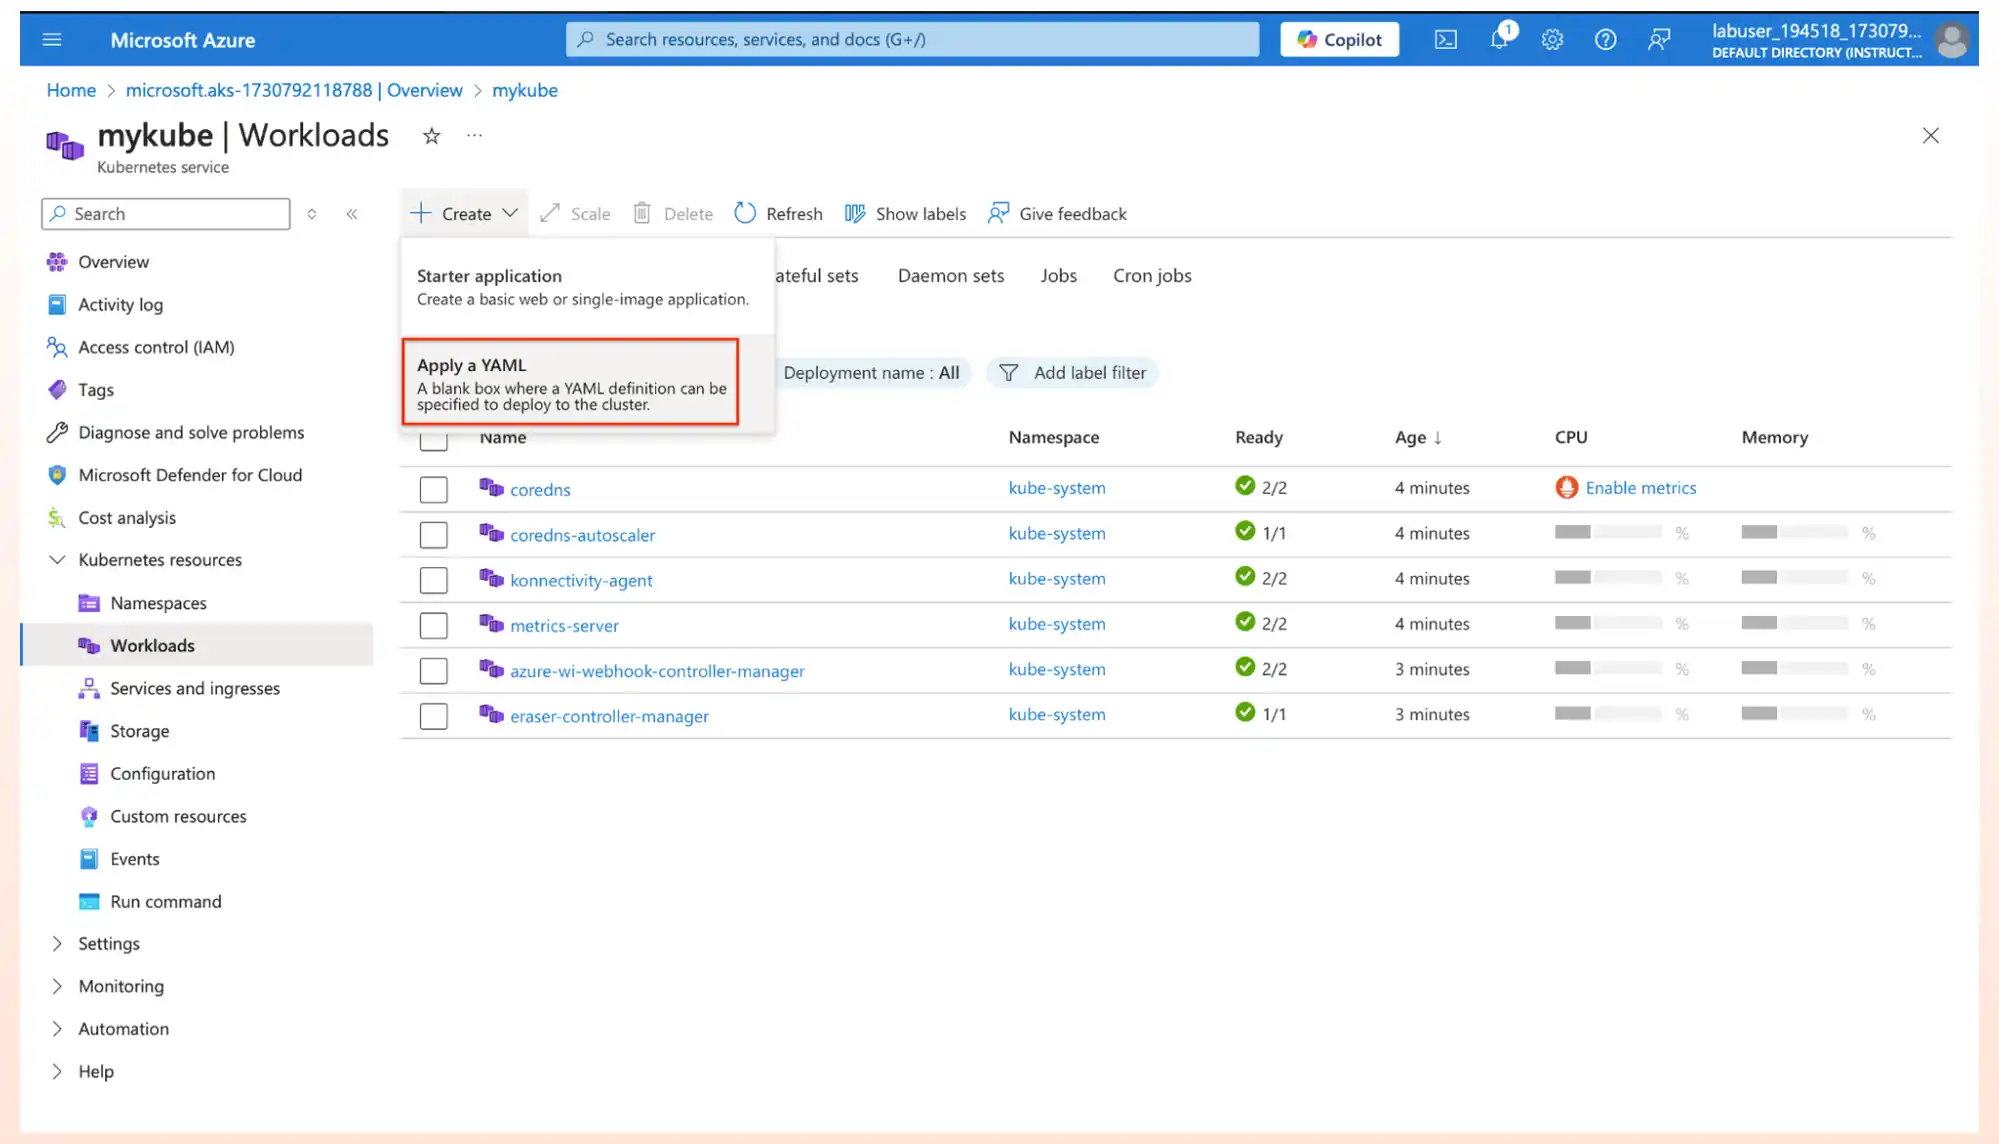 2.Copy and paste the below Yaml deployment in the yaml tab and click on Add.
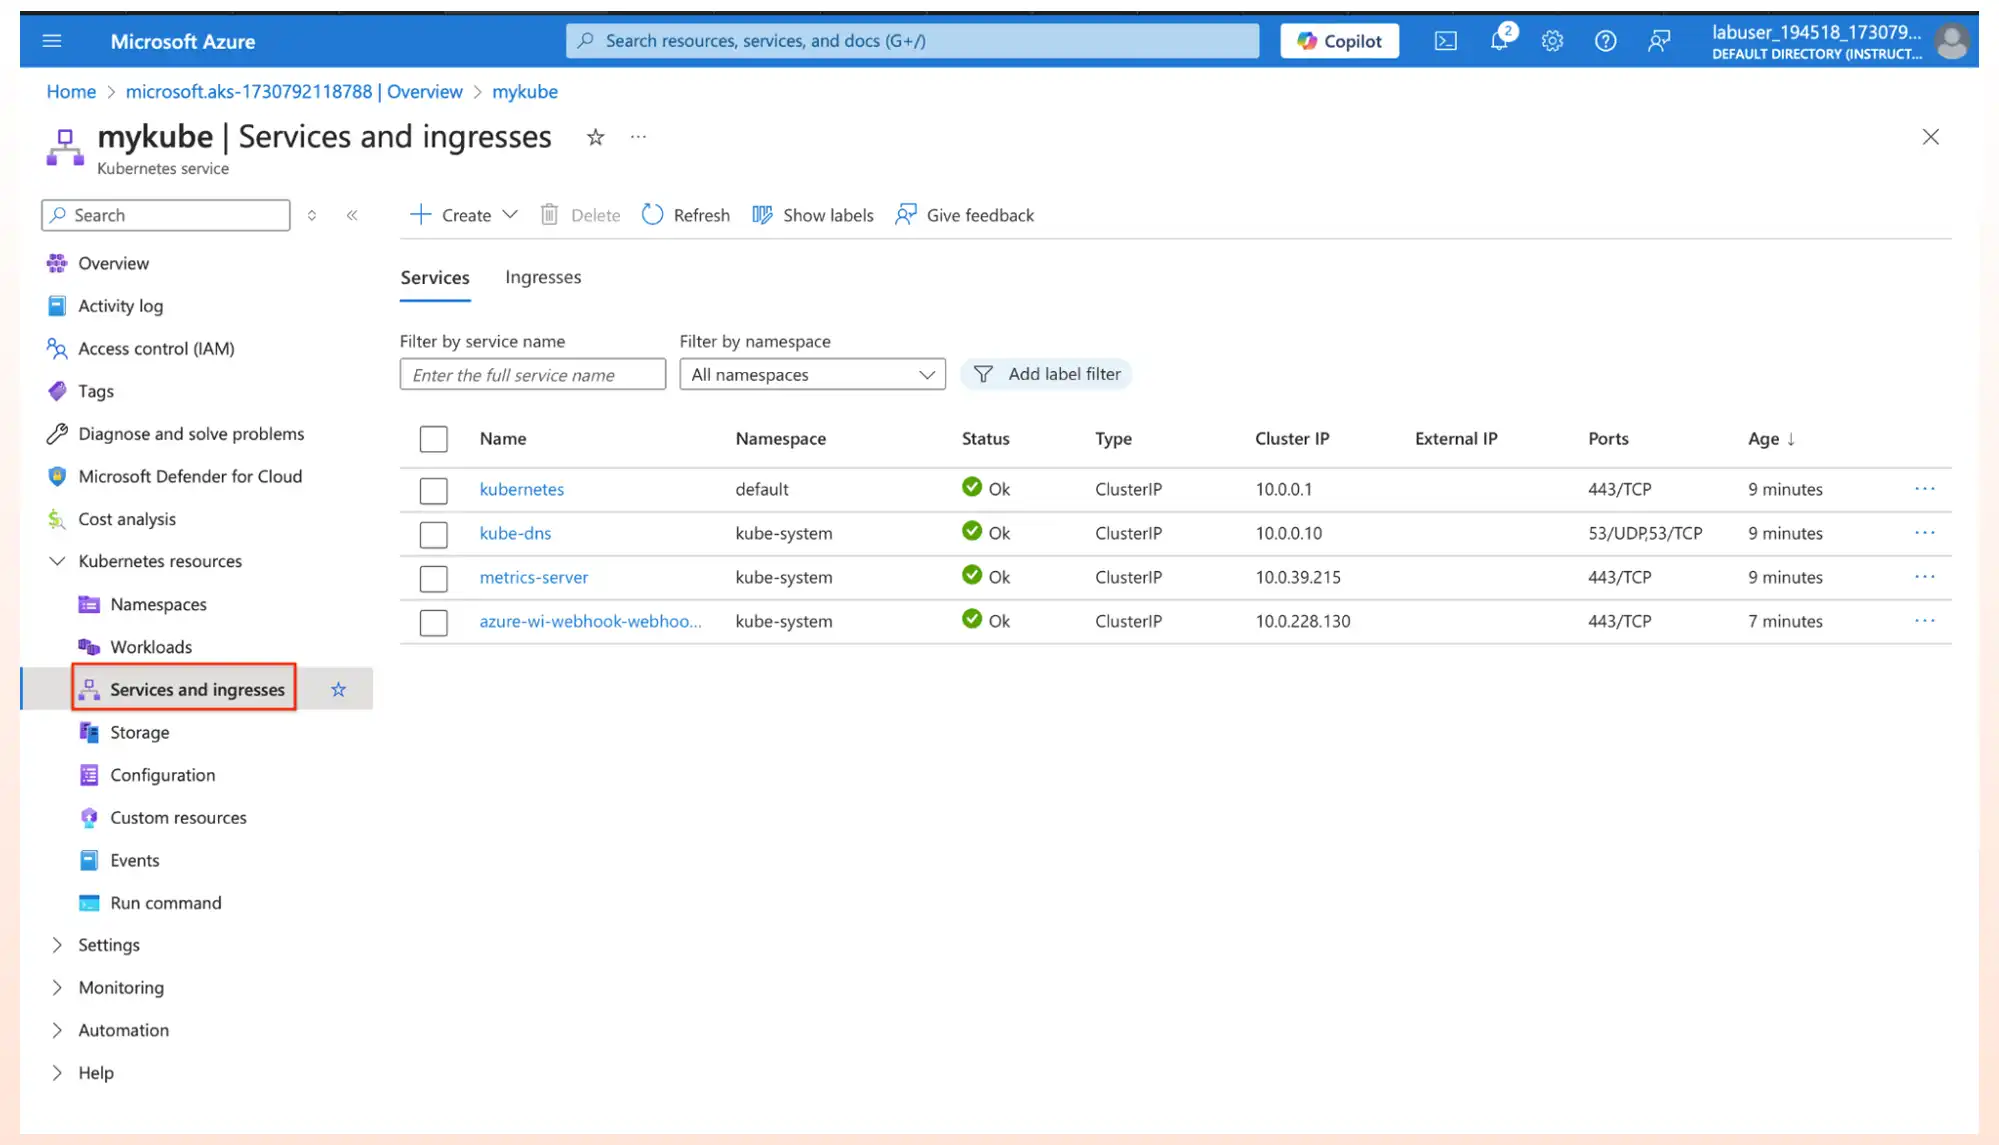 2. Click on Create and Select Apply a YAML.
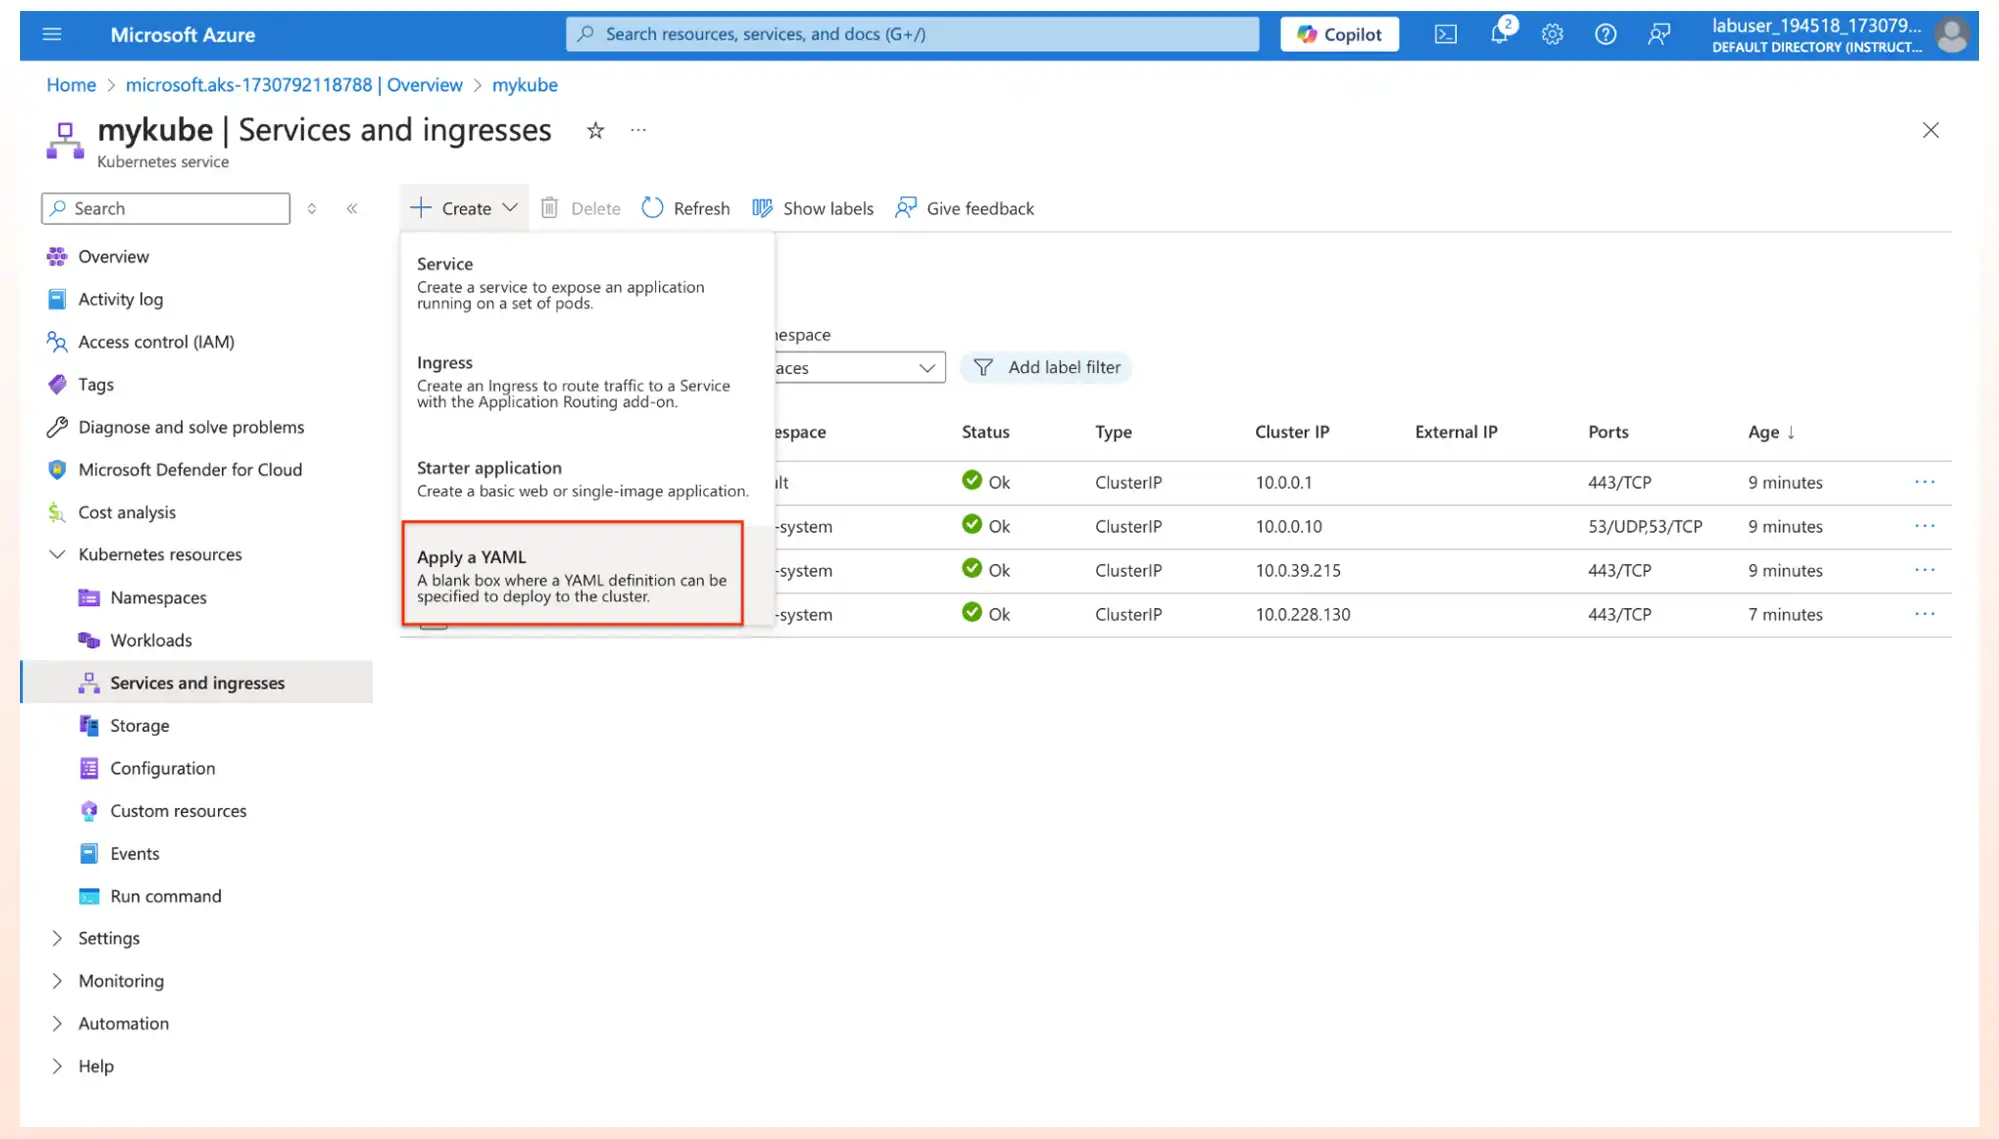 3. Now we have the service deployment file, which will place a load balancer in front of our container, allowing external access to the container over the internet.
