Azure SQL is a family of cloud relational databases that Microsoft offers as a service on Azure. These databases are powered by a SQL Server Engine which consistently goes through monumental updates and improvements by Microsoft to ensure enhanced efficiency.
While Microsoft continues to support its on-prem setup of the Microsoft SQL Server product, more capabilities and extended support are provided on the cloud, delivering solutions that leverage the ever-growing data demands in today’s information age.
Today, Microsoft has three offerings that make up the entire Azure SQL family, which are:
- SQL Server on Azure Virtual Machines,
- Azure SQL Managed Instance, and
- Azure SQL Database.
Each service has its benefits, and choosing one over the other depends on the business and technical teams’ goals.
The table below points out some of the main reasons teams could choose one service over the other.
The Azure SQL-managed instance lies between Infrastructure as a service and Platform as a service offering, providing database administrators the capability to manage parts of SQL Server’s infrastructure components. Let us go through the steps to migrating your existing database to an Azure SQL-managed instance.
Section 1: Getting Started
Prerequisites:
- A Microsoft Azure Subscription.
- A resource group to place newly created Azure services.
- An Azure virtual network for the SQL server-managed instance.
- Ensure that you have existing site-to-site VPN connectivity to the Azure cloud, i.e., Azure VPN gateway or Express route connection. If you don’t have a site-to-site VPN setup, you can use the Azure Data Migration service in hybrid mode.
- An Azure storage account of standard performance tier, allowing all network access.
- To enable the Data migration service to access the on-premise SQL server, open port 1433 or any other port used by the database engine on your firewall.
- Ensure that you have an SMB share that contains all the database backups and log files and open port 445 on your firewall to allow the Data migration service to access the shared folder.
- Ensure that the logins used to connect the source SQL Server and the target SQL Managed Instance are members of the Service Administrator Server Role.
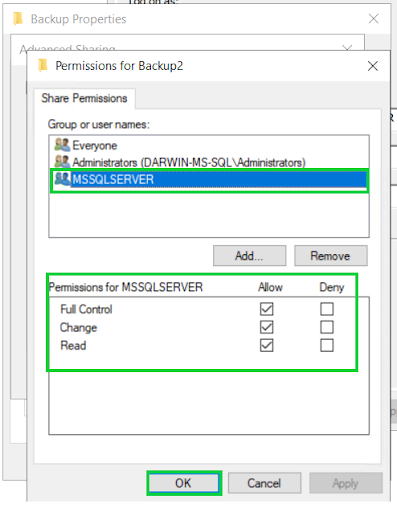
- The source SQL server’s service administrator account should have write privileges on the network share, and the source SQL server service account should have read/write access to that shared folder.
Quick Note:
Migration from on-prem SQL Server to Azure Cloud supports all Microsoft SQL Server versions of 2005 through Microsoft SQL Server 2019.
Data Migration Tools
- Data Migration Assistant: Assess your current database by performing compatibility checks and generate reports to see recommendations before deciding to move your database to a new Azure SQL server.
- Data Migration Service: This is a managed service in Azure and adds to the Data migration assistant’s capabilities, allowing you to perform bulk migrations of on-premises Microsoft SQL Server databases to Azure.
In this article, we will focus on using the Data Migration service to perform end-to-end database migration activities.
Online versus Offline migrations
Depending on the application availability requirements, teams can choose an online migration if the goal is to have minimal downtime, and time is lost only when the cutover activity is initiated. With offline migrations, all databases are shut down and migrated similarly.
In this article, we will cover both online and offline migration scenarios.
Section 2: Create an Azure SQL Managed Instance.
Step 1: Create an Azure SQL Managed Instance.
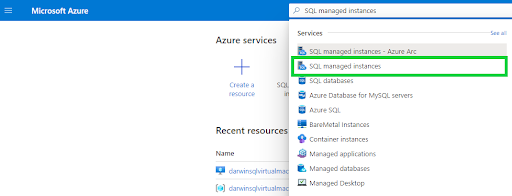
A. In the Azure portal, search for SQL managed instances.
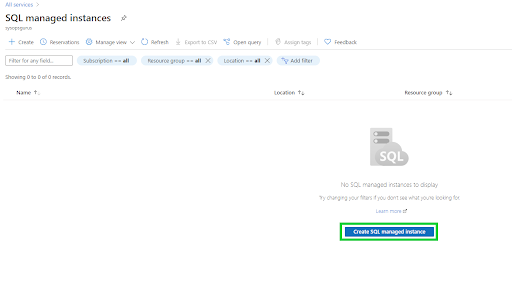
B. A display showing all managed instances within your Azure AD Tenant will appear. Since we have none yet, click on the button Create SQL managed instance.
C. On the next screen, select the Subscription and Resource group. Also, name the managed instance, set its location, and click on the Configure Managed Instance link.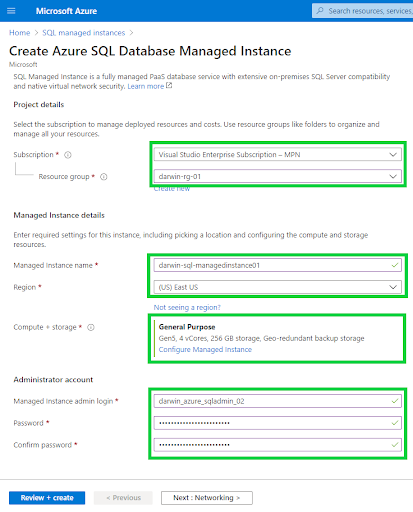
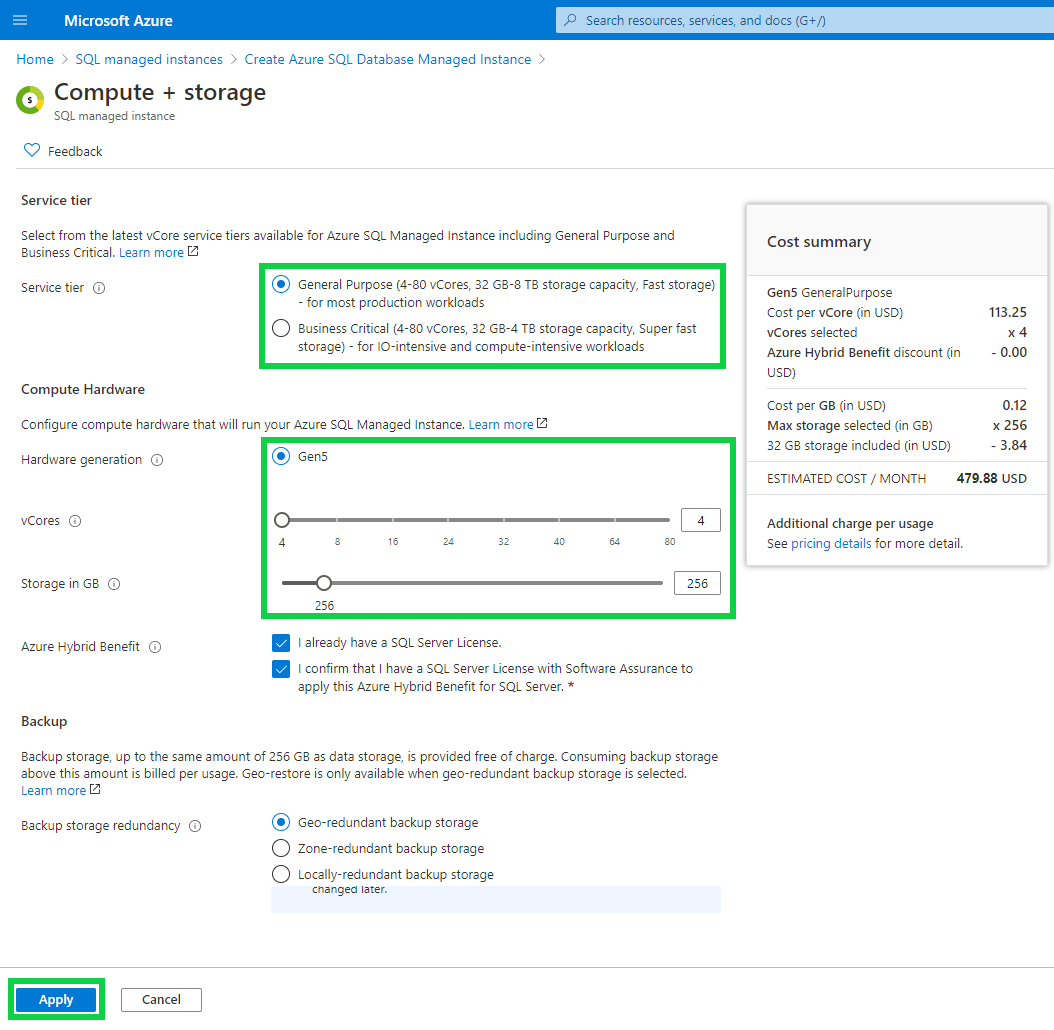
D. Once you click on the link, the following page will appear, and a list of options to select from for the managed instance specifications will be shown, click Apply after selection.
-
- Service tier: Select the General purpose or Business-critical workloads depending on your current resource usage for the on-prem SQL Server database infrastructure.
- Compute hardware: Generation is Gen5 by default, set the number of vCores and the required storage space for the database transactional data files.
Quick Tip:
- Select both checkboxes within the Azure Hybrid Benefits section if you want to reuse some of your on-prem SQL server licenses to save on the licensing charges for your managed instance.
- Choose Geo-redundant backup storage if you prefer to backup your databases to multiple Azure cloud regions and perform full database restoration in case of an Azure regional failure.
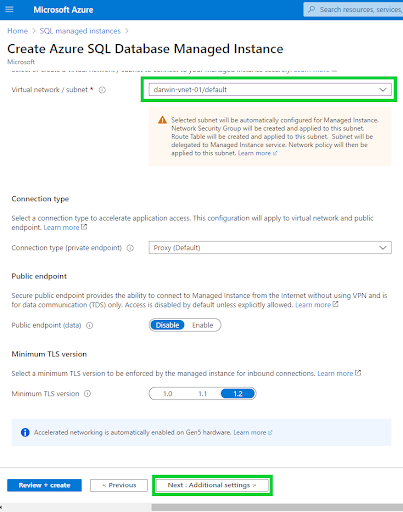
E. Once you click Next, the following tab is the Networking section. Click on the drop-down and select the Virtual network of your Azure SQL Managed Instance.
Unless there is a specific setup required for your instance, the rest of the settings should be left with their defaults and click Next: Additional settings.
Quick Tip:
Use VNet peering on the Azure SQL Managed Instance’s Virtual network to enable private TCP/IP communication with the Azure VPN Gateway subnet.
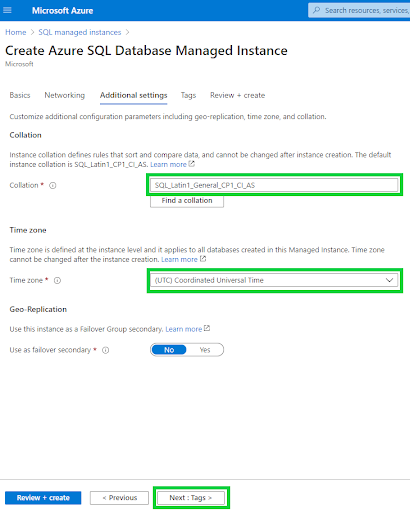
F. On the additional settings, Find and select the Collation similar to the on-prem SQL Server instance, the Time zone, and leave the Geo-Replication settings to their defaults.
Quick Tip:
Use failover groups if one of the main requirements is to maintain your databases’ availability on the Azure SQL Managed instance across regions. Set up an additional managed instance in a different region and add a failover secondary to the primary instance.
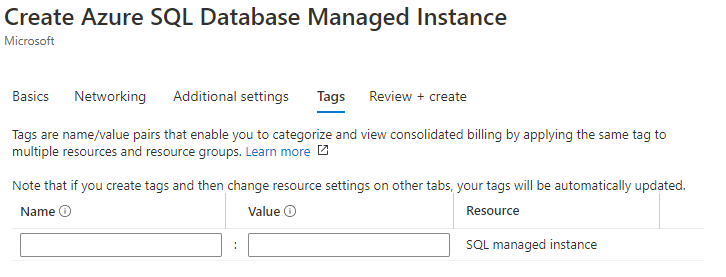
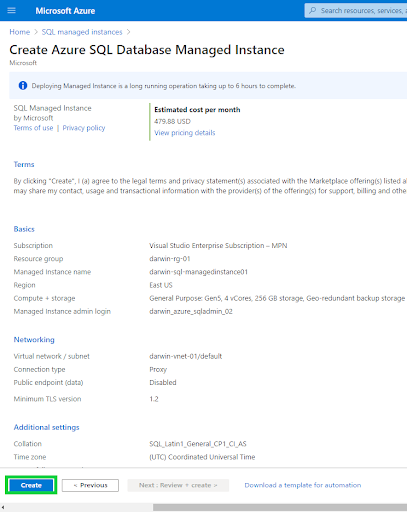
G. The next screen requires you to set up Tags with most Azure services for billing purposes. If you don’t use tags, click to the next page, which validates and summarizes how we plan to create our managed instance. Click Create.
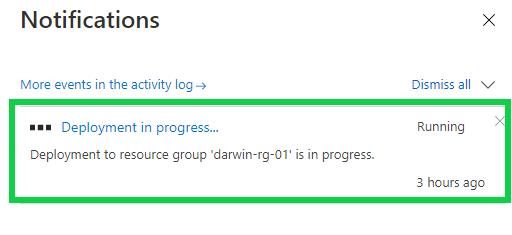
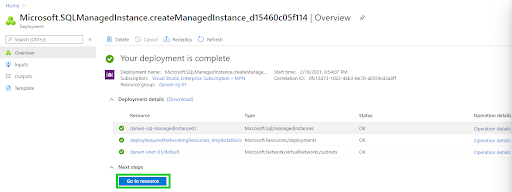
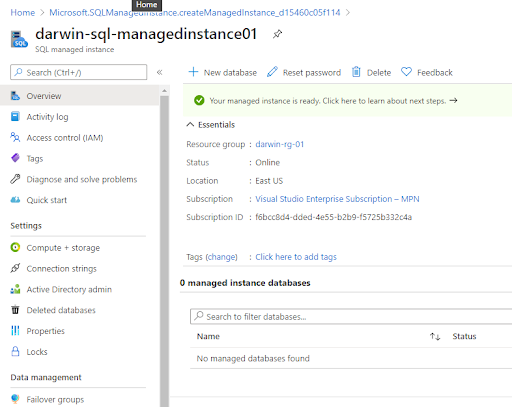
H. The deployment of a managed instance takes a long creation time and could take up to 4 hours. In our case, while writing this article, it took a total of 3 hours. We will then click Go to resource to access the newly created instance.
Section 3: Create a Data Migration Service.
This section will cover how to create the Data Migration service required for our database migration.
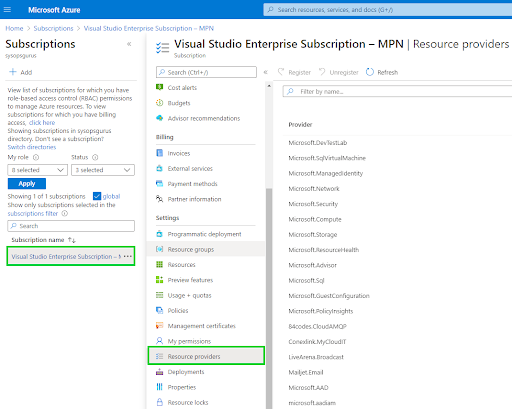
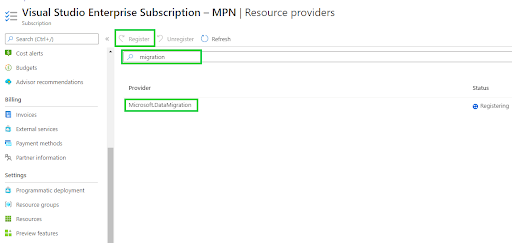
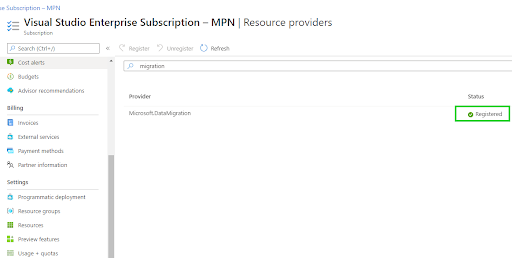
Step 1: Register the Microsoft.DataMigration resource provider.
-
- In the Azure portal, search for subscriptions.
- On the selected subscription, click on the Resource providers blade.
- Search for migration and click on Register the Microsoft.DataMigration resource provider.
- In the Azure portal, search for subscriptions.
Step 2: Create the Azure Database Migration service.
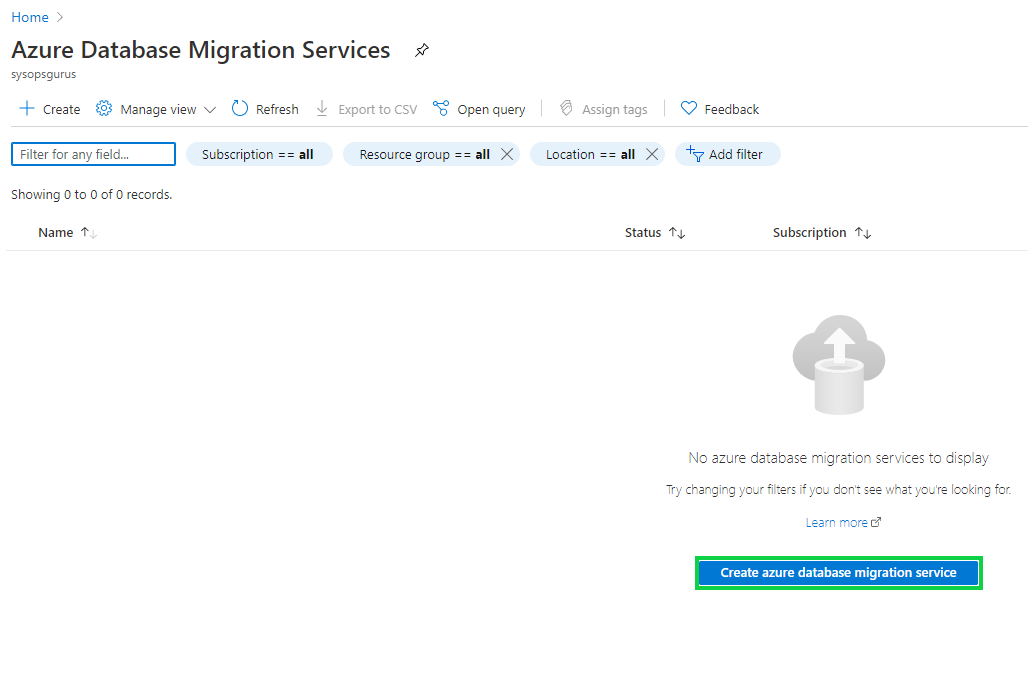
A. Access the Azure portal and search for the Azure Database Migration Services. Click Create azure database migration service.
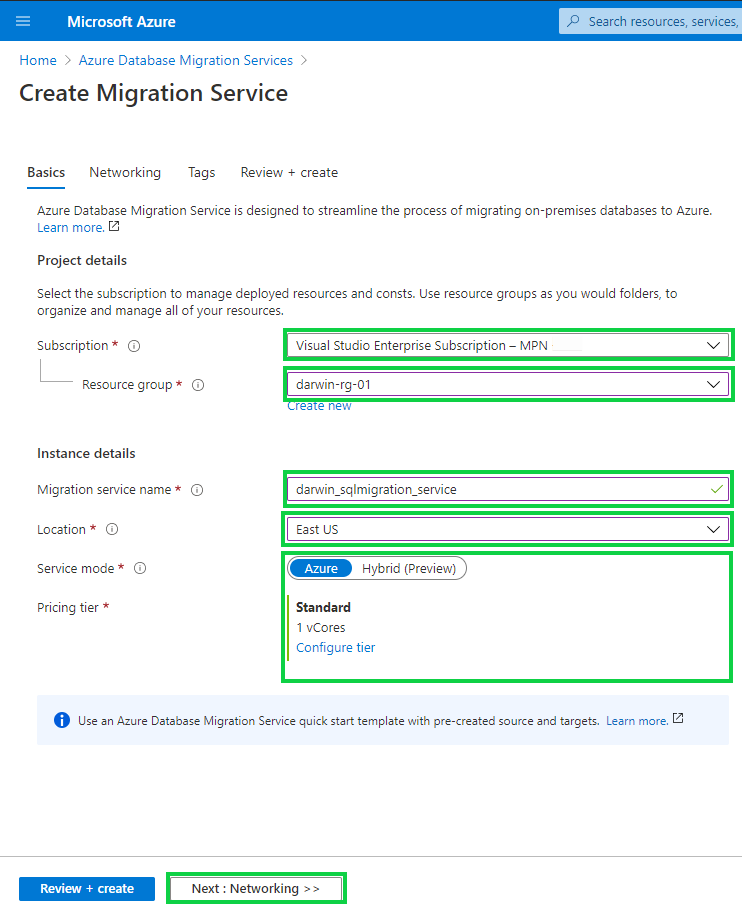
B. On the next screen, select the Subscription and Resource group, and name the migration service, set location, select the Azure service mode and click Configure tier.
Quick tip: Setting hybrid mode will enable the migration service to perform migrations over the public internet, requiring no Azure VPN gateway.
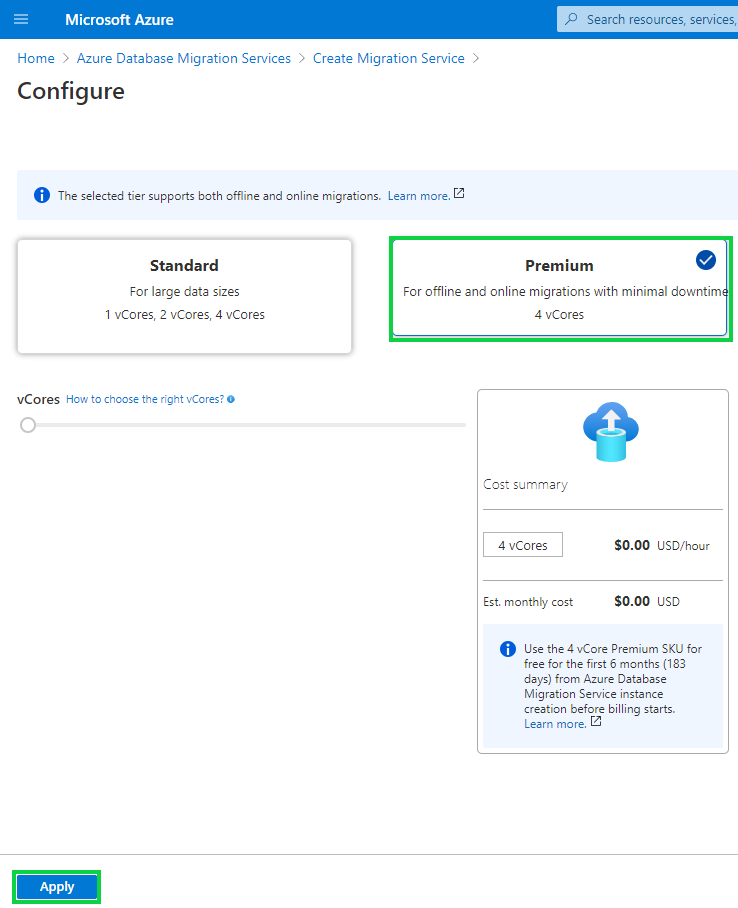
C. On the Configure page, select the premium tier for online and offline migrations and click Apply and move onto the Networking tab.
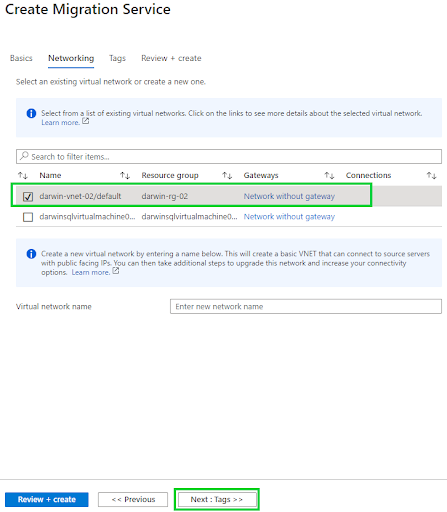
D. On the Networking tab, select the Virtual Network that the migration service should use, and click Next.
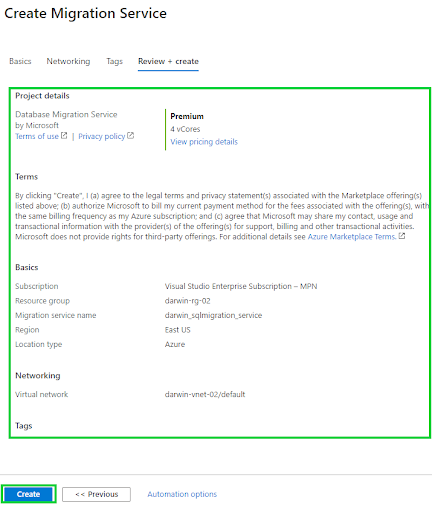
E. We shall not set tags for the migration service in our scenario. The final tab presents us with a summary of how we plan to set up our migration service. Click Create to submit the deployment.
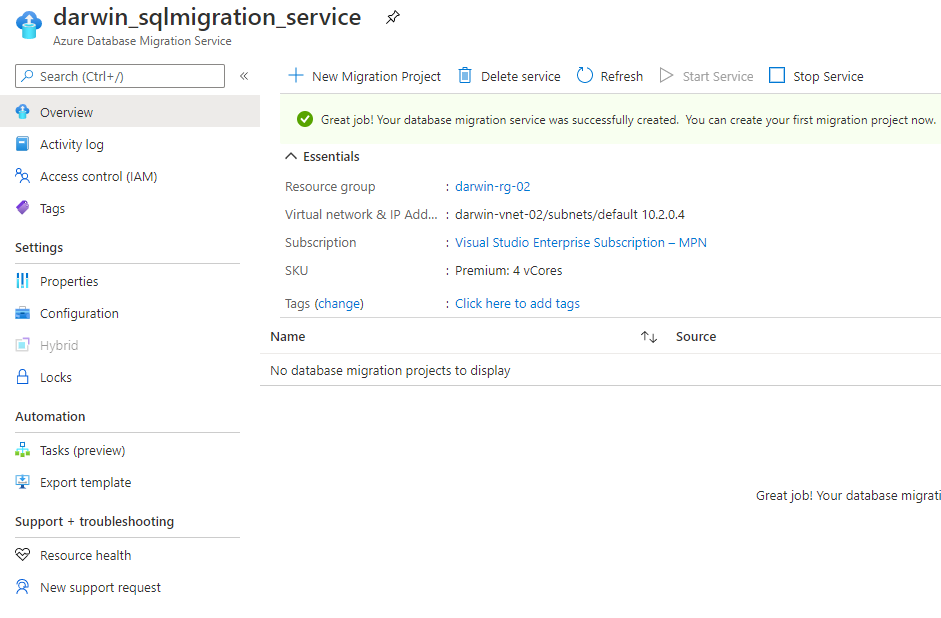
F. Our new migration service is created successfully.
Section 4: Create a Migration Project.
Step1: Create a new migration project.
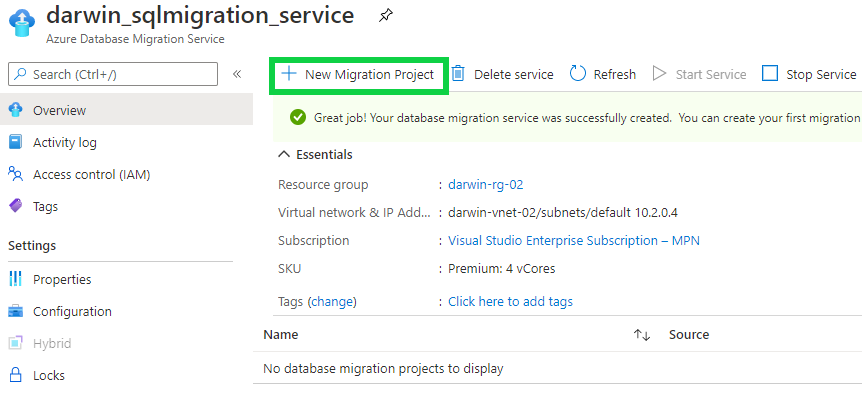
A. Access the previously created Azure Data Migration service, and click New migration project.
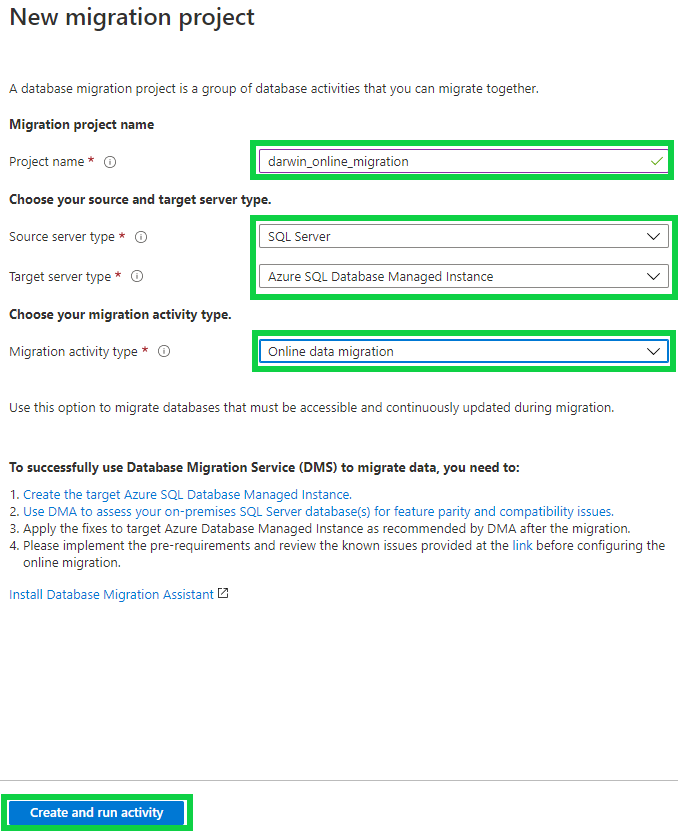
B. A screen will appear that asks us to enter the migration project name, source, and target server type: SQL Server and Azure SQL Database Managed Instance. The migration activity type is Online data migration. Then click create and run activity after filing in the required fields.
C. After running the activity, we will be presented with the migration project wizard. Insert the source SQL Server private IP address, select Windows authentication, type the user account and password with administrator permissions over the source SQL Server instance.
D. Make sure to check both checkboxes on connection properties, then click next.
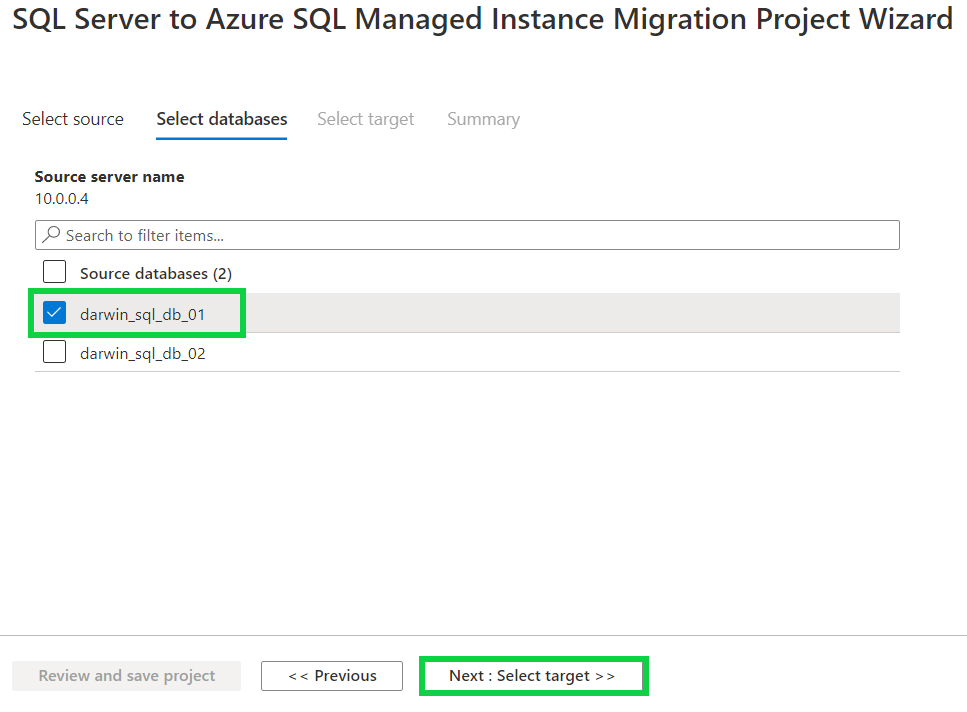
E. On the next tab, select the database for the online migration activity and click Next.
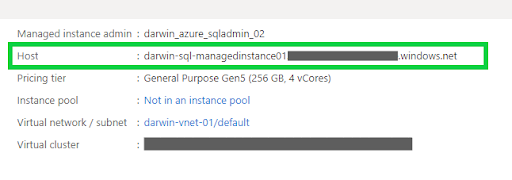
F. On the target tab, copy and paste the server name for the target Azure SQL Managed Instance, set the authentication type to SQL Authentication, type the username and password for the managed instance administrator account, and then click Next.
Quick tip: The Server name for the managed instance is found on the default page of the new managed instance.
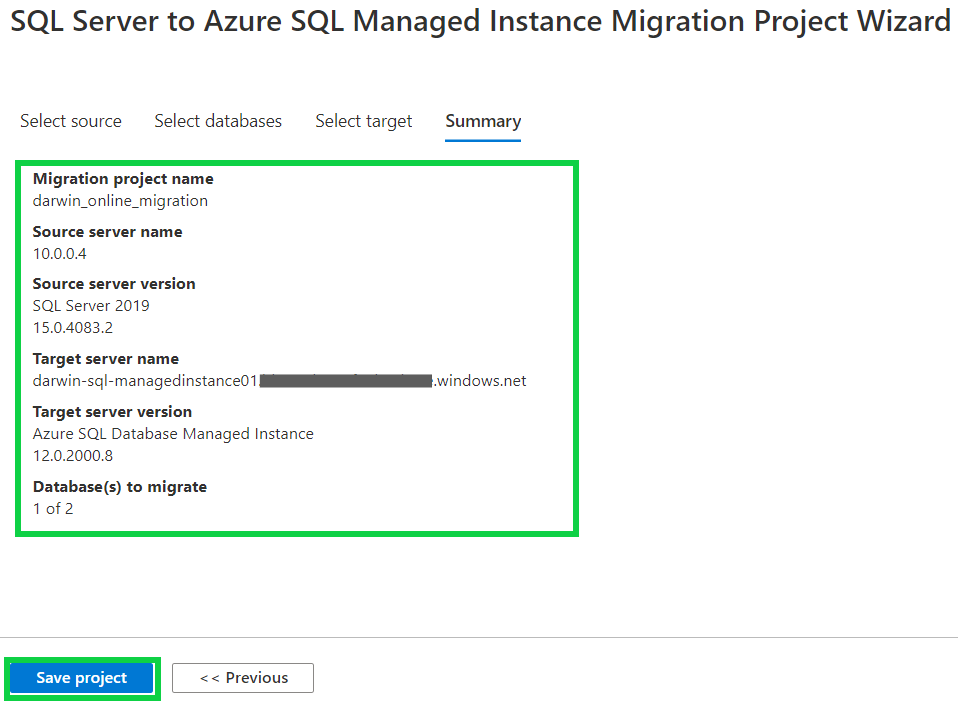
G. On the summary screen, check that all the configurations are correct, and click Save project.
Section 5: Trigger the Migration Activity.
Step 1: Create an Azure AD Application ID and service principal.
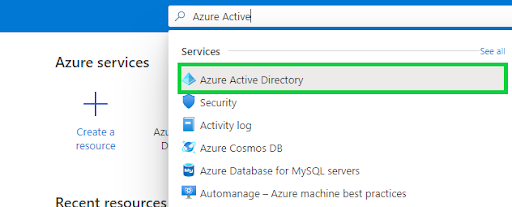
A. To create a new Application ID to use for the migration, search for Azure Active Directory in the Azure portal.
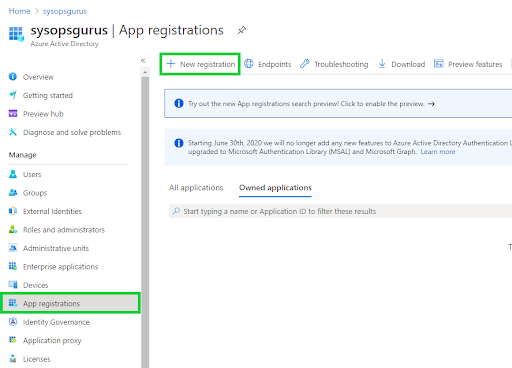
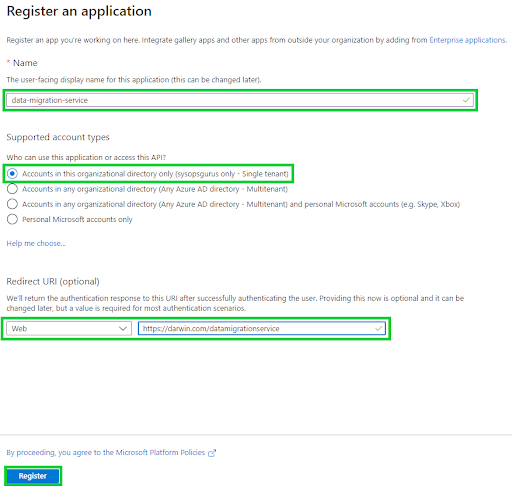
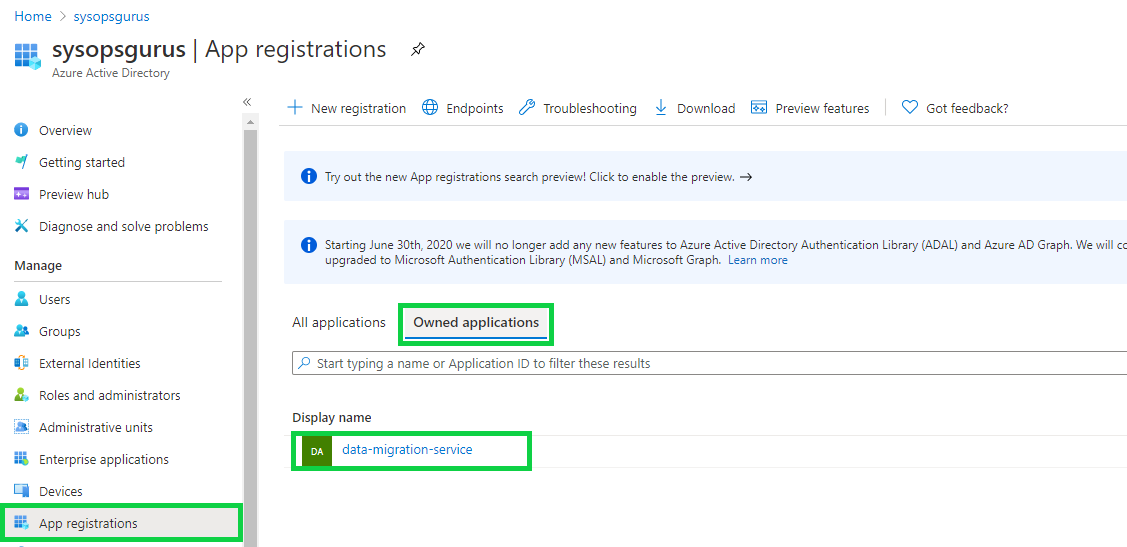
B. Once the Azure Active Directory service blades become active, click on the App registrations blade and select New registration.
C. Type your new application’s Name, assign it a Redirect URI, and then click Register.
Quick Tip: If you have multiple Azure tenants, you may want to select the second option under Supported account types to reuse the Application ID for database migrations in separate Azure AD tenants. However, this is not mandatory.
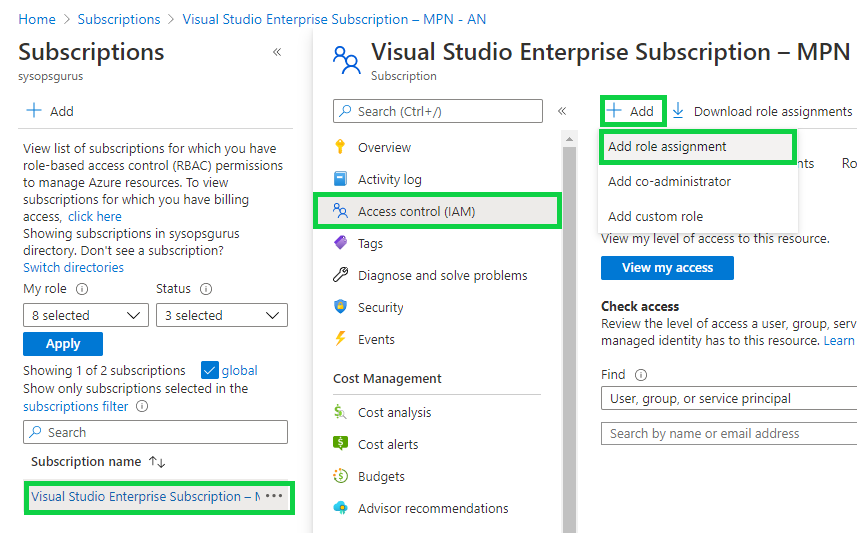
D. Search for subscriptions in the Azure portal, select the subscription you are using for the Data Migration service, select Access control (IAM), and Add role assignment.
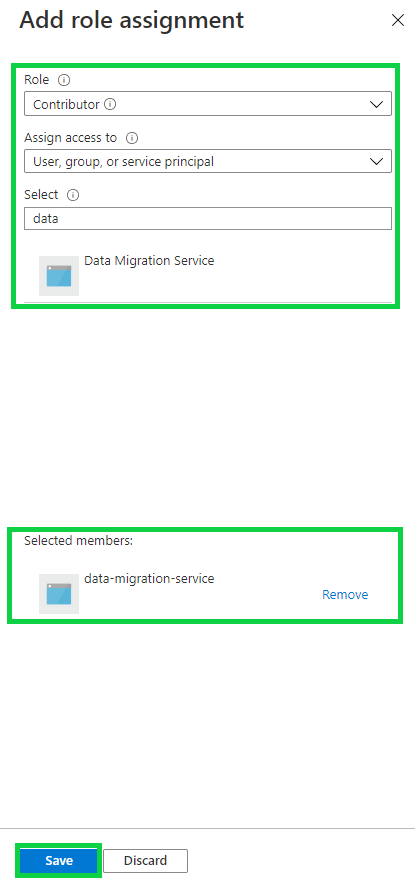
E. Assign the Contributor role to the Data Migration Service service principal that we just created. Click Save.
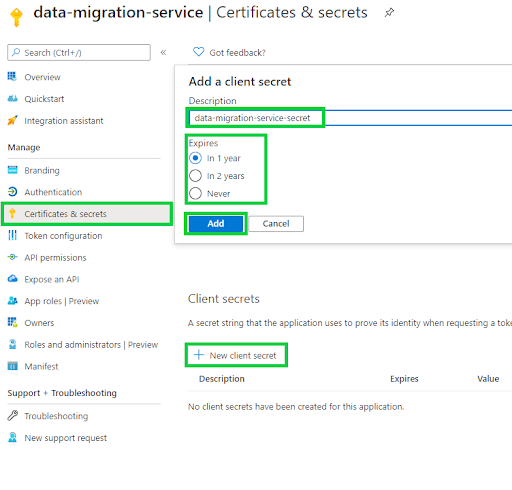
F. Access Azure Active Directory, obtain the Application client ID under App registrations and then create a New client secret for the registered data migration service application and service principal.
G. Once done obtaining the client ID, head over to the Certificates & secrets blade and click New client secret, assign it a name and an expiry period of your choice, then click Add.
H. Copy the client secret value and keep it safe for future reference during the migration activity.
Step 2: Start the online database migration activity (Option-1).
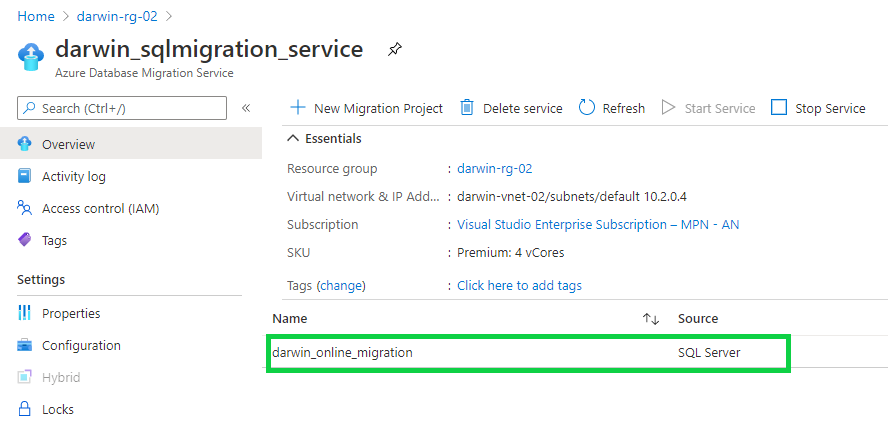
A. Access the Azure Database Migration Service and select the Online migration project that you created previously.
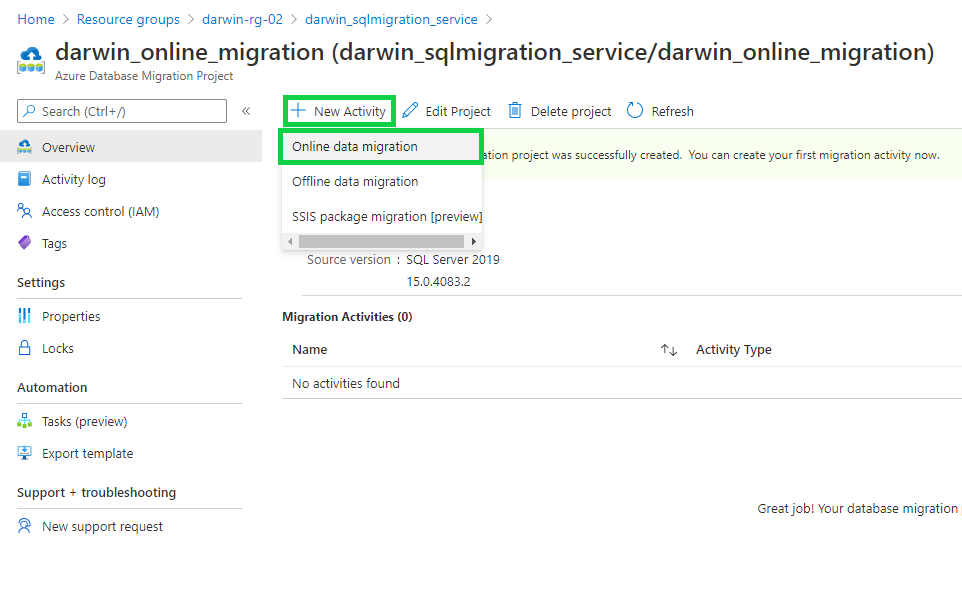
B. Click New Activity and select Online data migration.
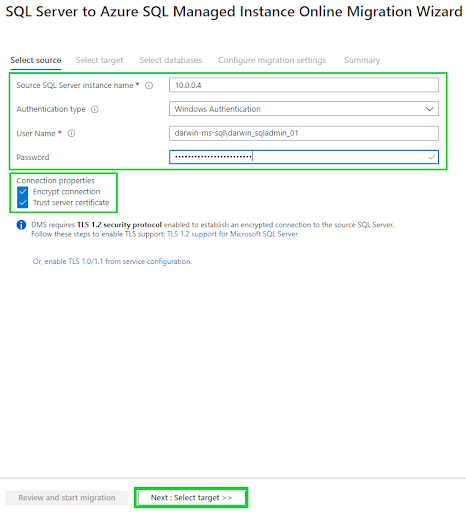
C. Insert the source SQL server IP address, select Windows authentication, and insert the username and password for the source SQL Server.
Make sure to check both Connection properties checkboxes before clicking next.
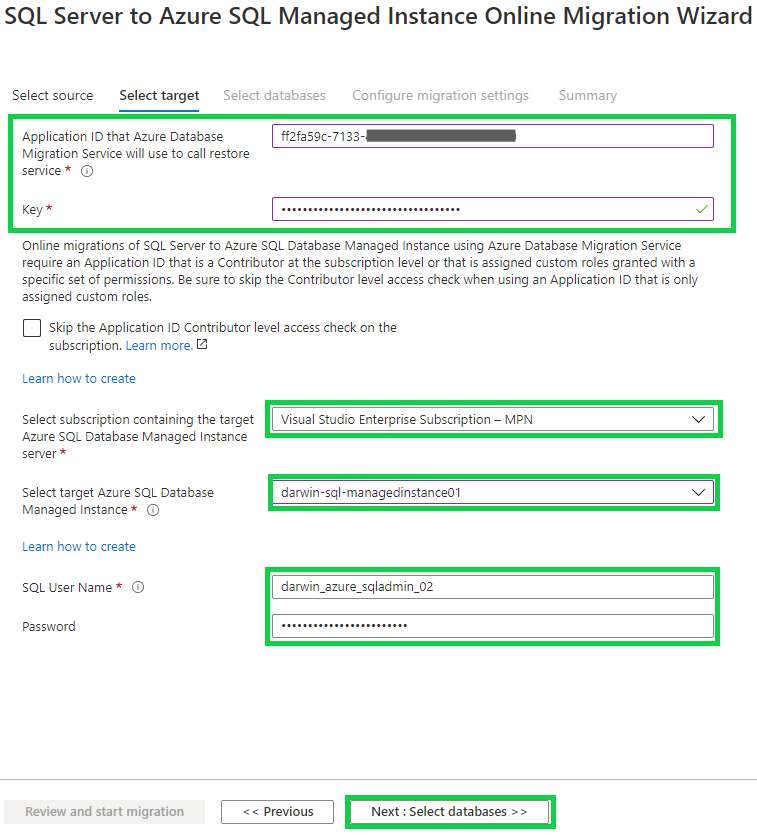
D. On the next tab, insert the Application ID and Client secret value you created in Step 1. Select the subscription and target Azure SQL managed instance, SQL username, and password for the managed instance. Then click Next.
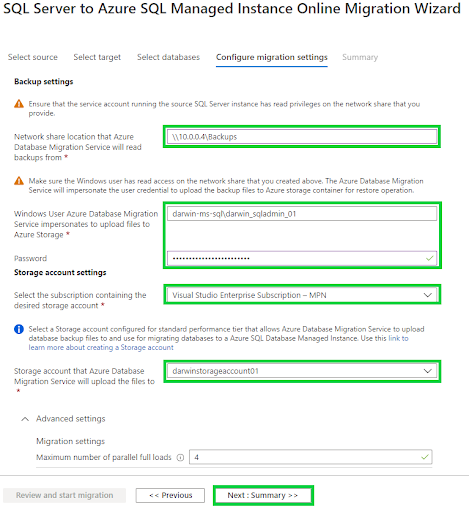
E. On the next tab, select the Database to migrate online and click Next to configure the migration settings. Set the location of the Shared backups folder, the user account with privileges to the folder, and the Azure storage account where to upload the backups. Click Next to the summary tab when done.
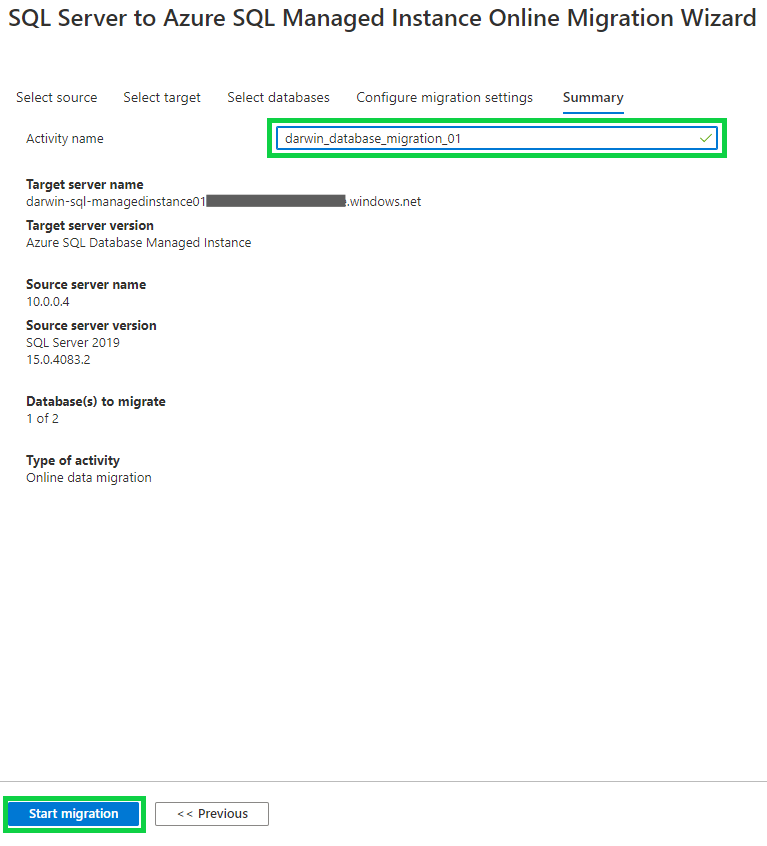
F. On the summary tab, type the Name of the online migration activity and finally start the migration.
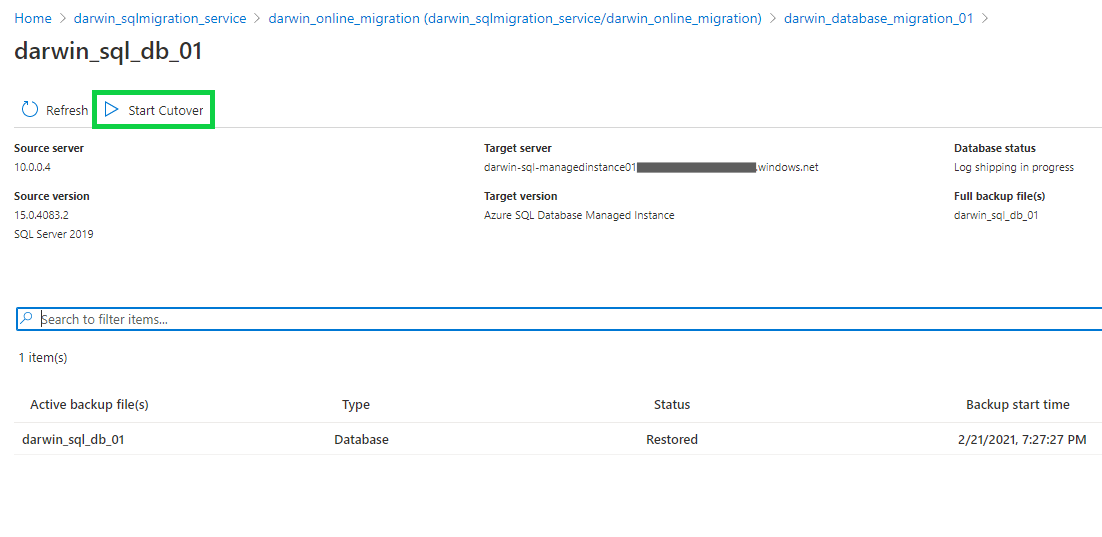
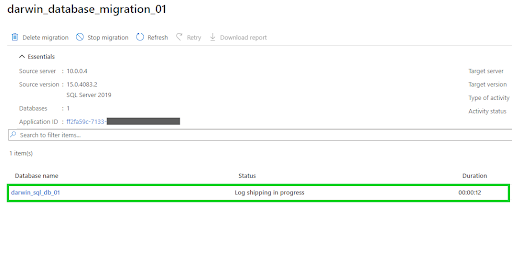
G. Once the migration starts and completes, the databases will remain in a Log shipping state. This means you’ll have two functional databases with updated data both on-prem and in the Azure cloud.
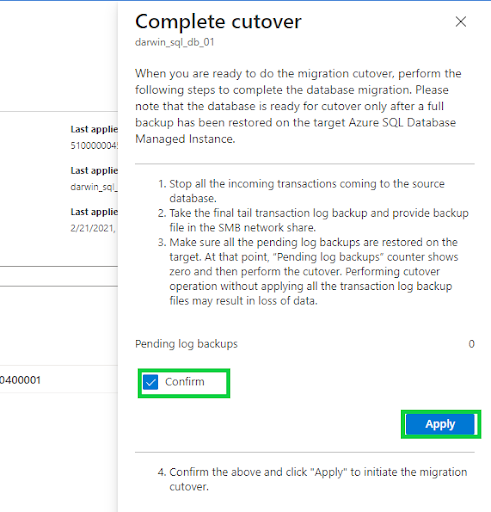
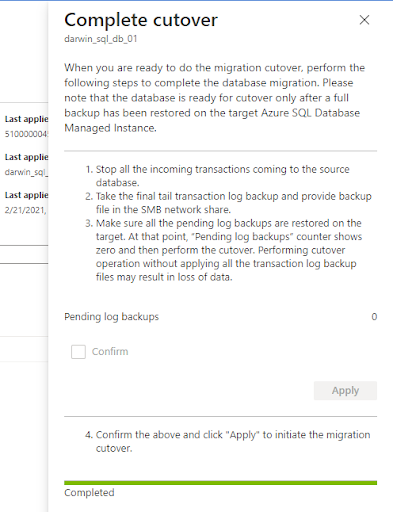
I. Once done, Confirm and Apply the cutover migration.
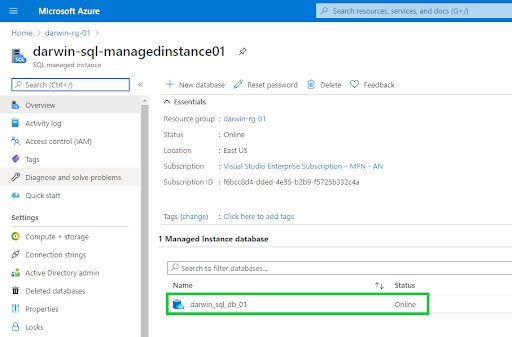
J. To confirm our new database in the Azure SQL Managed Instance, select your Managed instance service and look for the database that we just migrated.
Step 3: Start the offline database migration activity (Option – 2).
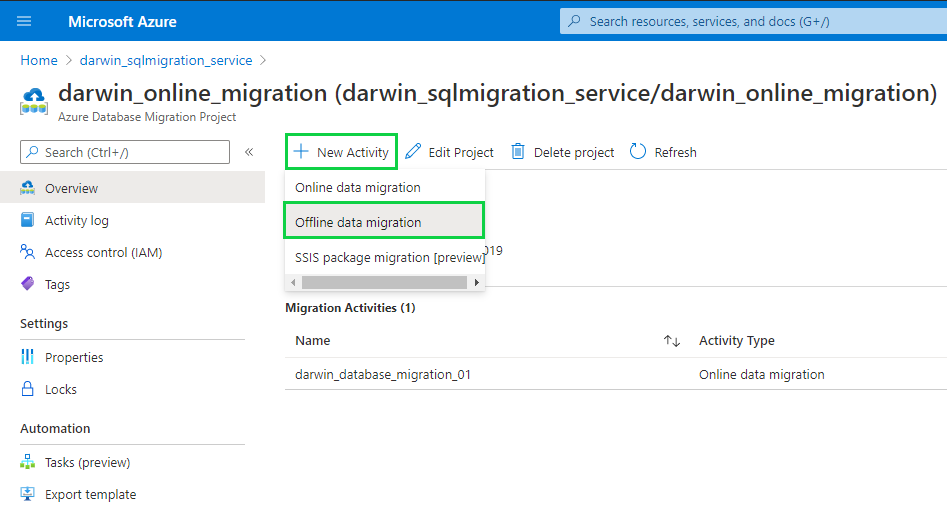
A. Access your previously created migration project and select a new Offline data migration activity. You can also create a new migration project. In this example, we will reuse an existing project to achieve the same goal.
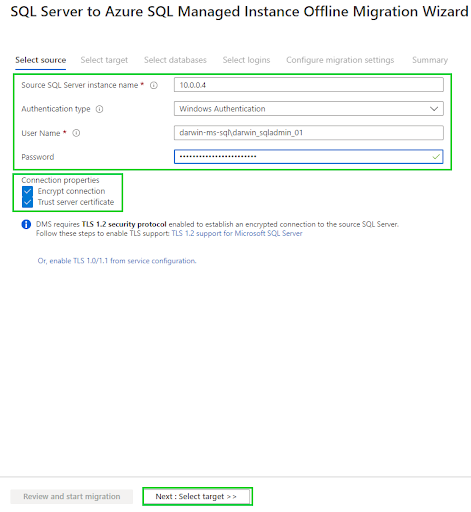
B. Like the online migration, Insert the source SQL server IP address, select Windows Authentication, and insert the User name and password for the source SQL Server.
Also, make sure to check both Connection properties checkboxes before clicking Next.
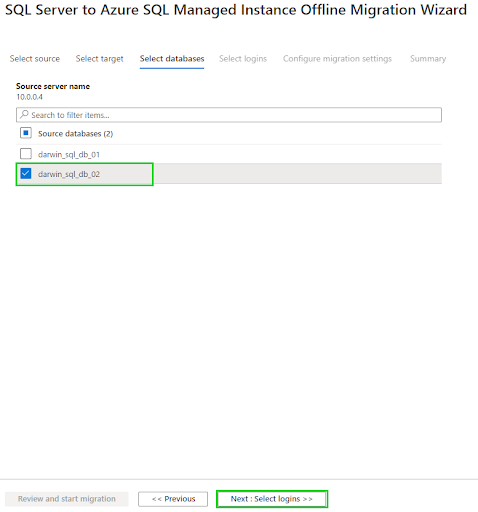
C. The next section of the offline migration activity creation is different from the online migration type. Insert the Azure SQL-managed instance’s Target server name, set the Authentication type to SQL Authentication, and enter the Username and Password. Click Next.
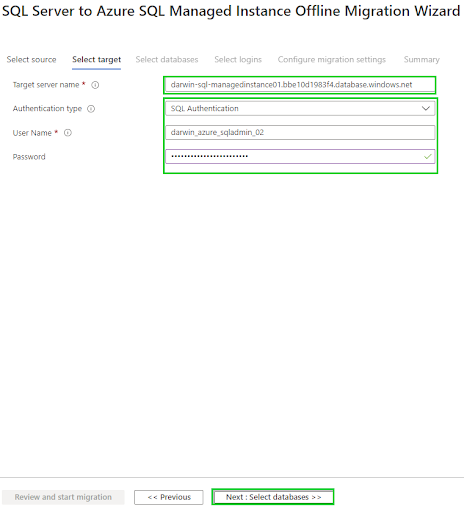
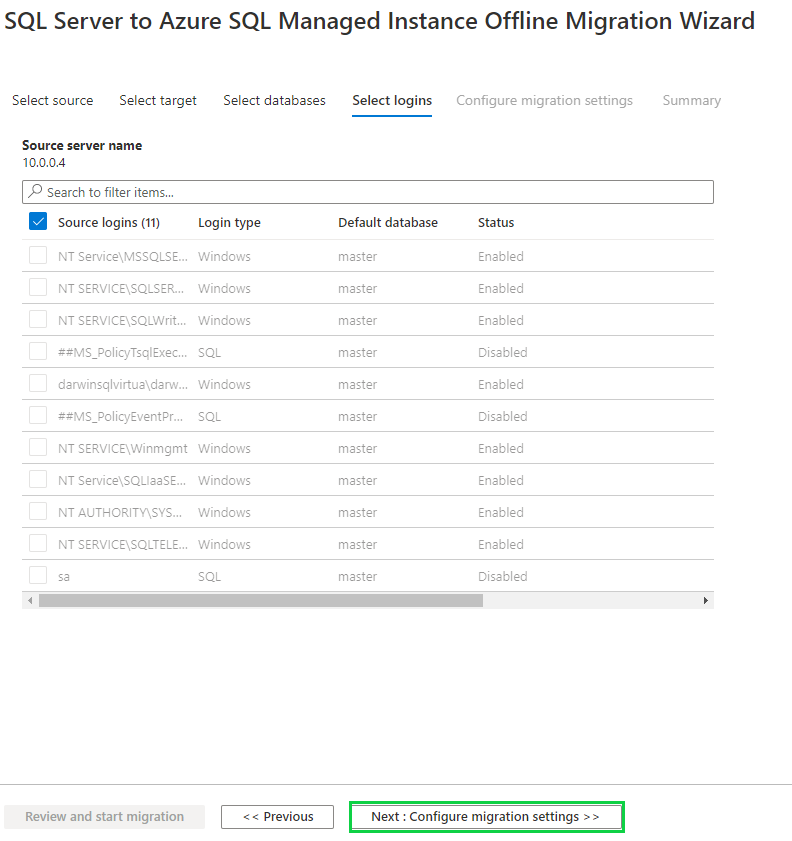
E. Select the database logins to migrate with the database from the source Microsoft SQL Server and click Next.
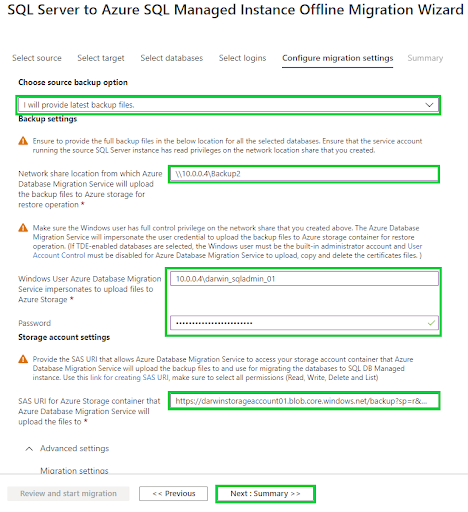
F. On the migration settings tab, choose the Backup option, type the Network share containing the database backups, type the Windows user and Password with privileges over the share, and the Azure storage account to upload the databases. Click Next.
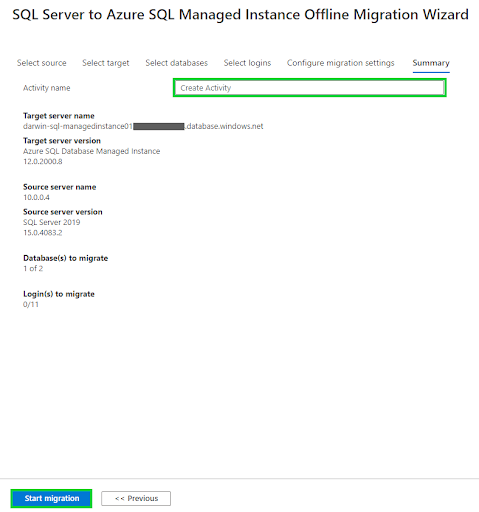
G. Ensure every configuration is correct on the summary page, type the migration activity name and click Start migration.
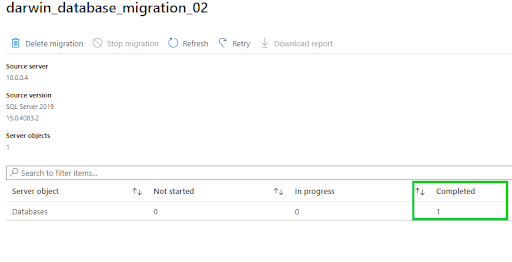
H. Check the screen pop-up showing the status of the offline migration.
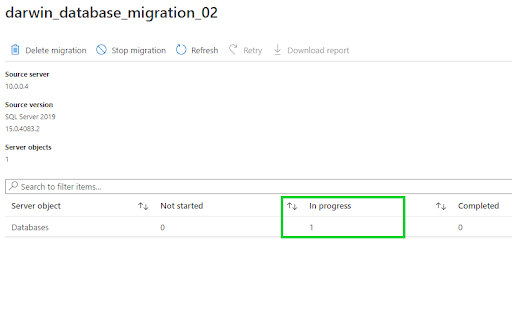
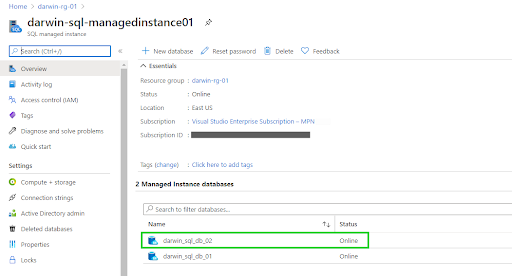
J. You can now check to confirm the status of the new database on the managed instance.
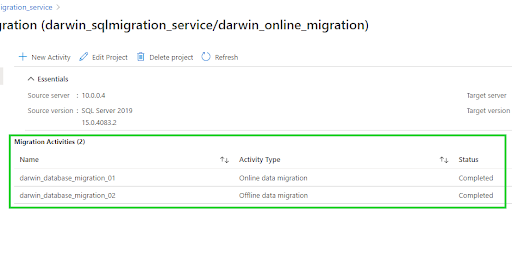
Well done! We have completed migrating two on-prem Microsoft SQL Server databases to the Azure cloud using both the online and offline migration methods.
Not sure about which microsoft azure certification to get? Try our annual SUBSCRIPTION and learn unlimited! Click here to know more
Troubleshooting Common Migration Issues
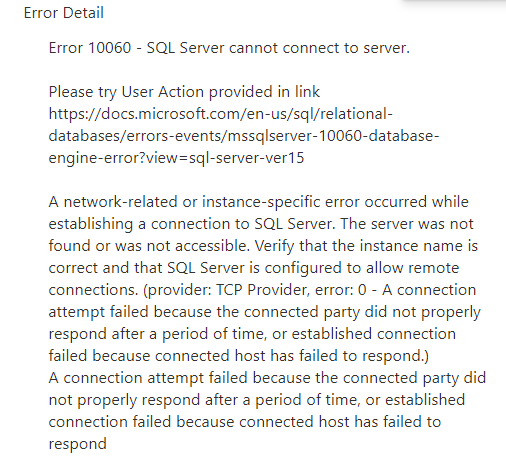
Issue 1: The Azure SQL-managed instance cannot connect to the on-prem Microsoft SQL Server.
Resolution: Ensure VPN connectivity between the Azure SQL-managed instance and the on-prem Microsoft SQL Server. Also, make sure that SQL Server engine port 1433 is open.
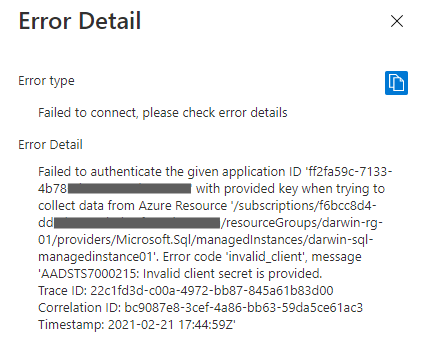
Issue 2: Failed to authenticate the service principal during online database migration.
Resolution: Ensure that the Application ID and Client secret used within the online migration settings are correct and the Service Principal has contributor access over the subscription.
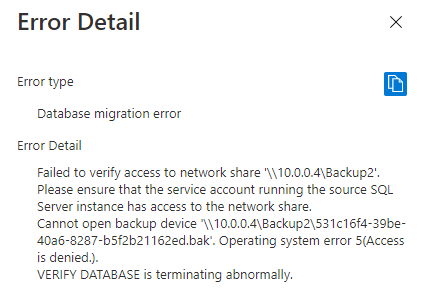
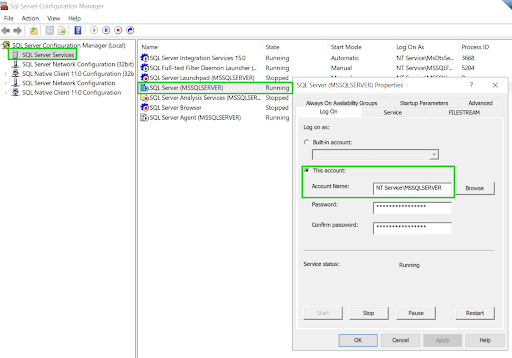
Issue 3: The data migration and on-prem Microsoft SQL Server service account cannot access the shared backups folder.
Resolution: Ensure that the Windows user account used in creating the migration activity has read and write permissions over the shared folder. Also, ensure that the Microsoft SQL Server service account has read and write permissions onto the shared folder.
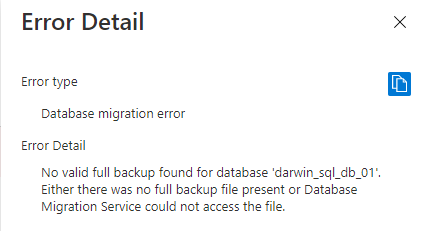
Issue 4: Database migration error or No valid full backup found.
Resolution: Ensure that you have Full backups, and not Differential or Incremental backups enabled for the backups shared folder.
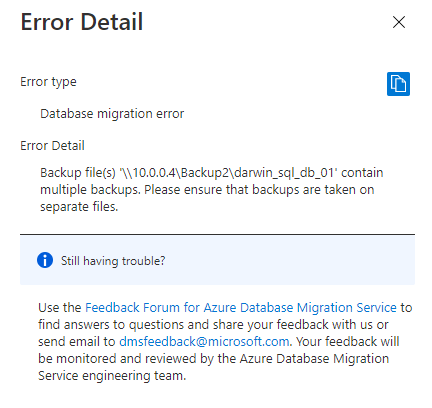
Issue 5: Appended backup set error.
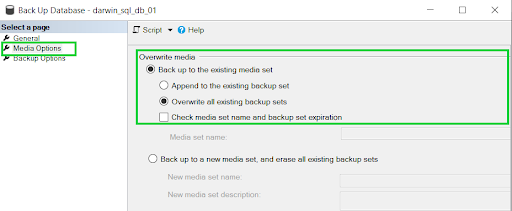
Resolution: The Data migration service doesn’t accept appended backup sets. Use the Overwrite backup sets option when creating backups. If you are using Microsoft SQL Server maintenance plans, add the options to the maintenance steps.
Issue 6: Disabled checksum during the creation of database backups.
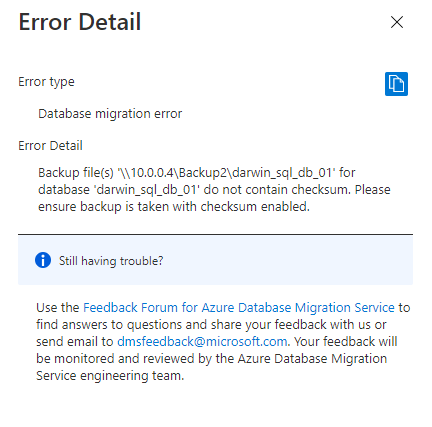
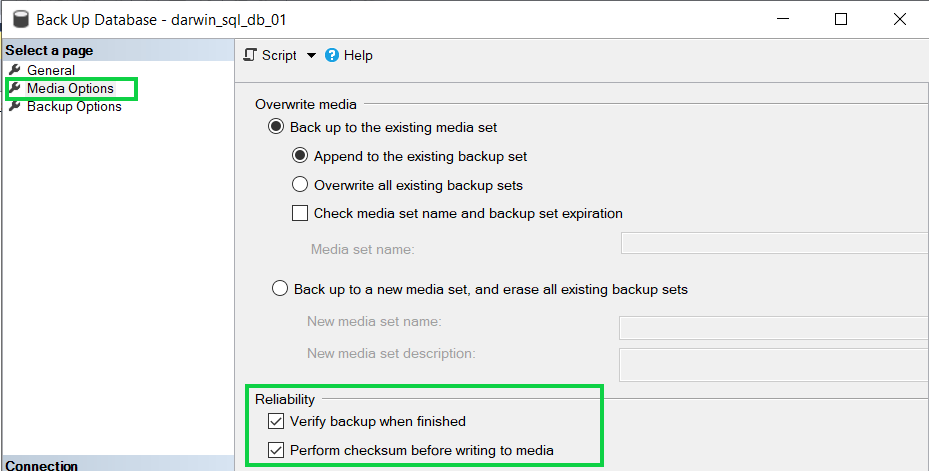
Resolution: The Data migration service requires enabled checksum before Writing to media option on all your database backups. Also, make sure to set this option if you are using maintenance plans or any other SQL Server database backup option that you’re using.
Checkout Whizlabs Microsoft Azure Certification courses here!
Conclusion
With businesses looking towards leveraging the cloud to gain a competitive advantage, moving your Microsoft SQL Server database to the Azure cloud offers unparalleled benefits. High availability with 99.99% SLA, automated patching, automated backups and retention, artificial intelligence-driven query performance, and threat detection are just a few of the reasons teams should migrate their databases to the Azure cloud.
Not to say, moving your Microsoft SQL Servers/databases reduces the CAPEX (Capital expenditures) and OPEX (Operating expenditures) on Server hardware and software licenses. This lets you lift and shift your databases and let Microsoft handle the rest.
- Cloud DNS – A Complete Guide - December 15, 2021
- Google Compute Engine: Features and Advantages - December 14, 2021
- What is Cloud Run? - December 13, 2021
- What is Cloud Load Balancing? A Complete Guide - December 9, 2021
- What is a BigTable? - December 8, 2021
- Docker Image creation – Everything You Should Know! - November 25, 2021
- What is BigQuery? - November 19, 2021
- Docker Architecture in Detail - October 6, 2021

