Azure PowerShell (Az PowerShell for short) is the product name for the collection of official Microsoft PowerShell command-line and scripting language modules that are used for managing and administering Azure resources. You can use Azure PowerShell interactively by running commands from PowerShell or creating and executing scripts that comprise multiple commands that control every aspect of Azure. It is deployed in the building of automated workflows using and runs on many platforms, including Linux, macOS, and Windows.
Here’s How to Run Your First Script Using Azure PowerShell: Follow These Steps
- Right-click the Start menu
- Open Terminal and you get the Windows PowerShell window
- Run the Install-Module cmdlet at the end of the command line. Use Az for the Name parameter and append a Force switch at the end as follows: Install-Module -Name Az -Force
Step 2: Access Azure PowerShell
Accessing the Azure Powershell is the next step after a successful installation. This is achieved using the following 3 options namely: local access, Azure Cloud Shell access and Azure portal access.
-
- Local Access: This refers to accessing the Azure PowerShell for the local installation. Using this approach, follow the following steps:
- Write the ‘Connect-AZ Account’ cmdlet. A Microsoft Azure icon will pop up.
- Local Access: This refers to accessing the Azure PowerShell for the local installation. Using this approach, follow the following steps:
- Sign in to your Azure account and you now have access.
- Azure Cloud Shell Access: Another option to access and connect is through Azure Cloud Shell. Azure Cloud Shell is a pre-installed browser-based environment that runs PowerShell on a Linux container, where Windows-specific features are not available. This allows you to run Azure PowerShell commands installing nothing on your local machine. To access;
- Go to shell.azure.com. A Microsoft Azure icon will pop up and then;
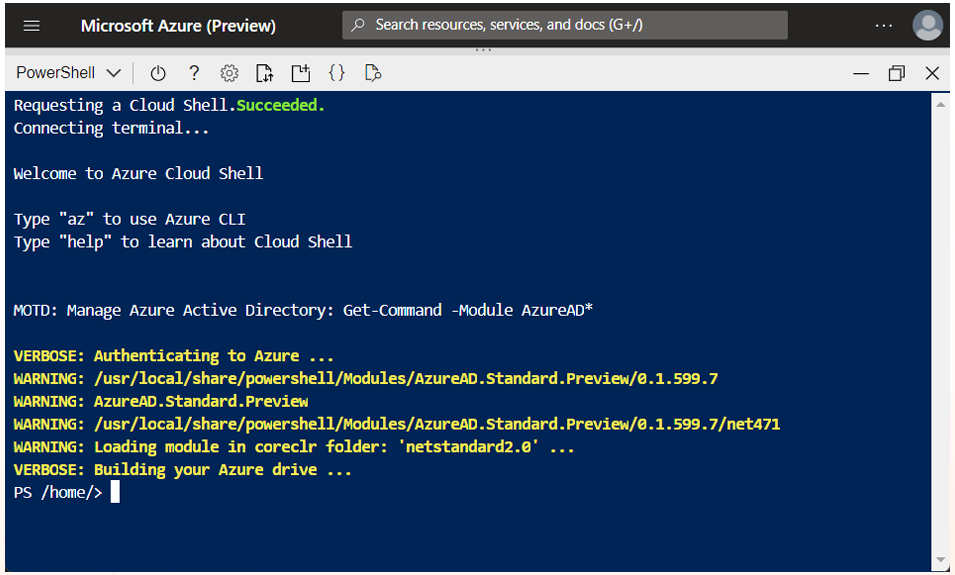
- Sign in to your Azure account. You will now have access as shown below;
Note that if you are logging in the first time logging in, the system will show a failure to mount the Azure file share. If you proceed without mounting storage, Azure Cloud Shell your files will be ephemeral, and will not exist beyond your existing session. You, therefore, need to create storage either from PowerShell or Bash. To create storage.
- Select the Subscription used in creating the storage account
- Select Create storage
The above steps will cause Azure Cloud Shell to create for your use a standard storage account and allocate 5 GB of storage for the file share.
- Azure Portal: This is the easiest way to access Azure PowerShell, and you follow the following simple steps
- Go to the Azure portal.
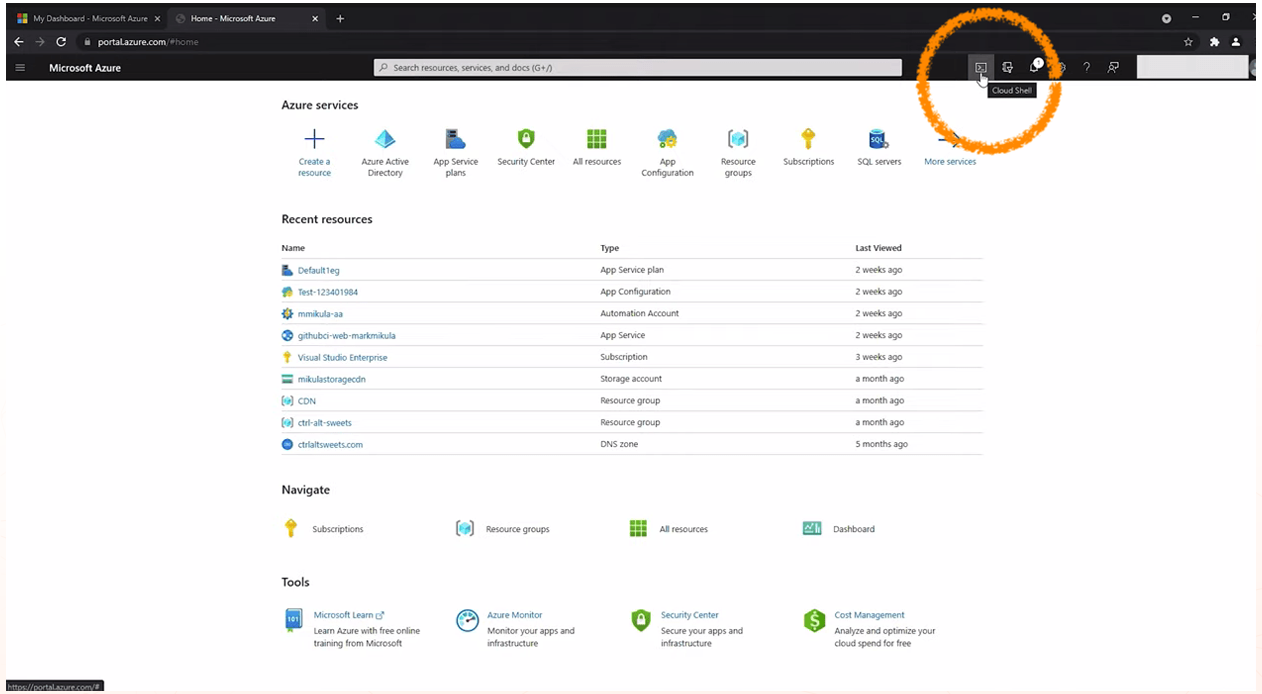
- Click on the menu in the top right-hand corner is a command-prompt icon as shown below, and it will open a shell at the bottom of the screen.
As in Azure Cloud Shell access, you need to create storage either from PowerShell or Bash to enable your files to be stored in standard storage and not ephemeral storage. Follow the same stages.
- Select the Subscription that was used to create the storage account
- Select Create storage.
Azure Cloud Shell will create a storage account and allocate 5 GB and 100 GB of storage for standard and premium users respectively. Note that regardless of the method to connect, Azure PowerShell processes go through a single management interface called the Azure Resource Manager, whose purpose is to authenticate and allow all the actions you need to perform. For Azure PowerShell and the Azure Command-Line Interface, use a Software Development Kit (SDK), to connect to Azure Resource Manager and perform the required actions. Remember, the SDK is automatically installed as part of the Azure PowerShell Module.
Step 3: Create your PowerShell environment
After successfully signing in and creating storage, you then need to create the Azure PowerShell environment. You can choose between PowerShell and Bash for your command-line experience. You can also resize your environment as per your requirements.
Step 4: Register resource provider
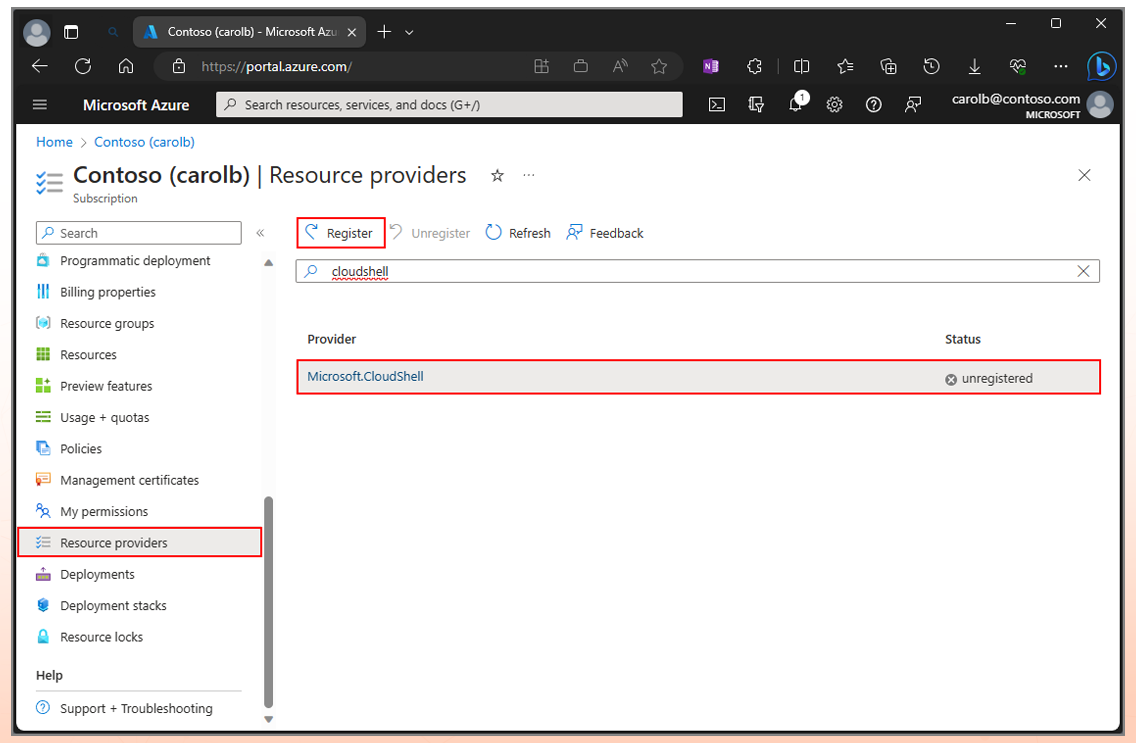
To start using Azure Cloud Shell, you must register with Microsoft. Cloud Shell resource provider to enable access to resources. To register;
- Start Azure Cloud Shell
- Select your Subscription.
- Under Settings, select Resource providers.
- Enter Cloud Shell in the search ox
- Select the Microsoft.Cloud Shell resource provider.
- Select Register
- Change the status from unregistered to registered, as shown in the figure below.
Step 5: Find commands:
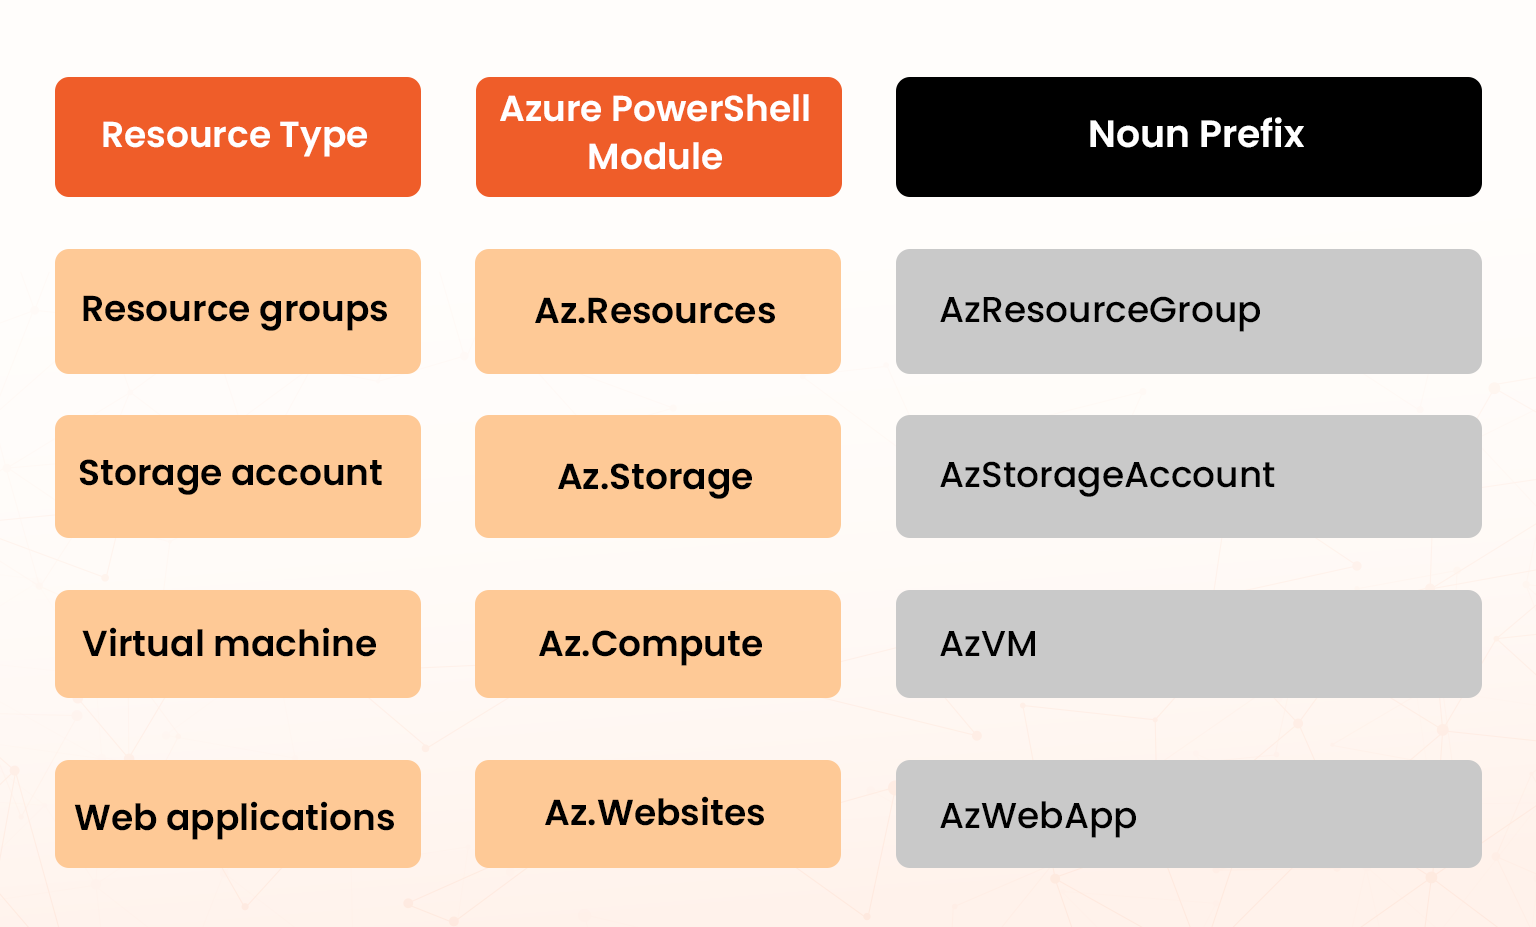
The next step is to use the cmdlets to manage your Azure resources. A cmdlet is the basic syntax that contains all the code needed in order to perform an action in Azure PowerShell. Cmdlets follow the standard PowerShell naming convention of Verb-Noun with the verb describing the action (e.g., New, Get, Set), while the noun represents the resource type such as AzKeyVaultCertificate, Firewall. Put simply, the interpretation is that the code is doing something (verb) to a thing (noun) thus making it easier to understand what the code is trying to do. Note that nouns in Azure PowerShell start must start with the ‘Az’ prefix. For example;
Get. AzResourceGroup cmdlet will return all the resource groups in your current Azure subscription.
The following is a list of the common Azure PowerShell resources and their associated modules.
Cmdlets also have parameters to gather information in order to perform the required actions. You can scroll through all the different parameters that are available and choose the required one. In Azure PowerShell, you can enclose strings in either single quotation marks (”) or double quotation marks (“”) as both methods allow Azure PowerShell to display variable values instead of variable names.
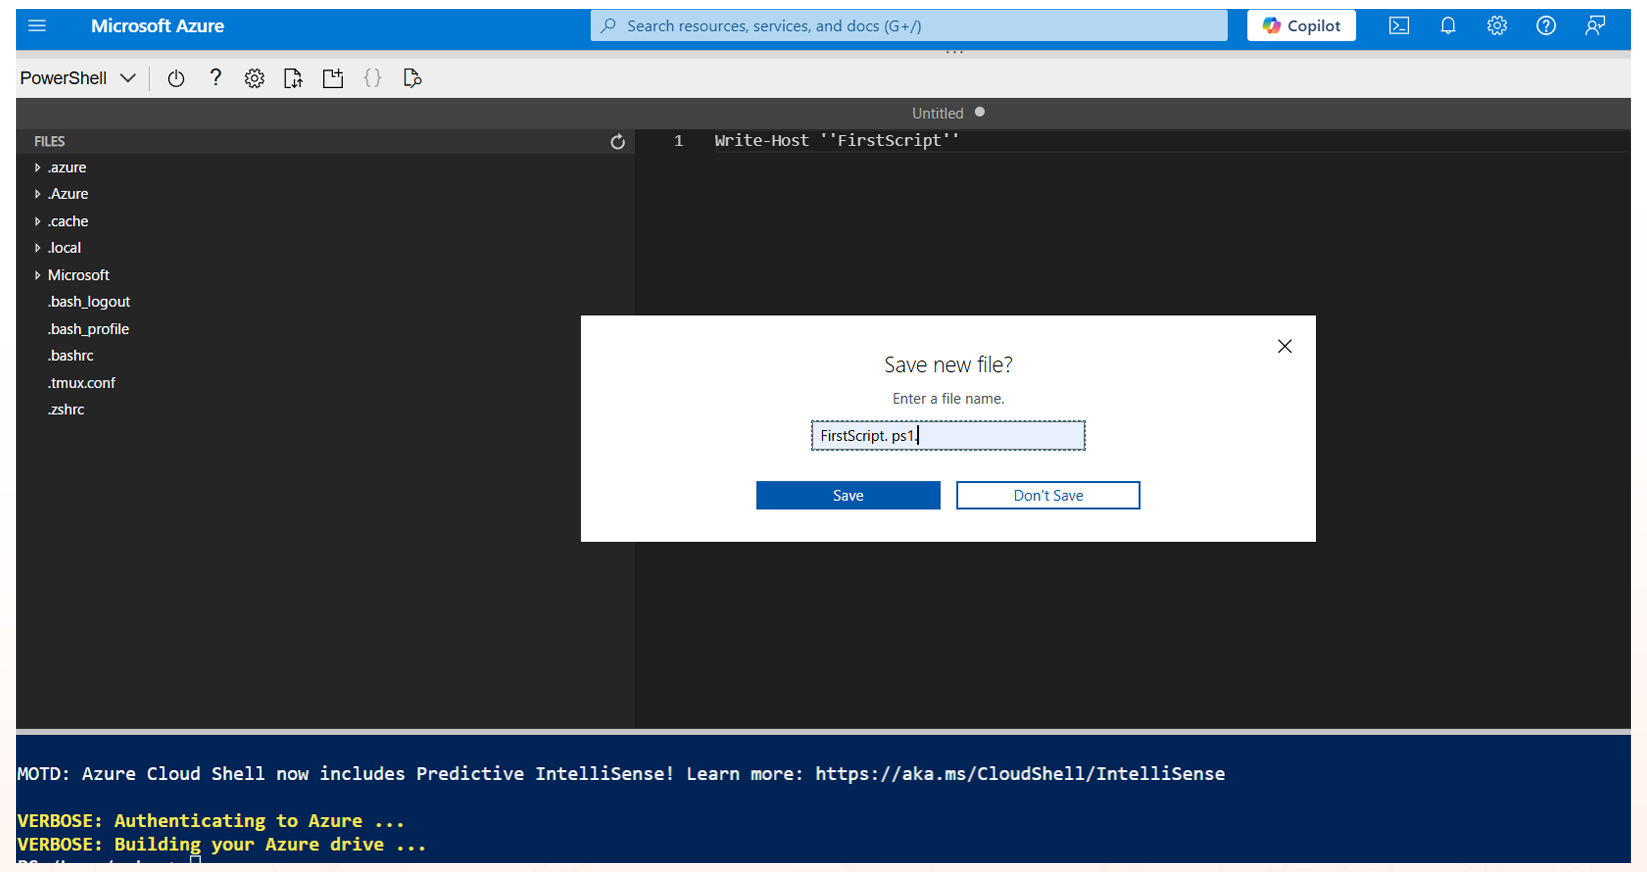
Step 6: Create a new file.
Use any text editor such as Notepad to create a new Azure PowerShell script file. Follow the following steps.
- Create a new file
- Name the file ‘First Script’
- Save the file with a. ps1 extension, that is, FirstScript.ps1 after writing your commands
- Return to the Azure PowerShell window
NOTE: You can also follow the longstanding tradition among software engineers of typing the phrase “Hello World” to a command line.
Step 7: Run your Script
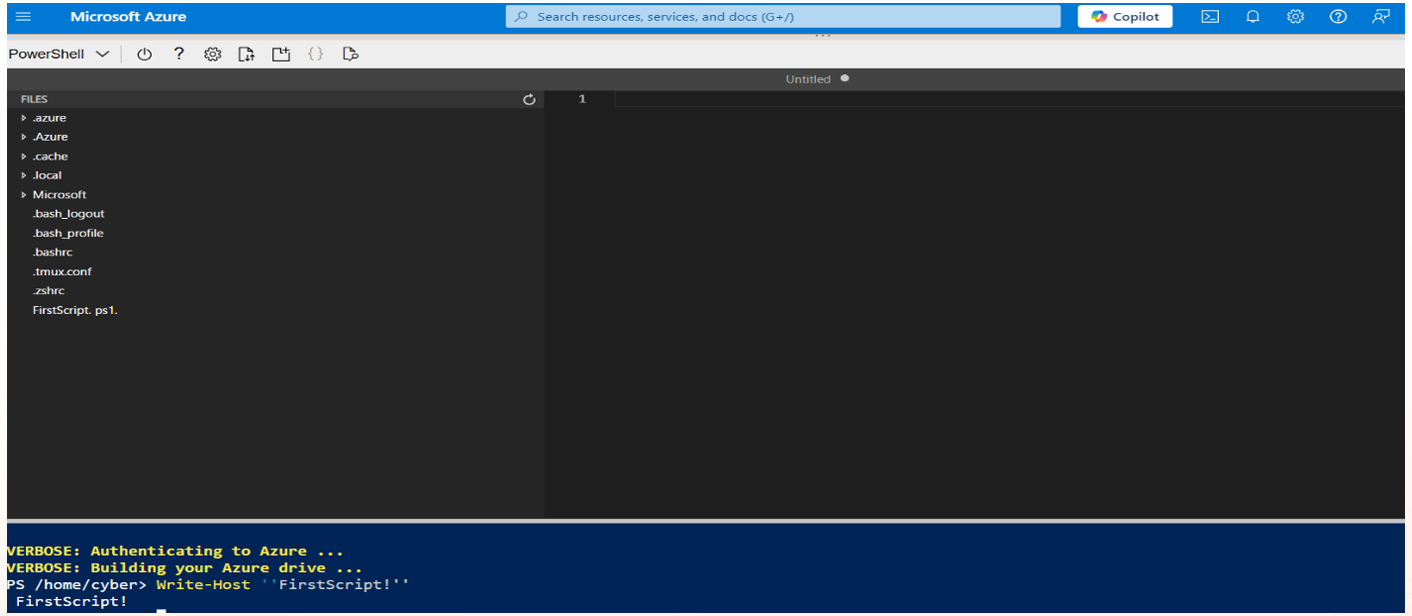
To run the script, the most common method is to call it in the Azure PowerShell terminal, and you can use the PowerShell ISE or VS CodeVS Code for this purpose. Use the following steps.
- Open Azure PowerShell
- Type in the Code: Write-Host “FirstScript!”
The results will be : FirstScript as shown below (Last line);
Step 8: Verify the results
The output of the script “First Script” will be displayed in the Azure PowerShell terminal. Verify the output in the Azure PowerShell window to see if it is your desired output.
Step 9: Change the execution policy (Optional)
Azure PowerShell enforces an execution policy to prevent malicious scripts from running. To use our newly created script, change your execution policy to allow our Azure PowerShell script to run. The following are the categories of execution policies that control security and the ability to execute scripts:
- Restricted: This is the default execution policy for Azure PowerShell and means that scripts are disabled. This means that only interactive commands can be executed on the console, which provides enhanced security.
- RemoteSigned: Using this method, locally created scripts may run while those created on another machine are restricted. They are only allowed to run when a trusted publisher signs them. This method allows the local scripts to be used with ease.
- AllSigned: All scripts are only allowed to run if a trusted publisher digitally signs them. This therefore entails the author using a digital certificate to sign the script.
- Unrestricted: All scripts run regardless of their creator and whether they are signed or not. This is the least secure of the methods and is not recommended as it poses security risks. However, the method can be used for testing purposes.
You can view the current execution policy in your Azure PowerShell environment using the Get-ExecutionPolicy command. Use the Set-ExecutionPolicy command to change the current execution policy to the policy you want. If you have not digitally signed your PowerShell script, your options for the execution policy will be limited to RemoteSigned and Unrestricted. If the SetExecutionPolicy cmdlet asks you to verify that you really want to change the execution policy, select Y for yes and then close and reopen your PowerShell window.
To change the execution policy;
- Reopen Azure PowerShell as an administrator
- Run the command: Set-ExecutionPolicy RemoteSigned
Step 10: Get help
One of the most crucial advantages of Azure PowerShell is that it always provides help whenever it is required. To get help, simply enter Get-Help and then the cmdlet you want to get help on, and assistance is immediately provided.
Conclusion
The above steps explained how to write and run your Azure PowerShell script in quite an uncomplicated way. The major takeaway of these steps is the simplicity of the scripting language and process. Where other languages require every character, PowerShell is more relaxed in that regard. For example, the language is case-insensitive, and accidental typing type, an upper- or lowercase letter, will not affect the results. However, you should always be on the lookout for misspellings and any extra or missing spaces. Always check for spelling of the name and path that was included, as reading, and correcting these errors are essential in helping you learn what caused them. The good thing is that with Azure, PowerShell, as you run a program and get an error, the error is often accompanied by the number where the issue occurred, a description of the error, and sometimes a suggestion for how to fix it, simplifying the error resolution process.
If you are preparing for AZ-104: Microsoft Azure Administrator Certification, it’s important to learn about Powershell in order to deploy the resources through the Azure CLI and help in automating the infrastructure. Do try the above Powershell commands in our Azure Sandbox Environment.This practical experience will enhance your skills and provide the knowledge necessary to help you clear your certification exams.
- How to Enable CORS for Azure Functions? - January 24, 2025
- How Microsoft Entra ID Simplify Developer Authentication? - January 21, 2025
- What Role Does Azure Redis Cache Play in Reducing Latency? - December 27, 2024
- Master Cloud Management with Azure Resource Architecture - December 2, 2024
- Microsoft Defender: Your Key to Azure Security Management - November 26, 2024
- What is Microsoft Entra ID and How It Enhances Security - November 26, 2024
- How to Build Secure Networks with Azure Virtual Networking - November 20, 2024
- Step-by-Step Nginx Deployment on Azure Kubernetes Service - November 13, 2024

