
Integrating AWS SDKs into your Node.js application opens up a world of possibilities, allowing you to leverage the power and scalability of AWS services directly from your code. Whether you are creating serverless functions, deploying applications on EC2, or managing resources with Elastic Beanstalk, understanding how to set up and use AWS SDKs is crucial.
For those aiming to become an AWS Certified Developer Associate, mastering these skills is essential. In this guide, we will walk you through the process of setting up an AWS Node.js environment, installing necessary SDKs and dependencies, configuring credentials securely, and writing and running your first Node.js application that interacts with AWS services.
How to Set Up and Integrate AWS SDKs into Your Node.js Environment?
To integrate AWS SDKs, you need to set an AWS Node.js environment so that you will be able to run your application. The following options can be considered:
Option 1: Choosing an Amazon Machine Image (AMI) that has already been pre-installed with Node.js to create an Amazon EC2 instance. Search the AWS marketplace for an AMI option with 32-bit or 64-bit versions of Node.js. This option leverages IAM roles for Amazon EC2 which provides credentials automatically to the instance. This eliminates the need to provide credentials manually.
Option 2: Installing Node.js on an Amazon EC2.
Option 3: Running Node.js as a Lambda function on a serverless environment created through AWS Lambda. This creates a unique IAM role with permission to execute functions. You must specify the IAM role when setting up a Lambda function. See the tutorial to be guided
Option 4: Use Elastic Beanstalk to deploy your Node.js. See AWS Elastic Beanstalk to learn more.
Option 5: Creating a Node.js application server through AWS OpsWorks.
Setting Up an AWS Node.js Environment is supported by the following browsers and their versions.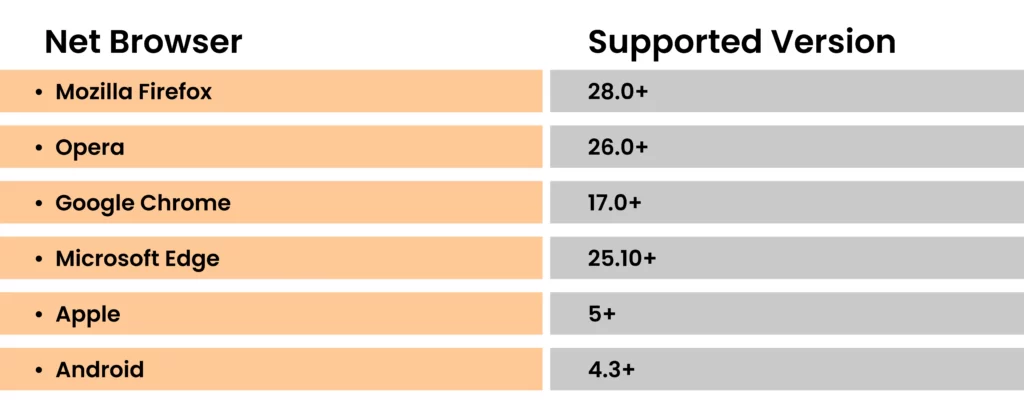
Prerequisites
You need to create a working directory for your Node.js and save it on a location that be updated. Avoid the “C:\Program Files”. Name your directory as awsnodesample. Now visit the Node.js website to download and install current and LTS version of Node.js.
Note that Amazon S3 bucket names are normally required to be unique globally and for this example we have used a third-party Node.js to achieve this. This module is known as uuid.
Installation of SDK and Dependencies
The first step you need to take is to install the SDK for the JavaScript package. This is done using Node.js Package Manager (NPM). From your package directory of awsnodesample, insert these command lines.
npm install aws-sdk
Your package. Json directory will be updated to list the project dependency once the command installs SDK for JavaScript. You can visit the npm website and search “aws-sdk” to obtain more information on the package.
Now enter this command line:
npm install uuid
The uuid module will be installed on the project and package. json will be updated.
For more information, see Installing the SDK for JavaScript.
Configuring Credentials
For you to access your account and its resources privately, you will need to configure credentials. It is recommended that you create a shared credential file. See Credential in Node.js to learn how. Your file should look like this:
[default]
aws_access_key_id = YOUR_ACCESS_KEY_ID
aws_secret_access_key = YOUR_SECRET_ACCESS_KEY
It is important that you confirm you have set the right credentials. Execute the following code on Node.js to confirm:
var AWS = require(“aws-sdk”);
AWS.config.getCredentials(function(err) {
if (err) console.log(err.stack);
// credentials not loaded
else {
console.log(“Access key:”, AWS.config.credentials.accessKeyId);
}
});
To display the value set in your configuration file, run this code:
var AWS = require(“aws-sdk”);
console.log(“Region: “, AWS.config.region);
Creating the Projects’ Package JSON
To hold the metadata of your Node.js project, you need to add a package. json to your awsnodesample project directory. Go to your project directory and create a new file package. json and add the following:
{
“dependencies”: {},
“name”: “aws-nodejs-sample”,
“description”: “A simple Node.js application illustrating usage of the SDK for JavaScript.”,
“version”: “1.0.1”,
“main”: “sample.js”,
“devDependencies”: {},
“scripts”: {
“test”: “echo \”Error: no test specified\” && exit 1″
},
“author”: “NAME”,
“license”: “ISC”
}
Now save the file and the dependencies portion of the file will be completed.
It is important to note that when configuring credentials in Node.js, you have to be careful not to over rely on more than one source of the JSON file you are loading. To supply your credential in order of recommendation, follow these steps:
Step 1: Load credentials from AWS identity. See using IAM roles.
Step2: Load the shared credential file (~/.aws/credentials)
[default]
aws_access_key_id = <YOUR_ACCESS_KEY_ID>
aws_secret_access_key = <YOUR_SECRET_ACCESS_KEY>
Step 3: Load from environmental variables: The SDK always detects any AWS credential set as a variable in your environment. This is used for requests and the variables include:
AWS_ACCESS_KEY_ID
AWS_SECRET_ACCESS_KEY
AWS_SESSION_TOKEN
Step 4: Load from a JSON file on disk: This is achieved through using AWS.config.loadFromPath. The specified path is relative to the working directory of your process. For example, loading credentials from ‘config.json’ file will require you to run this command:
{ “accessKeyId”: <YOUR_ACCESS_KEY_ID>, “secretAccessKey”: <YOUR_SECRET_ACCESS_KEY>,
“region”: “us-east-1” }
Followed by the code:
var AWS = require(“aws-sdk”);
AWS.config.loadFromPath(‘./config.json’);
Step 5: Other credentials provided by the SDK. You can also get credentials from specifying the credential process in the AWS config file. The set AWS_SDK_LOAD_CONFIG environment variable will be prioritized to the specified credentials file if there is any. See External Processes in sourcing credentials to learn more.
In the event of an SDK with more than one credential source, then the default selection will be loaded as follows:
- Credentials set through service-client constructor
- Environment variables
- Shared credentials
- Credentials from ECS
- Credentials specified in the shared AWS configuration file
- Credentials loaded from AWS of Amazon EC2.
Note that it is not recommended to hand code your AWS credentials in the application because it possesses the risk of exposing your secret access key and ID.
Writing the Node.js Code
Proceed to create a new file titled sample.js for the example code. Add the required function calls for the SDK and uuid models to be made available for use. Add your unique ID value to a recognizable prefix to come up with a bucket name for creating an Amazon S3 bucket. In our example we have used ‘node-sdk-sample-’. Call the uuid module to generate your unique ID and a name for the key parameter used to upload an object to the bucket.
Now create a promise object for you to be able to call the createBucket method of AWS.S3 service object. Now create another promise so that you can call the putObject method for you to upload text to the bucket. Here is a sample of the same that can also be found in GitHub.
// Load the SDK and UUID
var AWS = require(“aws-sdk”);
var uuid = require(“uuid”);
// Create unique bucket name
var bucketName = “node-sdk-sample-” + uuid.v4();
// Create name for uploaded object key
var keyName = “hello_world.txt”;
// Create a promise on S3 service object
var bucketPromise = new AWS.S3({ apiVersion: “2006-03-01” })
.createBucket({ Bucket: bucketName })
.promise();
// Handle promise fulfilled/rejected states
bucketPromise
.then(function (data) {
// Create params for putObject call
var objectParams = {
Bucket: bucketName,
Key: keyName,
Body: “Hello World!”,
};
// Create object upload promise
var uploadPromise = new AWS.S3({ apiVersion: “2006-03-01” })
.putObject(objectParams)
.promise();
uploadPromise.then(function (data) {
console.log(
“Successfully uploaded data to ” + bucketName + “/” + keyName
);
});
})
.catch(function (err) {
console.error(err, err.stack);
});
Running the Sample
Finally, type this command to run the sample:
node sample.js
Successful uploads prompt confirmation messages at the command line. You can also access the bucket and text object in the Amazon S3 console.
Verifying Versions of TLS
To verify the version of OpenSSL and TLS used by Node.js on your device:
Run this command for OpenSSL:
node -p process.versions
You will expect to get the following results:
openssl: ‘1.1.1b’
Run this command for TSL:
> var tls = require(“tls”);
> var tlsSocket = new tls.TLSSocket();
> tlsSocket.getProtocol();
The last output should read:
‘TLSv1.3’
Conclusion
In this blog, we’ve explored how integrating AWS SDKs into your Node.js applications can significantly enhance your development capabilities and leverage AWS’s robust cloud infrastructure. By following the detailed steps provided, you can efficiently set up your environment, manage dependencies, and securely configure your application to interact seamlessly with AWS services. Whether you’re deploying simple serverless functions or building complex, scalable applications, mastering these integration techniques will greatly improve your productivity and efficiency.
- How GCP Cloud Engineers Handle Security & IAM - May 15, 2025
- What Is Amazon Redshift and How Does It Work? - April 28, 2025
- What Is the Role of AWS Lambda in AI Model Deployment? - April 2, 2025
- What Are ETL Best Practices for AWS Data Engineers - March 17, 2025
- How to Create Secure User Authentication with AWS Cognito for Cloud Applications - September 30, 2024
- 2024 Roadmap to AWS Security Specialty Certification Success - August 16, 2024
- Top 25 AWS Full Stack Developer Interview Questions & Answers - August 14, 2024
- AWS Machine Learning Specialty vs Google ML Engineer – Difference - August 9, 2024