Want to learn how to create a Lifecycle Policy for an S3 Bucket and optimize your AWS costs? Here we bring a step by step, detailed guide on how to create a lifecycle policy for an S3 bucket. Let’s dive deep and learn!
Amazon S3 Bucket is a powerful storage tool for cloud computing. Different S3 storage classes allow you to store different types of data according to your access needs. AWS lifecycle policy actions include transitioning objects between classes, deleting or archiving them. You can create a lifecycle policy for all your S3 objects in a single bucket. These objects should use a shared tag or prefix. More so, you can have as many as 1000 policies for each S3 bucket.
Creating an Amazon S3 Lifecycle Policy is one of the best AWS cost optimization best practices that safely manages how data is stored in your S3 buckets. Using a lifecycle policy, you are instructing Amazon AWS on how to handle an object throughout its lifetime. A lifecycle policy will also let you define actions that apply to modern and legacy versions of objects. Lifecycle Policies are, therefore, crucial for cloud security, internal policy compliance, compliance with legislative requirements, and housekeeping.
How to Create a Lifecycle Policy for an S3 Bucket
So, are you ready to reduce your AWS bills with the Amazon S3 Lifecycle Policy AWS cost optimization strategy? If yes, let’s move forward to the step-by-step guide on how to create a lifecycle policy for an S3 bucket.
1. Log in to your AWS console. If you don’t have an AWS account, you can sign up for a free-tier one. This gives you 12-month access to basic AWS Services that you can use to configure, test, and deploy your cloud projects.
Go to the AWS Homepage, Click My Account, then select AWS Management Console under the pop-up menu.
2. Click on Services, and you’ll be redirected to a services tab displaying several AWS services categorized by functionality.
In the Services tab, under the Storage category, select S3.
Enroll Now: AWS Cost Optimization Training
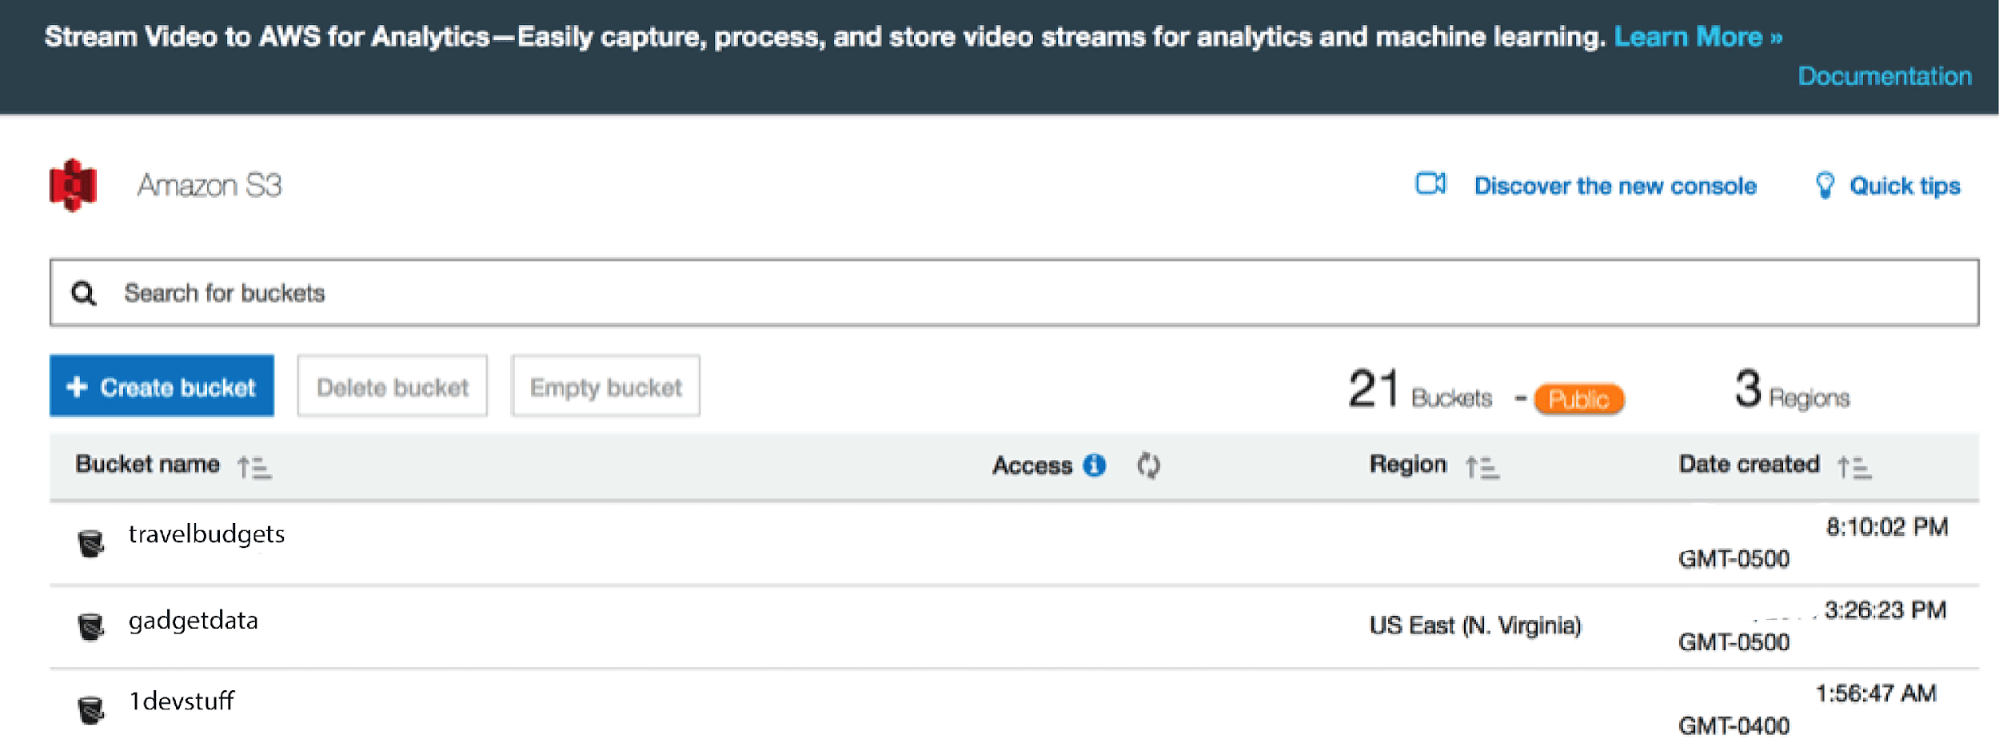
3. You will be sent to a page that lists all your S3 buckets. Select the bucket for which you’d want to set lifecycle policies. This takes you to an overview tab that shows the contents of that bucket.
Quick Tip: Versioning allows you to set different lifecycle policies for different versions of objects. To enable versioning, click on your dashboard’s Properties tab, and click on the button in the Versioning column next to the word Disabled.
4. The Management tab is where you will find all you need to create a lifecycle policy for your S3 bucket. Once you have clicked on the Management tab, click ‘Add Lifecycle Rule’ among the options presented to you.
5. Clicking on the Add Lifecycle Rule button brings up a dialog box that lets you set your rule’s Name, Transition, Expiration, and allows you to Review all your rule’s settings.
On the Name and Scope tab, enter a relevant Rule Name which must be unique and that helps you identify the Lifecycle later by its name.
Quick Tip: AWS allows object tagging for easy segregation of storage. If your S3 bucket does not have any object tags, skip the ‘Add filter to limit scope to prefix/tags’ portion. To know more about Prefix/Tags, click here.
Once you’ve named your rule, click Next.
6. The next page lets you configure your bucket’s storage class Transition options. This lets you instruct AWS on how to transition objects between the Standard S3 class and the Standard-IA, Glacier, Deep Storage Archives, and One Zone-IA.
Quick Tip: Since we enabled versioning, you can set different transitions for your bucket objects’ previous and current versions.
To add a transition to your object’s current version, click the radio button beside the words Current Version, then click Add Transition. You can do the same for previous versions of your object and select both buttons if you’d like to apply the transition to all versions of your object.
Each transition gives you five options:
- Transition to Standard-IA after
- Transition to Intelligent Tiering after
- Transition to One Zone-IA after
- Transition to Glacier After
- Transition to Glacier Deep Archive After
You choose the S3 Storage Class you want to move your data after a set number of days.
Once you have set all your transitions, click Next.
Also Read: 8 Ways to Reduce Your AWS Bill
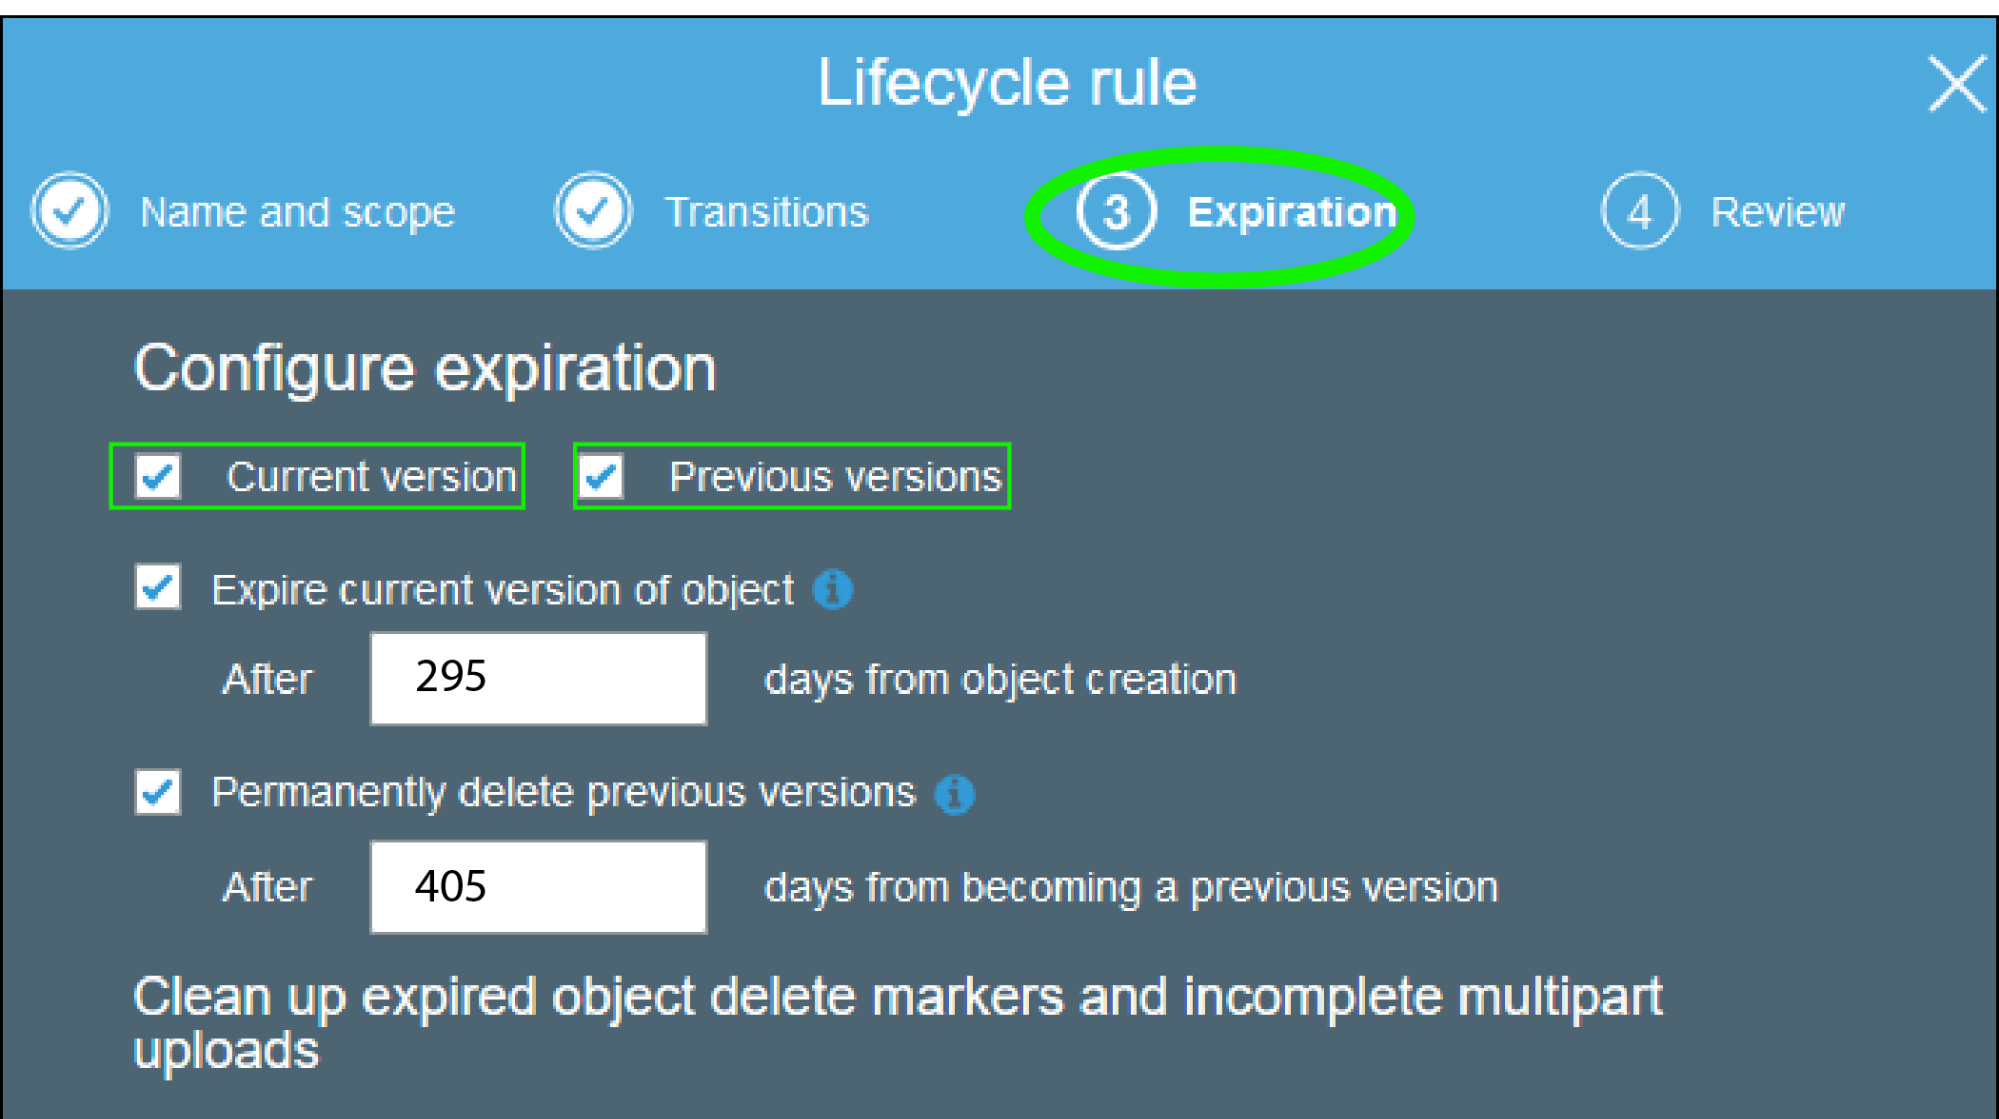
7. The next step lets you configure the expiration of your S3 bucket objects.
For this exercise, we’ll be configuring expiration for both the current and previous versions of our data. Let’s check the boxes next to both the Current version and Previous version options.
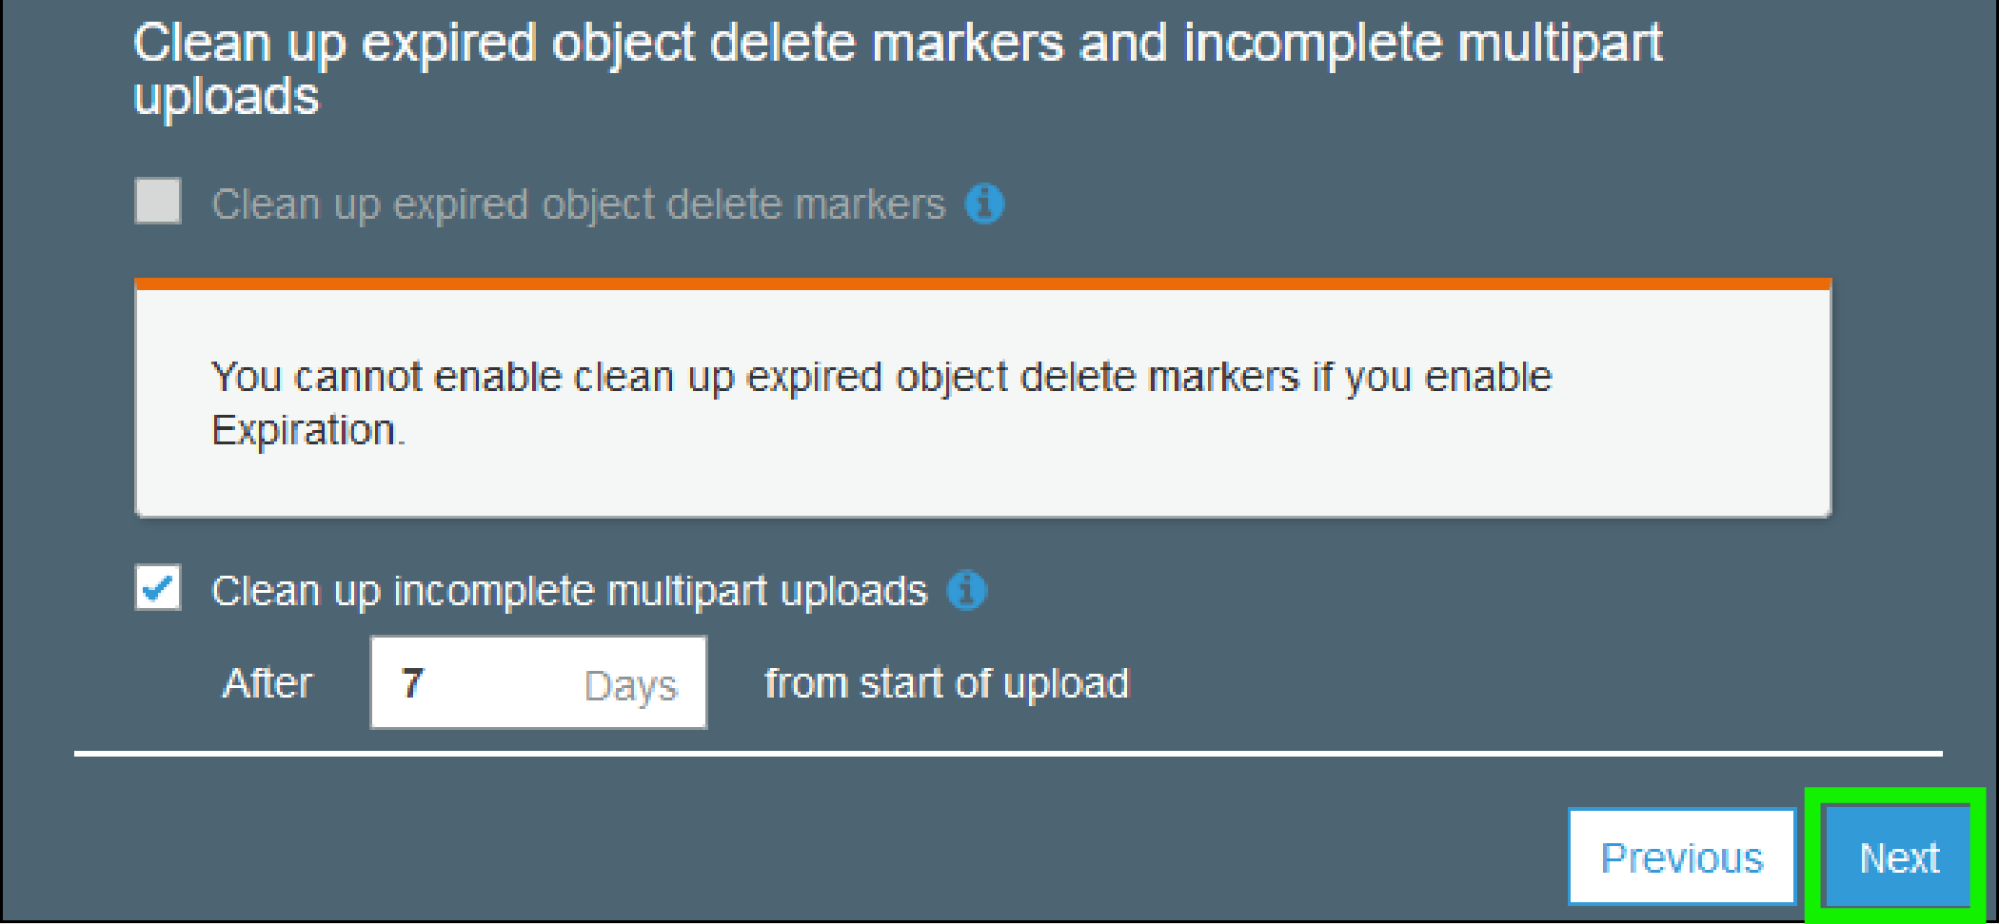
Check the box next to Expire Current Version of This Object, then set the number of days it will be deleted. When you choose this expire option, you cannot clean up expired object delete markers. In our case, we made the number of days 295.
Check the box next to Permanently Delete Previous Versions and enter the number of days between when the object becomes a previous version and its permanent deletion.
Check the box next to Clean up incomplete multipart uploads and set the number of days when large, partly uploaded objects can be deleted.
When you are done with the expiration configuration options, press Next.
8. The Review tab lets you verify all your rule configuration settings. If you are unsatisfied with your settings, click Previous, and make corrections. If the settings match your needs, click Save. All Error-free rules are enabled and can be accessed on the Lifecycle page.
Your lifecycle policy is active and will direct AWS on transitions and expirations for your S3 bucket objects.
Preparing to become an AWS Certified Solutions Architect? Follow this preparation guide for the AWS Certified Solutions Architect Associate exam and get ready to pass the exam.
Bottom Line
An AWS S3 Lifecycle policy is excellent at optimizing your cloud costs if your bucket objects have a definite life cycle. If you upload your data to AWS for archiving, this tool will help you save tons in storage costs. The tool is also perfect for data that users access for a specific time duration.
With a proper understanding of your users’ access patterns, you can create a lifecycle policy that will avail your data as-needed at slashed storage costs. Lifecycle policies are also worth a try if you upload periodic logs to an S3 bucket, as this improves availability and accessibility for applications that use them until they aren’t needed.
AWS Cost Optimization is important to save on AWS bills when you are using the AWS platform and multiple AWS services. Hope this detailed guide will help create a lifecycle policy for an S3 Bucket and save on AWS bills. So, use this guide now and reduce your AWS bills. If you want to learn the hidden strategies of AWS cost optimization, enroll in Cost Optimization in AWS training course, and become an AWS pro!
- Cloud DNS – A Complete Guide - December 15, 2021
- Google Compute Engine: Features and Advantages - December 14, 2021
- What is Cloud Run? - December 13, 2021
- What is Cloud Load Balancing? A Complete Guide - December 9, 2021
- What is a BigTable? - December 8, 2021
- Docker Image creation – Everything You Should Know! - November 25, 2021
- What is BigQuery? - November 19, 2021
- Docker Architecture in Detail - October 6, 2021


